
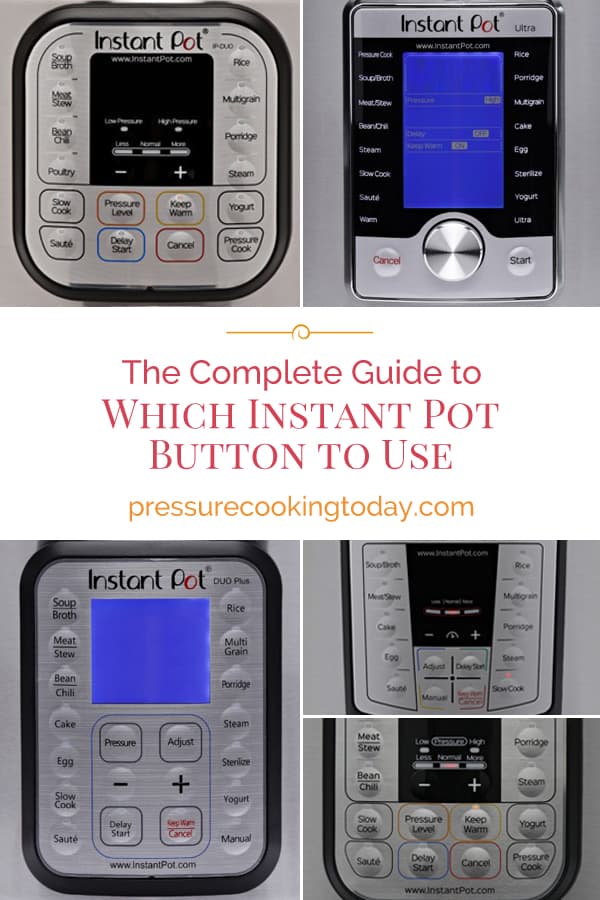
Which Instant Pot Buttons to Use
SO MANY BUTTONS! How to use Insta Pot is a top Google search. If you own an Instant Pot electric pressure cooker and want to know what each button does and when to use it, my complete guide will tell you everything you need to know about using the Instant Pot buttons for every model and version!
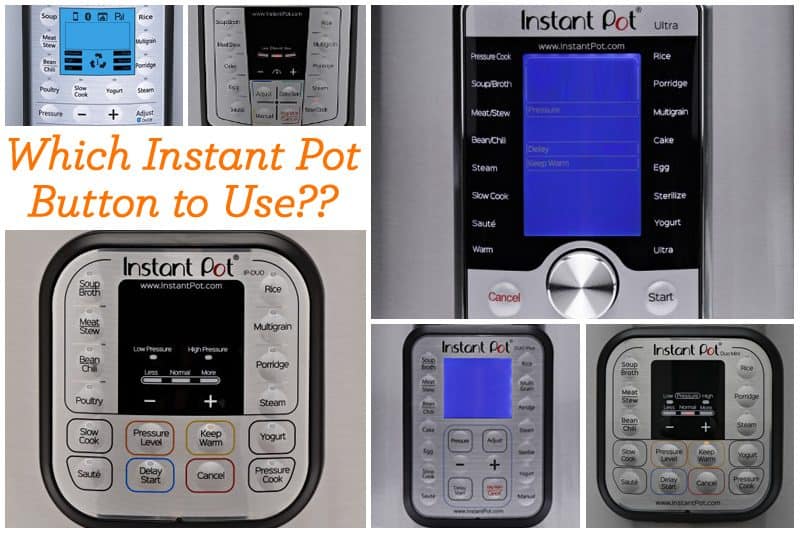
If you’re just getting started with your Instant Pot, your first question might be “How do I know which Instant Pot buttons to use?” Here’s a detailed explanation that will help.
The most important thing to know is the buttons are just preset, suggested cook times for specific items. If you use the Poultry button, your Instant Pot will not know how much meat is in the pot or whether it’s frozen or fresh. Your Instant Pot CANNOT sense what you are actually cooking and CANNOT tell you when the food in your pot is cooked through.
So when you’re cooking chicken soup, you can use the Soup button, the Poultry button, the Meat button, or the Manual button (Pressure Cook on some models.) It really doesn’t matter which button you use, just choose the button with the closest cook time to the time in the recipe you’re using (more on that below).
THE THREE MOST IMPORTANT INSTANT POT BUTTONS
There are really only three buttons you need to know when you are just starting out with pressure cooking:
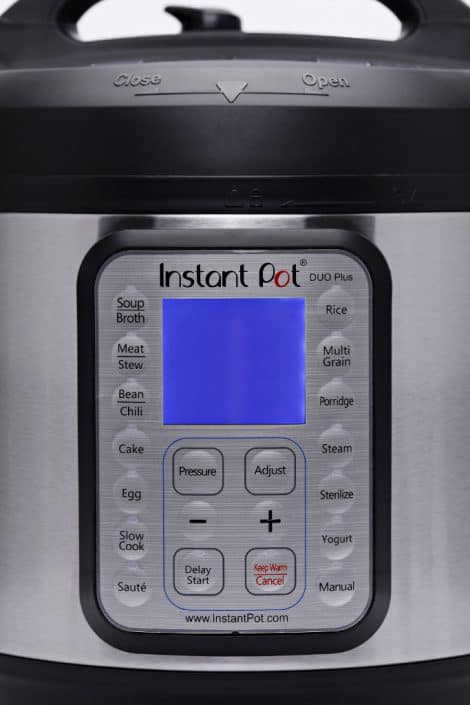
Manual/Pressure Cook. This button is where the magic happens—if a recipe says to cook at High Pressure, this is the button you need. Just press it, then use the [+] and [-] buttons to change the cook time. After a brief pause, the Instant Pot will beep to tell you it’s beginning the pressure cooking process. (The exact name of this button depends on your model of Instant Pot.) Some Instant Pots, such a the Duo Evo Plus have a start button that you’ll need to press to start the cooking process.
Sauté. Press the Sauté button to brown meats, sauté vegetables, and simmer ingredients in the pressure cooking pot. Adjust Sauté to less for simmer, normal to sauté and more for browning.
Keep Warm/Cancel. Use this button to cancel a function or to turn off your Instant Pot.
Honestly, that’s it! I recommend beginning with some easy, tried-and-true recipes before branching out into converting your old favorites. Since I write my recipes so they can be made in any electric pressure cooker, I rarely use the preset Instant Pot buttons.
FUNCTIONS OF EACH OF THE INSTANT POT BUTTONS
Still, there may be times you prefer to use the preset options or you might just be curious to know how they work. There is a bit of variety among each of the different models (and even between the different versions of popular models); however, all of the Instant Pot buttons cook the same.
For your convenience, I’ve created a printable Button Summary Sheet with detailed explanations of the different settings for each of the major Instant Pot models—just click the link on your model below:
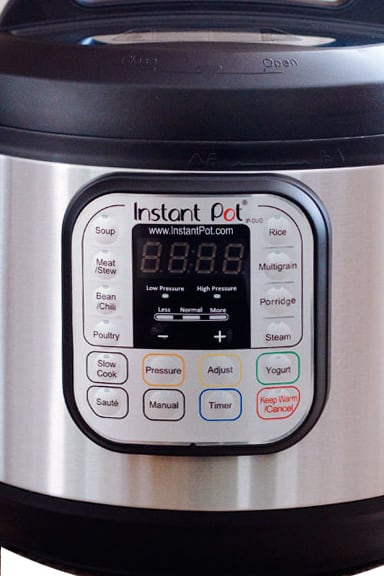
Instant Pot Duo (version 3)
Buttons Summary. User manual.
Instant Pot Duo (versions 1-2)
Buttons Summary. User manual. Differences between Version 1 and Version 2.
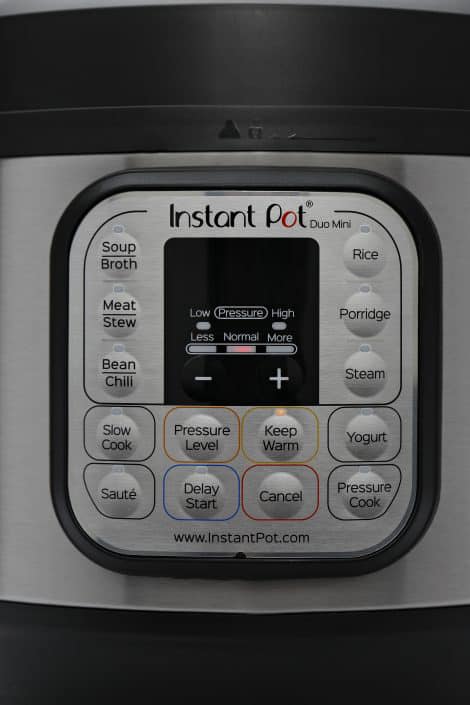
Instant Pot Mini
Buttons Summary. User manual.
Instant Pot Duo Plus
Buttons Summary. User manual.
Instant Pot Ultra
Buttons Summary. User manual.
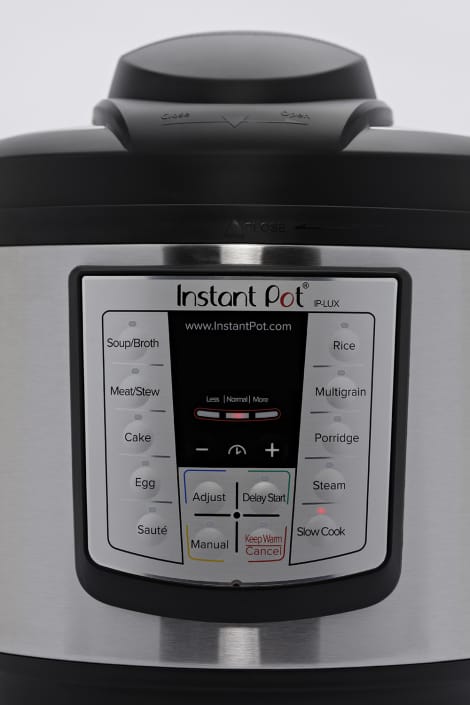
Instant Pot Lux (version 3)
Buttons Summary. Version 3 user manual.
Instant Pot Lux (versions 1-2)
Buttons Summary. Version 2 user manual.
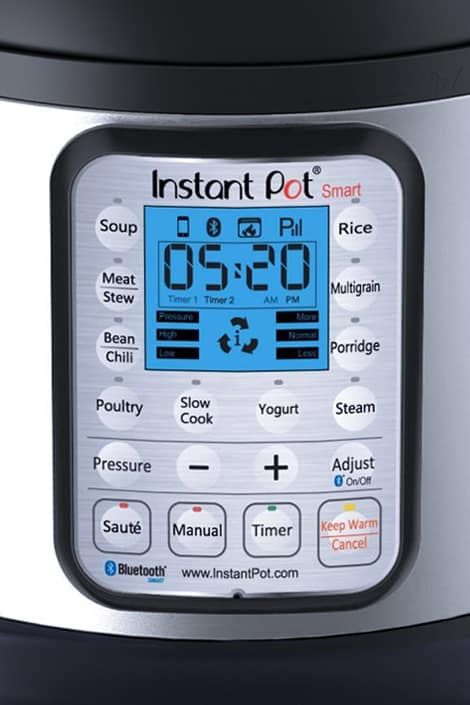
Instant Pot Smart
Buttons Summary. User manual.
(You can find your model on the control panel next to the Instant Pot logo in small print. For the Duo, if you’re unsure which model you have, the label on the back of the Instant Pot will tell you: Duo Version 3 will read V3 or IP-DUO60. Duo Version 2 will read V2 or IP-DUO60-ENW. Or you can always match your buttons to the pictures throughout the post, if you’re not sure!)
Every Instant Pot Button Explained
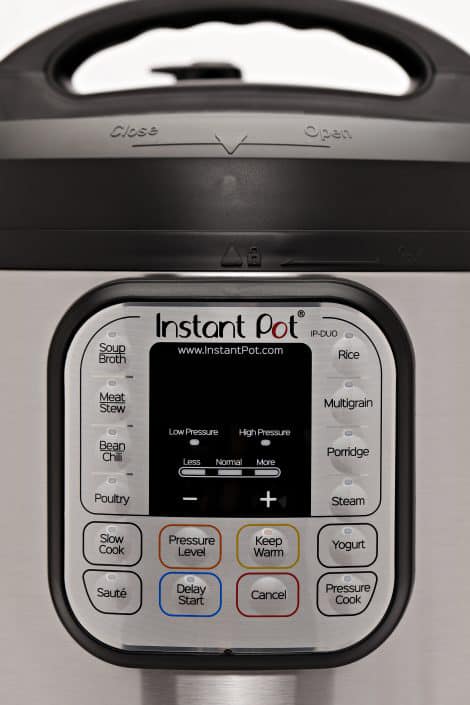
Soup/Broth. This button cooks at High Pressure for 30 minutes. Adjusted to more cooks for 40 minutes. Adjusted to less cooks for 20 minutes.
Meat/Stew. This button cooks at High Pressure for 35 minutes. Adjusted to more cooks for 45 minutes. Adjusted to less cooks for 20 minutes.
Bean/Chili. This button cooks at High Pressure for 30 minutes. Adjusted to more cooks for 40 minutes. Adjusted to less cooks for 25 minutes.
Poultry. This button cooks at High Pressure for 15 minutes. Adjusted to more cooks for 30 minutes. Adjusted to less cooks for 5 minutes.
Rice. This button cooks at Low Pressure and is the only fully automatic program. It is for cooking white rice and will adjust the cooking time depending on the amount of water and rice in the cooking pot.
Multigrain. This button cooks at High Pressure for 40 minutes. Adjusted to more cooks for 45 minutes of warm water soaking time and 60 minutes pressure cooking time. Adjusted to less cooks for 20 minutes.
Porridge. This button cooks at High Pressure for 20 minutes. Adjusted to more cooks for 30 minutes. Adjusted to less cooks for 15 minutes.
Steam. This button cooks at High Pressure for 10 minutes. Adjusted to more cooks for 15 minutes. Adjusted to less cooks for 3 minutes. Use this function with a rack or steamer basket because it heats at full power continuously while it’s coming to pressure and you don’t want food in direct contact with the bottom of the pressure cooking pot. Once it reaches pressure, the steam button regulates pressure by cycling on and off, similar to the other pressure buttons.
Less | Normal | More. Adjust between the Less | Normal | More settings by pressing the same cooking function button repeatedly until you get to the desired setting. (Older versions use the Adjust button.)
[-] and [+] Buttons. Adjust the cook time up [+] or down [-]. (On newer models, you can also press and hold [-] or [+] for 3 seconds to turn sound OFF or ON.)
Slow Cook. Adjust to slow cook on low (180–190°F), normal (190–200°F), or high (200–210°F). Use [+] and [-] to increase or decrease the cook time. (Temperatures are slightly different on older versions of the Instant Pot.)
Pressure Level. Switch between High and Low Pressure settings for pressure cooking programs. Works with all buttons that cook at High or Low Pressure.
Keep Warm. Turns the Auto Keep Warm function ON and OFF. Keep Warm keeps the contents of the cooking pot between 145–172°F.
Yogurt. Adjust to More for boiling the milk, use Normal for incubating the yogurt. (Making yogurt is fairly technical, see this post for details: https://www.pressurecookingtoday.com/pressure-cooker-yogurt-in-the-instant-pot/)
Sauté. Wait until display says “Hot” to add ingredients to the pot. Use Normal for sautéing veggies, adjust to More for browning meats, adjust to Less to simmer.
Delay Start. Select a cooking function and set adjustments, then press Delay Start and use the [+] and [-] buttons to set amount of time you’d like to wait before the Instant Pot starts cooking.
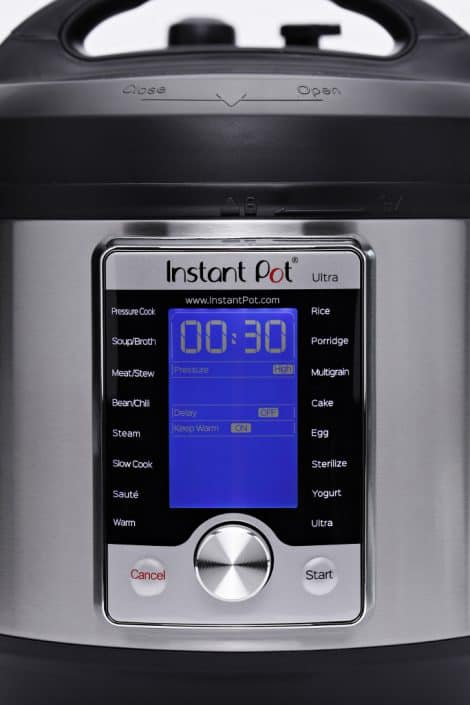
Cancel. End a cooking program at any time. (On newer models, hold this key until the Instant Pot beeps to reset to factory default settings. Also, for the Ultra, this key returns you to the previous step selecting your cooking options.)
Pressure Cook. Use Pressure Level to switch between High and Low Pressure and [+] or [-] to adjust cook time. When pressure is reached, time will begin to count down.
 Instant Pot Duo (version 2)
Adjust. On older Instant Pot versions, use this button to toggle from the Less | Normal | More settings. Press the feature you wish to use, then press Adjust until until the light under Less | Normal | More is adjusted to the desired setting.
Pressure. Switch between High and Low Pressure settings for pressure cooking programs. Works with all buttons that cook at High or Low Pressure.
Timer. Select a cooking function and adjust time/pressure, then press Timer and use the [+] and [-] buttons to set amount of time to wait for the Instant Pot to start cooking.
Manual. Set a custom pressure level and cook time using the Adjust and [+] or [-] buttons. When working pressure is reached, time will begin to count down. (On the older Instant Pot versions, it was easy to confuse the Pressure and Manual buttons, which is why the terms were changed for newer versions.)
Cake. This button cooks at High Pressure for 30 minutes. Adjusted to more cooks for 40 minutes. Adjusted to less cooks for 25 minutes.
Egg. This button cooks at High Pressure for 5 minutes. Adjusted to more cooks for 6 minutes. Adjusted to less cooks for 4 minutes.
Central Dial. Unique to the Instant Pot Ultra, you turn this dial to scroll between menu options and push to select.
Ultra. Unique to the Instant Pot Ultra, this setting allows you to control every part of the cooking process—whether to cook at High/Low/No Pressure, set custom temperatures, and select any time you’ll need.
Temp. Turn the dial on the Instant Pot Ultra to select a custom cooking temperature.
 Instant Pot Smart
USING THE INSTANT POT BUTTONS MAY SEEM A LITTLE INTIMIDATING AT FIRST BECAUSE THERE ARE SO MANY, BUT REALLY, IT’S EASY!
Before you know it you’ll be whipping up fabulous meals and desserts that will impress your friends and family. Have fun!
For step by step instructions, watch my how to use an Instant Pot multicooker video.
For more information on using your new Instant Pot, come join my Facebook community at https://www.facebook.com/groups/TheElectricPressureCookerGroup/.
***Many thanks to my friend Sigrid for alerting me to the updated information about the latest versions of the Instant Pot buttons.***
Pin It
Other Useful Instant Pot / Pressure Cooker Links:
- Choosing the Best Instant Pot To Buy
- The Best Pressure Cooker Accessories
- How to Use an Instant Pot in Your RV
- Instant Pot / Pressure Cooking Tricks
- Getting Started: How To use an Instant Pot / Pressure Cooker


Hello I have a 6qr duo, with the air fryer lid. I have a Proofing setting button, it uses the air fryer lid. It doesn’t work for me and I can’t find the machine version anywhere for instructions. Any ideas, please? Its so frustrating!
Hi Julie – to help, I need to know the exact model you have. On the back of the Instant Pot is a label that has your model number info on it.
I have a new Instant Pot Duo Plus that does not have a Steam button (which would have been a lot more helpful than a Cake button, but I digress). What setting and timing should I use to steam, say, whole potatoes?
Hi Laura – I rarely use any of the other buttons except the Pressure Cook button. The Steam function cooks a little hotter to get to pressure, but once it reaches pressure, it cycles on and off to maintain pressure just like the other pressure cook buttons, so there’s not much advantage to using it. Here’s my post on cooking “baked” potatoes https://www.pressurecookingtoday.com/pressure-cooker-baked-potatoes/ Have fun!
I love the sheet on which each button’s default pressure setting, # of minutes, and adjustment to more or less.
Can you please tell me what these settings are for the sous vide button on the gourmet model of Instant Pot?
Also what is accuracy keeping level the temperature for the sous vide button on the gourmet model, e.g. I’ve read the Ulta InstantPot is plus or minus 5 degrees.
What is the default preset temperature for the sous vide button?
My Instant Pot is the 8 qt Duo. It clearly says version 2 (V2) Model: IP-DUO80 V2. However, it only matches the V3 manual and features listed on this website.
Hi Doug – that’s interesting. Definitely go by the V3 manual then 🙂
I recent purchased the smallest instant pot and I am having trouble with the nob that controls the timing buttons. It seems to be all over the place. For example if I am trying to set it at 4 it comes up as 30 and then I find it difficult to adjust. If you turn the nob it jus does not go down in sequence but some up with all sorts of numbers.. Can you help?
Hi Liz – which Instant Pot model do you have?
I have the Power Pressure Cooker XL. The buttons on it are totally different then the buttons on the instant pots I see online.
HELP
Hi Lana – here’s a link to my post on using the XL https://www.pressurecookingtoday.com/how-to-use-the-power-pressure-cooker-xl/
Hi Barbara- I was gifted a 3 qt InstantPot Lux Mini & I’ve had many sucessful receipes. But tonite I tried pork chops & apples & used the preset Meat setting( 1st time) & followed the receipe which called for 10 min cook time after saluting the chops & apples. Turned out awful, very dry & tough- Ugh What did I do wrong?
Hi MaryAnn – since pork chops are fairly lean, it’s important to either cook them a short time https://www.pressurecookingtoday.com/1-minute-pressure-cooker-pork-chops/ or cook them in a sauce a little longer until they’re falling apart tender https://www.pressurecookingtoday.com/easy-pork-chops-in-mushroom-gravy/
I have the IP Lux. Cheesecake recipe says manual high pressure, I don’t seem to see how to adjust the pressure? I don’t see low, medium or high light up at all when using manual button. Can only adjust cooking time. Is it always high temp on manual setting?
Hi Leslie – the LUX only cooks on high pressure, which most all recipes use, so you don’t have to worry about changing the pressure for the cheesecake. Enjoy!
Thank you so much for your help. It’s a little scary not being able to find visual directions sometimes. And I could not find a video that would actually show me. Your reassurance is very much appreciated thank you and happy holidays.
Thank you so much for debunking all the buttons on my new IP-Duo V3 and especially for the handy chart. I was stumped for a long time and the printed manual that comes with it completely ignores any explanation of the difference between them, let alone what they are for in the first place, and why I should use them. It’s encouraging to know that even the specialists just use the Pressure Cook/Saute/Cancel buttons; if they made a 3-button cooker I would get one!
Glad it was helpful – thanks Glen!
Hi Barbara, I just noticed that your name is on the Recipes book that came with my IP, how great is that to have direct contact with the Chefs!
I have a new question as I adapt older recipes: I developed an easy hands-off split pea soup using the Brown Rice setting on my Zojirushi rice cooker, which is a less vigorous boil for a longer period (up to 2:40 sometimes!) than the White Rice setting. To match that on the IP, would I use Slow Cook More, for the same amount of time? Thanks for any insights.
I was a fan of the Instant Pot nearly from the beginning when they were a very small company still, so it was fun to have my recipes included in their recipe book. I have a really tasty split pea soup recipe https://www.pressurecookingtoday.com/split-pea-soup-with-chicken-sausage/ The Slow Cook More setting is equal to a slow cooker high setting, so I don’t know if that would be a long enough cook time for split pea soup.
I got a Midea my-12ls605a pressure cooker for my birthday and I want to make yoghurt. The prolem is I do not know how to set the time for 8 hrs?I tried to find the answer on the internet , but to no avail! Please help.
Hi Sandra – I looked at the online manual for that model and the manual is poorly written and difficult to understand. I would follow the instructions on this post https://www.friedalovesbread.com/2017/06/easy-cold-start-yogurt-no-boil-method.html for no yogurt button.
Thanks so much, I will try that!
We have the IP-Lux model and have been able to figure out how to use it as a pressure cooker. The problem is using it as a slow cooker (crock pot). The finished dish turns out tasting undercooked and is very cool when compared to suing a standard slow cooker. Your information here leads me to believe the problem is getting the temperature set properly. My model does not have a Pressure Cooker button so I assume I use the Manual button? Then how to I adjust the temperature higher … use the “+” button or the “Adjust” button? Thanks for any help you can provide.
Hi Gary – yes, people do struggle with the slow cook function. I recommend only using it on high. First, select slow cook, then adjust the time with the “+” button and then press the adjust button until More lights up – it will cycle through normal, less and more – basically Keep Warm, Low and High on a traditional slow cooker. That will be the high setting similar to high on a slow cooker.
I received the 6 qt duo Viva for Christmas. It has a slow cooker button on it. I am making soup and wanted it as the slow cooker but the pressure button will not move off of normal. What do do?
Hi Christina – on the Viva you press the slow cook button repeatedly to cycle through the different slow cook options, less (warm), normal (low), and more (high).
I am having a hard time figuring out the incredibly loose pressure release valve. Having grown up using the old time pressure cooker I know what my pressure release was then and it fit on just nice this one on the duo just sort of flops around like a limp noodle. where should it be up or down I am truly confused.
Hi Debbie – it is always going to be a little loose. Push it down so it’s completely seated on the post and then turn it so the handle is pointed to the words sealing when pressure cooking and venting when releasing the pressure. It’s okay if it’s a little loose as long as it’s pointed in the right direction and the steam doesn’t come out of the steam release valve until it’s time to release the pressure. While it’s coming to pressure steam will come out of the float valve – causing the float valve to rise up and seal shut.
I have the IP duo 8 qt which has no manual button. When i push pressure cook and than adjust time it only allows me to go to 4 minutes> What an i doing wrong? Thanks
Hi Brooke – sounds like you may be pushing the timer button which is for delayed starts – and it’s showing 4 hours. Just push the pressure cook button and then immediately the plus or minus button to adjust the cook time.
I made a recipe called jalapeño pork chopes you pressure cooked the brown rice first and I followed the directions exactly then when cooked you added the pork chops and cooked again and before it started to cook it said turn. I scraped the bootom of the pot ad added more water and it said burned again. I finally removed the rice and added the pork chops which were overcooked. The first time I cut down the recipes for two and it was perfect the secontime I cooked it with 6 chops and additional brown rice as required and got the burn. What to do I do
Hi Elaine – sounds like the rice absorbed all the liquid and there wasn’t enough liquid in the pork chop portion of the recipe to come to pressure.
I am having issues understanding the venting. Is there a purpose for having 2 sides for the vent release? When you finished cooking something on Manual for 15 minutes, for instance, after the timer is done and the pot says “ON” is it still heating? Then what?
Hi Linda – you can use either side to vent and release the pressure on the Instant Pot LUX – here’s more information about venting/releasing the pressure https://www.pressurecookingtoday.com/quick-pressure-release-or-natural-pressure-release/ Typically when you finish cooking something it goes to the Keep Warm setting unless you’ve turned that feature off. You’ll know it’s on the Keep Warm setting because it will have an L in front of the time and the time will start counting up.
Can’t figure out how to put my machine on low pressure. Model IP-DU050 & DU060
Hi Margaret – to change it to low pressure, first you need to select a pressure cooking function or use the manual/pressure cook button and then immediately press the Pressure button to switch between low and high pressure.
I have the instant pot duo and I’ve used it a few times but each time I’ve had to spend a lot of time just trying to figure it out. There’s been times I’ve thought I’ve started it but it hasn’t done anything and I’ve wasted 15 min! The manual is only semi helpful. When I turn it on, the number “12” pops up — what does that mean? Am I supposed to adjust it? And then I can’t figure out how to start the timer either so I’ve just used manual and use the timer on my phone. This is very frustrating.
Hi Lucy – The duo will remember the last time you used, so you probably cook something at 12 minutes and it’s remembering that. The timer button is a delay timer, used when you want to start a meal later. It is not a countdown timer for pressure cooking. When you start the Duo – using the manual/pressure cook button it will show the time, then beep and it will say On until it reaches pressure. Then when it reaches pressure, the time you selected will appear and start to count down.
What a great guide – thank you. The factory manual is not as helpful as this and doesn’t go into the explanation of how the presets work on the Instant Pot. I kept trying to adjust the time after hitting the presets, not knowing I was supposed to go to manual mode instead (which as you mentioned is not called Manual on my pot, but Pressure Cook instead). I’ve been looking for this very important information you outlined so clearly.
Thanks Eric – glad I could help!
So the labeled buttons can’t be adjusted for time and pressure? That makes them fairly useless. 12 mins won’t work for wild rice. Adjust button won’t let me increase the time.
Hi Linda – yes, on the Instant Pots, you can adjust the labeled buttons for time and pressure – just not the rice button which is only for white rice and automated. Cancel the cycle and use one of the other functions or the Manual/Pressure Cook button.
I’m trying to figure out my sister’s instant pot lux mini. We were trying to make a roast for french dip and it was still one piece kinda tough. What buttons do I need to push to make it like fall off the bone even though it doesn’t have a bone. It was about a pound?
Hi Amy – sounds like it needs to be cooked a longer time, the button you use doesn’t matter as much as choosing a piece of meat with good marbling so it will be tender and succulent when cooked long enough to be fall apart tender. A chuck roast is a good option. You can use the pressure cook button for most things. I had the butcher slice a top round roast before cook so I could use a shorter cook time https://www.pressurecookingtoday.com/easy-french-dip-sandwiches/
I am cooking boiled eggs in my Instant Pot.
How do you set it for 5 minutes?
00.05 is this 5 minutes ?
Hi Stacy – yes that is 5 minutes. It will switch to On and then when it reaches pressure the time will appear again and start to count down to zero.
I have the IP-LUX. There isn’t a bean/chili button. What do I use instead?
Hi Maryellen – you can use the manual/pressure cook button for anything. You don’t need to use a bean button to make chili.
I have Instant Pot Nova Plus and am trying to make bone broth. When I press the Soup/Broth button and “More” the time says 4:00. I believe that’s hours and after reading your instructions I’m afraid it’s way over what you say it should be. Should I have left the pressure vent open?
Hi Joyce – you are correct the Soup button on More is 4 hours. The Manual says it’s for a rich bone broth, but I haven’t seen a bone broth recipe that cooks it that long. You can use the minus button to reduce the cook time to the time of your choice.
No, you don’t want to leave the pressure vent open, eventually all the liquid would evaporate and you wouldn’t have the luscious bone broth you’re hoping to make.
What order do I press the buttons in? I spend a lot of time pressing the buttons I see on your cheat sheets until I finally hit them in the right order. And then I can’t tell if it’s really heating up or not. I’ve even tried to watch youtube videos and they don’t give details about what buttons in what order; the cook just says “45 minutes on high pressure). I don’t even see a place to enter minutes.
For most recipes, you only press the Pressure Cooker button (Manual on older models) and then the + or – button to adjust the time to the time in the recipe. Wait for the IP to beep, the display with say ON and that’s all there is to it. It will say ON until it reaches pressure and then switches to the recipe time and the time will start to count down.
I have a Flavor Master electric pressure cooker, the control panel has these setting,Meat/Stew, Poultry, Beans/Chili, Saulte/Brown,
Slow COOK, Start/Cancel, Delay/Start, Yogurt, Cake/Bake, Steam, Soup & Rice. In the middle area Hour & minute listed, under that area is rare, medium & well, then below that area is the plus sign, warm sign & minus sign. The recipe book is very vague & limited. I would like to make a cheesecake in it, but I do not know what control button to use. Most of the recipes call for about 26 minutes on high pressure. I do not know what button is high pressure & the manual does not give me that info.rmation. I like to use my presssure cooker, but feel limited because I do not know what button to hit for receipes that call for high or low pressure.
Hi Cheryl – I took a look at the manual https://media.thanedirect.com/manuals/FlavorMaster_MNL_ENG_R0_140812_View.pdf which lists the programmed times. Since the pressure cooker doesn’t give you an option to switch to low pressure, the pressure cooker cooks on high pressure all the time. All you need to do is select a button with the pressure cook time closest to the cook time in your recipe. So for example, you can push meat and then use the + button to adjust it to the 26 minute cook time for your cheesecake. Have fun!
What are the “less normal more” indicators for? I have a DUO80 V2 it stays on “less” regardless of which button I push!
Hi Dennis – you should be able to press the same button successively to advance it. So press the saute button, then immediately press it again to change it to normal, press it again to change it to more, press it again to change it back to less. You should be able to do that with most of the buttons.
Does the Manual button default to High Pressure? If a recipe says “cook at Low Pressure”, how do I do this? The +/- buttons only seem to change the time, not the mode. Also, (I have the 6qt Lux) the time display is confusing—are those hours and minutes? There are four placeholders for numbers on the display, with a break in the middle, like a standard digital clock, but it doesn’t work like a clock. The manual that came with this product is terrible. Very confusing and incomplete. I’m frustrated and am thinking of taking it back, but would like to hang in there and understand it.
Hi Kel – the Lux only cooks at High Pressure. It’s doesn’t have the ability to cook at low pressure. Sorry you’re frustrated, but do hang in there. Before you know it you’ll have the hang of it. Most recipes are written using high pressure. For any recipes written using low pressure, you can simply reduce the cook time.
Trying to cook mushroom soup from an IP recipe. I have an IP-Lux 6 qt. All the recipes I find say to use Pressure Cook or Manual cook & then put in the time.
I thought maybe I could use the soup/stew button because i’ve Never used it. It seemed to be coming up to pressure, but large amount of stem kept coming out. Of the vent, even though it was sealed. Well over20 min. I finally hit off. Letting it go for the 15 min natural release.
It seems, as I said, most recipes just say “ Press Pressure Cook or Manual for X amount of minutes”. All other times i’ve Cooked, it has come up to pressure, stopped sputtering & then the countdown timer clicks on. Not this time🥴
Hi Cindy – the soup/stew button should work similarly to the pressure cook / manual button. You should not see much steam coming out of the steam release valve as it’s coming to pressure – there will be steam coming out of the float valve. The steam pushed the float valve closed before it comes to pressure. Make sure that the small gasket is attached to the bottom of the float valve inside the lid.
Hi Barbara, Thanks for taking the time to put together this helpful site. In the “which button to use” section, would you be able to add a photo of the control panel in that section? Or in the section with your photos of panels, make them link to the related section? I don’t know if I’ve got a version 1 or 2 or Duo, etc..
Thanks a bunch!
Jeff
Thanks Jeff – it’s helpful. THe panels look similar, so the easiest way to tell which version you have is to look on the stick on the back of your Instant Pot. The model number should list the version – V2, V3
I think the smart programs are one of the most misunderstood things about the instant pot. The manufacturers website talks about how the different programs are different. I think you may be mistaken here. https://instantpot.com/portfolio-item/how-smart-cooking-programs-work/?fbclid=IwAR1P7ELiU792u9ZQ3yiVAYhVvgz0DjoXidp83i497mi54nvCkYyl5spKWMQ
Hi Christine – the information is correct. The multigrain and rice programs do behave differently as indicated in the link you provided and as outlined below, and the steam funciton heats up faster, but the other pressure cooker buttons are just suggested preset times.
Instant Pot Nova Plus 6 quart
Any print for this pne
I’ll get it added soon – thanks Mary.
I have an instapot three V3 and I want to cook potatoes what would be the best setting and the time to use for that my own self defense sister
Hi Calvin – I almost always use the Manual/Pressure Cook setting. The cook time depends on how you’re serving the potatoes https://www.pressurecookingtoday.com/tag/potatoes/
What setting would you use to cook rice in a power quickpot
Hi Lissa – I would use Pressure / Custom / change to 3 minutes cook time https://www.pressurecookingtoday.com/pressure-cooker-white-rice/
My Insta pot does not have a manual button. The receipt I’m using says use manual mode. What do u do?
Hi Lezlie – newer models have a pressure cook button which is the same as the manual button.
What setting can I use if I do not have a pressure cooker or manual setting when a recipe calls for it.
Hi Deette – if you have a brand that isn’t an Instant Pot and it doesn’t have a manual or pressure cook setting, then you’ll use one of the pre-sets with the time closest to the time in the recipe you’re using.
Bought mine on terrific sale this Christmas. Love it, sure won’t be sorry. Had another brand a few years ago- junk. Am VERY impressed with quality of instapot. Have used a few times.Just getting used to it, pretty easy to use
On the IP Lux…… Its the pressure cook and slow cook the same thing? I would like to cook chicken and thin pork chops.
Hi Kendall – no, they are very different. You’ll use the Pressure Cook button when the lid is sealed in place to pressure cook at high temperature. You’ll use the slow cook button when you have lots of time and want to cook at a low temperature for a long time – similar to a Crockpot Slow Cooker.
So i got the ip-lux 80 for christmas but there isn’t a chili button. What button should i use?
Hi Micha – just use the Pressure Cook button instead and set it for the time in the recipe. For my chili con carne with beef chunks from my cookbook, I use a 25 minute cook time. Have fun! https://amzn.to/2CyAbSl
So if I don’t have a poultry button can I use the meat/stew button and just put it for 20 mins like the recipe calls for? I’m still trying to figure this darn thing out. I love how vague the instructions are. That’s the frustrating part.
Hi Heather – you can use the meat/stew button, but eventually most just use the pressure cook button for most things. You’ll get the hang of it in no time I’m sure.
Recipe says cook at high pressure for 15 minutes. Please advise how on Viva; just want to be clear thanks meaningcwxactly which buttons to use thanks. Also manual on viva
Hi Carmen – I’ll update the post soon. Here’s the link to the Viva manual https://instantpot.com/wp-content/uploads/2018/06/Viva-Series_Manual_English_web.pdf To cook on high pressure for 15 minutes on the Viva, use the pressure cook button and adjust the time to 15 minutes. The preheating cycle will start after 10 seconds and the IP will say On until it reaches pressure and then the time will start counting down.
How do you change the mode on less to normal or more on the Insta pot viva
Hi Cindy – press the button repeatedly to cycle through the options. For example, press Saute once for normal, press it again to move it to More and press it again to move it to Saute Less.
Can you cook chicken/poultry in an instant pot with no poultry preset button? I’m trying to navigate the different kinds to buy and like the ones with more options, but find they don’t have a poultry button. Seems weird they’d remove poultry to add cake and egg; whey not all 3? Any advice?
Hi Julie – the buttons are just for convenience. You don’t need to cook poultry using the poultry button. In fact, I rarely use the buttons. I prefer just to use the Pressure Cook button for almost everything I cook. First pick the size you want. Then pick one that has the features you like – the Ultra steam release is a push button, the Duo has more info on the display, the LUX is the basic entry model and doesn’t have the yogurt feature, or if you want high tech and price isn’t an option the Smart or the Max would be the one you want.
The button also also has pre-programmed cycles. So that for foods which can be melted with the Manual function you can use the programmed. The cooking cycles will increase then decrease the heat like a sine wave. I use the Manual button 90% of the time.
Have been trying for 2 hours to cook 2 chicken breasts! Found out after finding this site how the timer worked. I’m s frustrated. Ready to take it back!!!
Thank you for your help!
Hi Jennifer – sorry you’re frustrated. Glad you found the post helpful. Hang in there! You’ll be loving it before you know it.
Glad to see I am not the only one. Had this same experience myself last night. If multiple people say they don’t use the pre set buttons why wouldn’t the manufacture make the timing feature much easier and intuitive? (i.e. less buttons and a simple feature to allow you to input a specific time). Not loving the constantly hitting plus/minus button to get to a time. I have made cauliflower mashed potatoes and lemon garlic chicken breasts which were quite good but I had to watch a bunch of videos (none of which had the same panel as my pot had). The manual and few pictures they provide are not helpful.
Hang in there. Once you get use to your model, it will get easier.
Hi I am a senior citizen with disabilities, I need to know if i get an instapot 8 quart or 6 quart will it shut off when the food is done? I dont want it to stay on warm if something happens to me when cooking, this is very important to me, Thank You, Tom
Hi Tom – most all of the Instant Pots you can turn off the Keep Warm setting. You just have to turn off Keep Warm it when you start the pressure cooking cycle.
I recently purchased the Instant Pot Lux V3 (have not used yet) and wondering if I should exchange for the Instant Pot Duo V3 if i want to use for cooking rice. The Lux version has a rice button but my understanding is that the Lux model does not use low pressure and and appears this is how white rice should be cooked.
Thanks
Hi Linda – low pressure is rarely used. I get great results cooking rice on high pressure https://www.pressurecookingtoday.com/pressure-cooker-white-rice/ If you want to cook yogurt, then I would return it for the Duo.
I have an 6qt duo. So frustrate. First try I cooked rice it was fine. Then wanted to cook chicken. Can’t get the timer to go past 4 min. Have tried poultry setting that didn’t work. How do I set this thing. Needed 9 min. Cheese and crackers for dinner☹️
Hi Susan – sounds like you may be using the delay timer instead of a cook time and it only goes to 4 hours. Try using the manual or pressure cook button and don’t press the timer button.
I *think I might know what you’re saying. When I first got it I thought that the timer would read 4:00 for 4 minutes but it’s actually 0:04 for 4 minutes. I really hope I don’t sound stupid right now.
Thanks Holly for adding to the explanation.
Thank you! I think this is confusing and was searching online regarding this. The auto timer display whole numbers but when I was doing pressure cook it looks like four seconds when it’s actually 4 minutes. I also can’t get my less, normal, and more setting to move and don’t see an explanation in the manual. Do you know how to change that? Thanks again!
HI Julian – just press the button again to cycle through the less, normal, and more settings. So if you’re sauteing and you want more keep pressure saute until more lights up. Saute on less is for simmering and saute more is for browning.
What is the poultry equivalent on the instant pot ultra?
Hi Susan – High Pressure for 15 minutes
Hi Barbara,
I have a 6 qt Instant Pot DuoPlus, and I love it. But I do have a question. The manual (and your instructions) state “Less | Normal | More. Adjust between the Less | Normal | More settings by pressing the same cooking function button repeatedly until you get to the desired setting.” However, all sources seem to say to toggle off the Keep Warm feature to press the cooking program a second time before the cooking program starts. However, if I do this all it does is switch between Less, Normal, and More. What am I missing?
Thanks, Dianne
Hi Diane – on the Duo Plus there is a separate Keep Warm button (above the plus sign). When Keep Warm function is ON, the Keep Warm status icon and LED light on top of the Keep Warm button will also light up.
That makes sense! Thank you. In retrospect, sorry for the dumb question. 🙂
No dumb questions – thanks for asking!
I have a 6 qt instantpot. IP- LUX60V3 and have a hard time with the instructions for the buttons….which to press first etc. Do you have have a ‘cheat sheet’ one csn copy for quick reference until I get use to this before, like others, I become too frustrated to continue trying to use it. Please tell me you do and how to find it. Thank you for your help.
Hi Donna – here’s the cheat sheet for the LUX V3 https://www.pressurecookingtoday.com/wp-content/uploads/2018/02/Which-Button-Instant-Pot-Lux-v-3.pdf
My recipe shows to choose the “manual” button, this is not on the 6 quart Instant Pot that I have where the manual button is showing on the video my Instant Pot says “sauté”. Where is the “manual” setting?
Hi Penelope – on most of the newer models, the manual button has been replaced with the Pressure Cook button. They function exactly the same.
Do you know the actual temperatures for each setting at less, more and normal?
For the duo plus
Hi Mia – the Duo manual lists this info – I assume the Duo plus would be similar:
Pressure Cooking Programs:
Working Pressure:
Low Pressure: 5.8 – 7.2 psi (40 – 50 kPa); High Pressure: 10.2 – 11.6 psi (70 – 80 kPa)
Pressure Release Pressure Limit: 15.22psi (105kPa)
Working Temperature: 115°C – 118°C (239°F ~ 244°F)
Non-Pressure Cooking Programs:
Keep Warm function: 63 – 78°C (145 ~ 172°F);
Slow Cook function: Less mode: 82-87.8°C / 180-190°F; Normal mode: 87.8-93°C / 190-200°F;
More mode: 93-99°C / 200-210°F;
Sauté function: Less mode: 135 -150°C (275 -302°F); Normal mode: 160 -176°C (320 -349°F);
More mode: 175 – 210°C (347 – 410°F
HI Barbara,
Thanks for this very helpful article. I have an IP-DUO80 and an Ultra, both of which I’ve been using for over a year. How can I mimic the Steam Function on the Ultra which doesn’t have a Steam button? Thanks!
Hi Linda – the Ultra has a Steam setting located right between Bean/Chili and Slow Cook
last chance before I take a sledge hammer to this Instant Pot. I have NEVER had ANYTHING turn out in this thing and I pulled it out after a year of not trying to see if maybe I could just actually cook my frozen chicken breasts to shred. So, it has taken 3 hours to try to cook these frozen breasts for 10 minutes. I have tried over and over again to follow instructions and press ONLY the pressure button to make it high pressure then the manual button to set it for 10 minutes. And over and over and over again it doesn’t even heat up It took me an our of failure using the mean button thinking that would work and when it didn’t I found this site only to learn that all those wonderful buttons are worthless and just confuse people. So now two hours later I am trying one last time to cook 6 breasts of frozen chicken 10 minutes… I could have had it done in my pot or just threw it into my crockpot and gone about my business all day. So, tell me what I am doing wrong or as I have thought for awhile, I have a defective Instant pot…. I’m heading to good will today with some stuff. I think I’ll take it along… UGH!!!!
Oh no – have you tried contacting the company to see if they’ll send you a new one if it’s defective?
I just found this site and saw ur question.
It sounds like there is air escaping from the unit as it’s trying to heat up.
Make sure that the pressure release knob on the lid is set to the CLOSED position.
Also make sure the rubber is properly seated in the lid.
I just bought a Power Cooker Plus – 8-qt ….don’t see it listerd in your article. I’m still learning to use the Crock Pot but every one is raving about their Instant Pot so I bought this – not realizing it’s like the “slow-cooker” versus “crockpot” thing – they all work similar but not quite the same. Manuals are a major bummer and I’m quite timid dealing with pressure cookers [the old fashioned kind] and the release steam thing. Can you can vegetables in these things? Interesting concept but quite intimidating in some ways. I’d like to print out the part explaining the buttons but it is quite lengthy for a handy chart to have for info. You seem to be so comfortable with it, as other commentators, so I guess it is mainly step up and do …. Also didn’t know about the sizes differences to know to likely consider buying a smaller size. Might be a good size if one can can in them. Kinda hard being a “newbie” about this. Thanks for listening as I build up to trying it.
Hi Eileen – here’s my post on the Power Cooker XL which is similar to the Plus https://www.pressurecookingtoday.com/how-to-use-the-power-pressure-cooker-xl/ Also, here’s my getting started guide with more info. https://www.pressurecookingtoday.com/getting-started-with-your-new-electric-pressure-cooker-or-instant-pot/ Hang in there, you’ll get the hang of it in now time.
My first recipe, chicken pot pie, was a disaster! Was only supposed to pressure cook for 5 min but the timer stopped at 3:30, stayed there for an hour and SLOWLY started counting down. Finally pushed cancel, what a mess. Why did the timer stop like that? No beep to vent…..not happy
Hi Linda – sorry you had trouble. Sounds like you may have pushed the delay start button. I recommend reading over this post https://www.pressurecookingtoday.com/getting-started-with-your-new-electric-pressure-cooker-or-instant-pot/ and practicing with just water in the Instant Pot so you know what to expect when your pressure cooker is coming to pressure. You’ll get the hang of it I’m sure.
I have a Power XL and still get confused on which button to use when they call for browning and such. any ideas. Hard to adjust when I am using other recipes not from the Power XL
Hi Suzanne – here’s a post that will answer your questions about the XL https://www.pressurecookingtoday.com/how-to-use-the-power-pressure-cooker-xl/
I can’t thank you enough for this site, Barbara. I,m new to my Instant Pot and was making country style pork tonight and was panicked because I couldn’t figure out how to get the high pressure for 15 minutes. I got the high pressure but could only get 9 minues or 45 minutes. So I quickly went to this saved site and bingo….there was my answer. Cooking now and excited to try it.
Thanks so much Judy! I’m glad you found your answer!
I have a faberware which was given to me as a gift, The manuel was very poor, so I have had to wing it. I find myself using a setting and then setting my kitchen timer for the amount of time I need. Not perfect, but it works. It has no manuel setting on it.
Hi Ellen – does it have “+” “-” keys that you can adjust the cook time to the cook time in recipes?
I have had an 8qt., 6qt. and 3qt. duo’s for quite a while and they all are used often. Now I bought an Ultra 6qt. and I do not like the manual at all. As an example: What is the egg button for and when do you use it? Is it for boiling eggs?
Hi Mary – yes, the egg button is for hard boiling eggs. If you haven’t tried hard boiled eggs in the Instant Pot, you need to give it a try. What I love about the Ultra is that you don’t have to remember to put the steam release valve in the sealing position. It automatically resets.
Thank you, Barbara!!!
The Duo Plus instructions regarding the Egg button are non-existent (and I have not had luck with steamer basket low pressure recipes). Do you cook the eggs in some water (or cover them like a regular pot). Do you quick vent? It seems like this info should be included for the extra $ for the Plus… but all I have found is “secure lid and hit the button” types of guidance.
Hi Steve – here’s how I like to do my eggs https://www.pressurecookingtoday.com/hard-boiled-eggs-for-easter-in-the-pressure-cooker/ Everyone’s perfect time can be a little bit different so really it’s just a matter of figuring out what works best for you. I almost never use the pre-programmed buttons. I think the LCD display with additional information makes the Plus worth the extra money.
Barbara…I’ve dubbed you my Pressure Cooking Guardian Angel!!! – your e-main came at the perfect time…I just sent you a comment regarding the Multigrain/Millet issue I was having…I do believe I was following an IP Ultra Time Chart which stated 10-12 minutes with a 1:2/3 ratio – I used 2 cups of water to be sure and added 2T EVOO as a foaming precaution…
Your information sheet has totally different timings…What I did do was reset the Ultra to Pressure rather than the Multigrain Mode and it worked like a charm….!!! – thanks to you and information sharing…I guess my question is WHY does the Ultra have all these pre-set buttons, when in actuality, one only needs Pressure Mode…lots of extra money for not really needing.
I will try the Multigrain Mode again and use your chart…but, very grateful to you! I keep looking for your most recent cookbook in the stores as well as the IP Indian Cookbook…not having any luck…I want to peruse before I invest – none of the libraries own it and the IP Indian Cookbook was stolen from the library…
Thanks again…I give you a 10 plus 1,000 stars!!!!
Hi Elaine – so glad I was able to help you find the solution to your problem! Some people really love the convenience of pre-set buttons so they don’t have to follow a recipe. I’m a recipe follower, so the pressure cook button works better for me. The feature I love most about the Ultra is not having to remember to put the steam release valve back to the sealing position every time. That for me is worth every extra penny the Ultra costs. Have fun!
You can request that your library order in the cookbook. You can order the cookbook at your local store and they’ll let your review it before you buy it. Amazon has a look inside feature so you can see lots of pages in the cookbook. Also, if you love the recipes on Pressure Cooking Today, you’ll love the cookbook. 🙂
Greetings Barbara!
I find myself using the following buttons for just about all of my pressure cooking needs: 1) manual; 2) adjust; 3) warm/cancel; 4) saute’ and finally; 5) the plus and minus button. Once I had these buttons memorized, I found that I rarely have a need for any of the other buttons.
That’s exactly how I feel too. However, so people do like the pre-set buttons.
Thanks Barbara that is very helpful information!
Great – thanks Karen!
Hi Barbara…I purchased your new book and Love it. Everything is so good that I have tried. Then, I had one sent to my granddaughter for her new Instant Pot.
I use the manual button 99% of the time except when making yogurt, of course.
Awesome – thanks! A perfect gift 🙂
Trying to cook millet – IPUltra/Multigrain…set for 12 minutes…taking forever to preheat…cancelled and started over and still taking forever…have on high pressure, no delay, no warm…am I doing something incorrectly…I use preset buttons all the time, but setting up is always finicky – never know when to go clockwise or counter-clockwise and pushing each setting…OR…is my IP dieing…doesn’t seem necessary to bring to pressure over 30+ minutes for a 12 minute cooking time…
Thank you for your articles. I find you have all the answers I have been looking for and that weren’t in the manual!
Great! Thanks Sandra 🙂
Very new to this.. Have read and reread Instruction booklet. the cheat sheet and numerous internet sites; still screwed up the spaghetti! Sauted meat & onions; put pasta crisscross over the cooked meat; poured marinara sauce, the water over the contents then placed & locked lid on my LUX 5 qt IP. Set the vent to ‘seal’, pressed manual and the display showed 30 with the ‘keep warm/cancel’ button lit up. Kept trying until I got 7 on the timer which caused 3 beeps and eventually steam pouring out the vent. The pot never said ‘hot’ even prior to sautéing and never cut off after the 7 mins. At about 12 mins into cooking, I stopped it. There did not seem to be any pressure inside… what am I doing wrong???
Hi Pat – sorry you had trouble spaghetti sauce often has thickeners that can interfere with coming to pressure. I recommend you practice bringing your Instant Pot to pressure with just water in the pot. Here’s more info about getting started https://www.pressurecookingtoday.com/getting-started-with-your-new-electric-pressure-cooker-or-instant-pot/
Push the cancel/keep warm button first
Set the pressure
set the time
wait do not push anything else
The pressure cooker will beep three times and start up.
The cancel/keep warm button will shut off.
When the time runs out the pressure cooker will beep again and the cancel keep/warm button will light up.
Is the venting and sealing on the instant pot always in the same on different versions? I have the duo my venting position is at bottom and sealing is st the top. It does not really matter, I am just curious, I used my daughters smart duo and I think the sealing and venting positions were opposite. I could be wrong.
Hi Jackie – as far as I know, they are all the same.
I have the LUX model. What setting do I use for low pressure?
Hi Celeste – the LUX doesn’t have a low pressure option. For recipes that use low pressure, you would want to reduce the cook time slightly.
Do you always have to use a liquid while cooking with an electric preasure cooker?
Hi Bill – yes, you always use a liquid while cooking with an electric pressure cooker – some ingredients release a lot of liquid as they cook, so in some case you can use very little liquid.
Hi, i have a IP-LUX. When trying to set the pressure set to high all i have is the adjust button. I can get it started on pressure and set the time but when do i use the adjust button to get the pressure setting on high?
The LUX only cooks at high pressure, so no need to worry about changing it.
Hello I have a homeleader instant pot an it doesn’t have many buttons the recipient cause for like I want to make a roast but it doesn’t have a button for it also does it normally take forever for it to start whistling an start going
Hi Danielle – I’m not familiar with that pressure cooker. Is it this one? http://amzn.to/2nbxgFY Generally all the pressure cooker buttons cook similarly so just use a pressure cooking button and adjust it to the time in the recipe. https://www.pressurecookingtoday.com/classic-pot-roast-and-potatoes/
I used a chili recipe tonight the came from an instant pot cookbook. It said to use chili button for 25 minutes but my instant pot does not have a chili button. I used manual setting for 20 minutes but the chili was very watery, not thick the way I like chili . Is it just the recipe?
Hi Betty – often in the pressure cooker you have to use some type of thickener at the end to thicken. You can thicken with a cornstarch or flour slurry. In my cookbook chili con carne recipe, I thicken it with crushed corn chips – it’s a great recipe.
I spread a 6oz can of tomato paste, or sometimes 2 can, over dishes using tomato products. It cooks into the sauce. Makes great chili or bolognese.
Its the receipe. You need to cook it longer to evaporate some of the water and let some of the beans disintegrate. Or you can take out some of the water and remove some of the beans and mash them into a paste and add back to thicken instead of cooking longer.
I just bought a Fagor Multi-cooker which had good reviews as compared to the Instant Pot. I was trying to translate the Instant Pot recipes from an excellent Indian Instant Pot Cookbook to the Fagor which has different buttons. For example, recipe says to keep yogurt from separating in my Punjabi Indian Curry recipe: press soup and then High pressure for 8 minutes. I am guessing that the “soup” button just sets the time to 8 minutes based on the excellent button explanation you gave. There is no such button on a Fagor–just White Rice, Brown Rice, Brown, Saute, Steam, High and Low Pressure, Slow Cook, Steam, yogurt and Simmer. So, I am guessing these are mostly time differences for the very specific foods. My hope is that I can simply count on setting my High Pressure for 8 minutes only and it won’t separate the yogurt. I will give my Fagor another chance tonight to see if I like it as I am now starting to wish I had ordered an Instant Pot.
Hi Janet – Fagor is a great pressure cooker and I think you’ll find the simplicity of the buttons is actually a bonus. Many Instant Pot users just use the Manual / Pressure Cook button. Yes, you should be able to just use your high pressure setting for 8 minutes without any problem. If you’re concerned about it, you could stir in the yogurt at the end.
My pressure cooker doesn’t have a poultry button. If I use the meat button, it wants to cook it for 35 min. Will it stop early automatically when it’s done? Or will it cook the full 35 min? I don’t want dry chicken! Lol
Hi Jamie – no, the pressure cooker doesn’t have any way to tell when your meat is done. If you set it for 35 minutes it will cook for 35 minutes. Just use the Pressure Cook (Manual on some models) button and the “+” or “-” buttons to adjust the time. You’ll want to use some easy recipes until you’ve got the hang of using the pressure cooker. https://www.pressurecookingtoday.com/category/chicken/
I have a IP-LUX60, no yogurt button (hubby didn’t realize there are so many different epc out there with so many different features).
Is it possible to make yogurt in the LUX, maybe using the slow cooker option?
I am not finding much out there on this.
Thanks in advance.
Hi Patti – here’s a link to a recipe for the LUX http://naturemoms.com/blog/2017/05/01/making-yogurt-lux-instant-pot/ Here’s another option if you prefer to make them in cups. http://maomaomom.com/yogurt-diy/ I haven’t tried it, let me know if you do. Have fun!
It is normal or not that when I use the MANUAL button , ican choose time but i cannot chose any level, i press the adjust button but nothing moves, it works in any other button???
Hi Olga – with the Manual button to adjust the time you use the “+” and “-” minus to adjust the time and the pressure button to switch from hight to low pressure. The pre-set buttons have 3 settings that you can cycle through using the adjust button but your can also adjust them with the “+” and “-” buttons.
Our pot does not have a poultry button. Which button is used ?
I rarely use the pre-set buttons. You can always use the Pressure Cook button (Manual on some models) and set the time to the time in the recipe you’re using. Have fun!
When I use the meat/stew button on my 6 qt. instant pot is the time set for 20 minutes? I don’t know whether I should add time or not.
I am very new at this and things are not explained too clearly. It seems to take a long time, but maybe I am being impassionate.
When I push the pressure cooker button on my instapot and change the timing it switches to “on” and the timer doesn’t come back on so it goes for longer then the suggested time am I doing something wrong?
Hi Ashley – that’s correct. It will show on until it reaches pressure and then the time will start to count down when it reaches pressure.
for me also timer doesnt come back ,before timer starts it showing burn… i tried 2 times
My InstaPot does not have a Manual button. So do I just use pressure cook and tbe time and level?
Hi Marisa – yes, the Pressure Cook button replaced the Manual button on newer models. Use the same time and level.
My Instant Pot does not have manual button either; I believe the model I have the slow cooker defaults to medium and there is no way to change that. If I push the +/- button only the time changes not the temperature setting.
Hi Jo Anne – have you tried pushing the slow cook button again to change it to a different temperature?
I am unable to set my Intant Pot DUO MINI timer over 4 min on any setting for any button no matter hiw I tey. I even ordered a new one but found the same problem. As soon as the timer hits 4 min it resets to zero. Please advise.
Hi Richard – so if you press the Pressure Cook button and then immediately the “+” button it won’t go higher than 4?
That’s exactly correct, and true for a brand-new replacement I just received from Amazon.
Richard.
That’s so frustrating. It definitely should go higher than 4. Sorry!
Kind of a stupid question, but are you sure it’s 4 minutes rather than 4 hours?
That is what I did first time. 4:00 is four hours! Numbers on the right of the colon are Minutes, not seconds 0:09 on the display equals 9 minutes. Hope this helps.
Hi. Thanks for the in-depth & well written break down on insta pot controls.
I’m considering getting an insta pot. What I’d really like to know is weather or not the insta pot is really worth its high price when compared to (what seem to be) pressure cookers with similar features that sell for about half the price.
Thanks
Hi Marshall – yes, I think it is worth the extra cost. I prefer a stainless steel pot – most other less expensive multi-cookers have a non-stick pot which doesn’t sear meats as well, you can’t scrub it to clean it and you have to be careful not to scratch the pot while cooking. Less expensive pressure cookers also don’t have the flexibility in settings. You have to use one of their pre-set settings and try to adjust it to the cook time you need. Some won’t cook less than 5 minutes nor more than 60 minutes. However, if cost is a big factor, I was impressed with the Crockpot Express https://www.pressurecookingtoday.com/how-to-use-the-crock-pot-express-pressure-cooker/
I would purchase an instapot again in a heartbeat. The pot is the greatest! It cleans easily, and I store leftovers in it in the fridge, too. The mechanisms are not scary for we pressur3 cooker adverse folks. The more precise controls than other products are very useful. I’ve been plying for 6 weeks with mine, and having a blast. Best time to buy: Winter is soup and stew season in our house. Last experiment was sugar pumpkin, onions, and potatoes from a CSA box, apples, reconstituted mixed mushrooms (Costco treat), and broth. Yummy, no recipe needed, other than to slice and onion and after partially sautéing it, add a little curry powder. Roasted a peeled pumpkin was toss in, along with everything else, skin on. Nice color, one pot, no need to even stay home while it cooked, and then stayed warm.
I always see recipes saying to do either a natural release or a quick release after cooking is finished. Is there a setting for how the pressure is released? How can I tell if the pot is doing a natural release?
Hi Adam – here’s more info on releasing the pressure https://www.pressurecookingtoday.com/quick-pressure-release-or-natural-pressure-release/ The Breville lets you select the pressure release method before starting cooking, but most pressure cookers do not have an automatic pressure release function. As soon as the pressure cooker is no longer heating, the pressure will start to release naturally. There isn’t a visual cue, but it happens automatically when there’s no heat.
I just received an IP-LUX60 and made a one-pot pasta meal. In doing so, I combined meatballs, pasta, sauce and water and pressed the manual button for 3 minutes. Once it was completed, I allowed the pasta to sit for five minutes, slow releasing. At the end of five minutes, I opened the pot and the pasta was not done so I repeated the process. After this, the pasta had cooked, but the entire dish had so much of a metallic taste we threw it all in the trash. Prior to cooking, I washed the liner pot and conducted the water test. I’m not sure what I did wrong, but welcome suggestions. I love the idea of this, but hate the idea of ruining another dinner.
Try the water test but add a 1/2 cup of white vinegar as well
I’m sorry you had a bad first experience. 🙁 We love 1 Pot Pasta. Here’s how I do it.
Lay 1 layer of frozen meatballs in bottom of the pot. Add 1 pound of dried pasta. Use a hearty shape, not spaghetti or fettuccine.
Pour 1 jar of pasta sauce on top. Add water to just cover pasta. DO NOT STIR.
PC on high for half the dried pasta’s cook time, rounding up. So 11 min pasta is cooked for 6 min.
Use quick release when done. Stir ingredients and serve.
I received an 8 qt IP for Christmas. I have used and loved my 6 qt IP for almost a year now so I’m not new to these process, but like you had a bad experience with my new pot. I washed the liner, did the water test, and proceeded to cook 2 dozen eggs for 5 minutes on high. The eggs came out cracked, brown and spongy. You could press your finger into the side of the peeled egg turned brown and it would hold the indentation. I was afraid to taste them but wonder if they, like your meal, would have tasted metallic as well. Definitely makes me nervous going forward.
I have a new LUX 6V3 instant Pot. The adjust feature does not work, I can’t make a plus/minus adjustment. The screen stays at 30 mo matter how many time I push the adjust button. What can I do except return it to Amazon.
Hi Marge – to adjust the time, you can use the “+” and “-” buttons. You’ll use the adjust button in conjunction with the pressure cooker buttons – so first press meat and 35 minutes should appear and then the adjust button immediately after it will switch to 45 minutes. If you’re pressing it immediately after and it’s not working, then you may need to return it.
Hi, I’m very new to pressure cooking and have an Instant Pot. I just can’t seem to understand the basic start instructions. Believe me, I’ve read the booklet every time I try using it and get confused all over again. Would you write a basic step-by-step instructions for me to refer to? It’s been taking me over an hour to cook a med sized roast. I find that I won’t use my Instant Pot as much as I would like. Thank you
Hi Tracy – here’s a video that will show you step by step how to use your Instant Pot. Have fun! https://www.pressurecookingtoday.com/video-use-instant-pot-ip-duo/
Thank you for the link. It was a big help and l’ll keep it to refer back to when l cook again. I plan to do it until l’m comfortable. Thank you again for the help.
I was given a express crock multi cooker by crock pot and the cookbook I have is for an Instant Pot. I am cooking a roast and it says to push the manual key and mine does not have a manual key what would be the equal to that button? Thank you
Hi Rita – the Crockpot Pressure cooker does not have an equivalent to the manual button on the Instant pot. Instead you have to select one of the pre-set functions – meat for example – and then adjust the time to the time in the recipe using the + button. It operates similarly to https://www.pressurecookingtoday.com/how-to-use-the-power-pressure-cooker-xl/ PPC XL. Page 22 of your owners guide gives you the default cooking times and the cook time range.
I’m planning a review of the Crockpot Pressure Cooker soon.
Thank you SO MUCH! I recently received a Gourmia SmoCooker as a gift which is a slow-cooker and pressure cooker and has the added benefit of being able to smoke foods. I’m new to pressure cooking. My issue is that when I search for recipes, they are ALL for Instant Pot users and so include things like “beans” button or “Manual” and I didn’t know what that meant for my own pressure cooker that has a hight and low setting for pressure. This page is helping me translate those recipes for my own pressure cooker!!! I feel so much less overwhelmed and optimistic about using mine. Thanks again 😀
Thanks Cassandra! Wow – I haven’t heard of the SmoCooker before. You’ll have to let me know how you like it. Have fun!
I have a POWER XL elec pressure cooker can not find any information online on how to use set up screen. Is it the same as the insta pot? Thank you so much for information.
Hi Darlene – they both operate very similarly, so much of the information would apply. Here’s my post about using the Power Pressure Cooker XL https://www.pressurecookingtoday.com/how-to-use-the-power-pressure-cooker-xl/
What do press with an IP-Lux if recipe says Manual high pressure 6 minutes?
Hi Ange – if you have a new IP-Lux they may have replaced the manual button with the pressure cook button. So press pressure cook and 6 minutes. The Lux always cooks at high pressure.
Hi,
Thank you for this post. Its very helpful. As you mentioned, press the adjust button to increase or decrease the cooking time. How does that work ?
One click on adjust button A= how much increase or decrease in cooking time ?
Does clicking on adjust button twice reduces the cooking time ? By how much ?
Can this be done in the middle of cooking as well ?
Thanks for answering.
Nupy
Hi – if you look above it tells you the time it will adjust to – for examplea; Soup – high pressure 30 minute cook time. Press soup and the Adjust button once (more) to cook for 40 minutes. Press soup and the Adjust button twice (less) to cook for 20.
How do you know if its on slow cook or not?
Hi Linda – there’s a little light that lights above the slow cook button.
How to get adjust the pressure level (low vs high)? I don’t have a pressure button, only a manual.
Hi Kristina – if you have the Instant Pot LUX it only cooks on high pressure. Since most recipes use high pressure, that’s not a problem and you don’t need to worry about changing the pressure.
Use the adjust button.
We are a family of 6 and I really want a 8 qt IP. But I cant decide which to get. I want to be able to cook cakes and eggs in the IP. Neither 8 qt. has both options… Can I still cook both cake and eggs in both models? Maybe with manual settings?
Hi Jeremy – yes, there’s no need to use the pre-set buttons. You can always use the manual setting if you prefer. The 8 quart sounds like the perfect choice for your family of 6. Have fun!
How can I move the low normal more panel. I don’t have a cooking program key on my new instant pot.
Hi Jerry – which Instant Pot model do you have?
I have the ip-duo60
Select the function you want to use – soup, meat, chili, etc. Then immediately press the adjust button to increase or decrease the pre-set time – the light will light below less, normal or more to let you know the setting you’re using. Have fun!
Hi,
I just bought an instant pot IP-DUO60. I have recipes that require bringing liquid to boil before adding the ingredients. And there is a reason for this. So, do I pressure cook my soup stock for 15 minutes and then add ingredients and reset the pressure cooker?
Would the saute button allow me to bring the stock to boil?
Hi Josie – yes, I would use the Saute button to bring the stock to a boil before pressure cooking.
Thank you so much for this post! Exactly what i was searching for! 🙂
When is the new models coming in the uk? Have you done a press release?
Hi Bally – sorry, I don’t have any info about models in the UK.
I got an IP Ultra 60 for the timer feature, so I can put dinner in the pot when I leave for work in the morning, and instead of cooking all day it will only cook the 3-4 hour slow-cook cycle it needs. But I’d also like to use it to sterilize my canning jars, and I can find ZERO instructions on how to do that. Any help?
Hi Stephanie – the Instant Pot Duo Plus manual gives a bit of information about the sterilize feature http://instantpot.com/wp-content/uploads/2017/04/DUO-Plus-Manual-English-April-18-2017.pdf on page 11.
I’m attempting to write a script for my Smart Instant Pot for Instant Pot Honey Glazed Chicken by “once a month meals”. My problem is, once I go to DIY, Recipe Commands, Heat to a Temperature, the temperature selections are in degrees and the Heating Level is in percentages. How do I correlate the “Poultry” button to a temperature and what is Heating Level?
Hi Bev – there’s a Facebook group https://www.facebook.com/groups/IPCAT/ that has more experience writing scripts than I do.
I use my pot a lot! But I have only used the manual high pressure button until the other day I did marinara sauce and it said to use the soup button so it does not burn! And Viola! It did not. I always have problems with that, but I’m wondering why??? Do you or anyone know so I can adapt that to other recipes with tomatoes? Thanks
I just re-read my comment and just for clarity, I’m not wondering why it usually burns, but rather why it did not on soup, as it says it is just high pressure here, there must be something else going on with it.
Hi Teresa – There is absolutely no difference in how the manual and soup functions work. I verified that again today with Instant Pot. The difference probably is in the ingredients, unless when using the soup function, you clicked different operation keys than when using the manual function. Perhaps you used low pressure?
Thanks for the great question. Tomato sauces in the pressure cooker can be difficult if you’re not using enough liquid.
I bought my INSTANT POT from Walmart and I noticed it doesn’t have a POULTRY setting which many recipes call for. What do I use instead? It is a IP-LUX60 V3 model. Thank you!
Congratulations Darci! All the pre-set buttons are just suggested / pre-set times and you can get the same result using the manual button and adjusting the time to the time in the recipe. Have fun!
I have used my IP twice with no problem. I tried to use it again and the button will not move to sealing. How do I do that?
Also, how do I cook vegetables?
Hi Gwen – you should be able to pull the sealing / venting button straight up and remove it. Wash it thoroughly and try again to seal it. What vegetables are you trying to cook?
I have recipe that says ” cook at high pressure for 20 minutes then NPR for 15 minutes”. How do I program this? Thank you!
Hi Ryan – are you wanting to program on the IP Smart? Here’s detailed instructions. http://instantpot.com/wp-content/uploads/2014/09/How-to-write-recipe-script-for-Instant-Pot-Smart-v1.0.pdf Or, if you don’t have a Smart, just use the manual button and adjust the time to 20 minutes. After the cooking time let the pressure release naturally (without doing anything) for 15 minutes, then release any remaining pressure with a quick pressure release. https://www.pressurecookingtoday.com/quick-pressure-release-or-natural-pressure-release/
I have the duo plus 60 model. I am wondering what is the difference in pressure cooking on high on “normal” mode vs. pressure cooking on high on “more” mode when I put in my own cooking time?
I am pressure cooking bone broth for 4 hours on high and i realize i can select “less”, “normal” or “more”.
My instant pot does not have a sautée button which would j use instead?
Barbara, pls help! I am so confused…. I have an older IP model, and what I am trying to do is make a medicinal tea decoction… It needs to be analogous to “low simmer” on the stove, as a boil would destroy the medicinal properties of the tea… Can you pls pls tell me the succession of buttons to push? I need to simmer for 3 hours… Thnx so much! XOXO
Hi Kira – I would probably bring it to a boil using the Saute setting, then switch it to the slow cook setting on normal or low. Just keep an eye on it and see if it’s simmering just right.
Thank you so so much!!! Barbra, I am so sorry to bug you, I promise I am not lazy – I tried to figure it out, but I am obviously not getting it… I know it sounds stupid, but I don’t know where to find “normal to low” setting once I press Slow Cook button.., Can you pls advise? Also, when you say “keep an eye on it” , wouldn’t the lid be closed on Slow Cook Setting?
Slow cooker mode, even covered, bare reaches boiling, and Saute LOW creates a full rolling boil. Simmering is impossible with any current Instant Pot.
I have a Midea MY-WCS603. Has Sauté , Slow cook , rice ,(white and brown) Keep warm, Chili- bean, Soup and steam
Are any of these low pressure ? This PC has no manuel button Any help is appreciated.
The instruction that came with it are awful
Hi Donna – unless it specifically says high or low pressure, then it always cooks at high pressure. Just use the pressure cooker button with the closet time to the time in the recipe and use the + and – buttons to adjust the time.
I don’t have the bean /Chile button. So what button do I use to make beans?
Hi Beatrice – just use the manual button and the time recommend in the manual for the type of beans you’re using, or one of these recipes https://www.pressurecookingtoday.com/?s=beans
Use manual mode for a few minutes then after 15-20 minutes open it up and stir it and let it set another half hour. I use 8 minutes for Black Beans. You can now use then the same as precooked canned beans.
I have many recipes says to use manual and let’s say 3 min…how do I get to 3 minutes mine only seta at 10 minute increments, how do I change to less than 10 min..is 12 or 5..
Hi Sandi – if you’re pressure cooker won’t set for less time, then you’ll need to set a timer and press the cancel button when three minutes is up. What pressure cooker are you using?
After you press manual and how many minutes you want, how long should it take for the instapot to start its countdown of minutes?
I am doing s hard boiled egg recipe and after sealing the pot and putting it on manual high and 6 minutes, it took about 6-10 minutes for the timer to start the countdown? Is this normal? Is it a sealing issue? If this is normal then all the recipes need extra time for the pot to get to the desired pressure and temp I guess.
Yes its normal for the pot to take awhile to count down. The pot has to come up to pressure before counting down. I don’t know if there is a great guideline for how long pots take to come to pressure. I do know it depends on the temp of the food in the pot as well as how full the pot is.
I don’t see a way to print this…it would be nice to have this as a handy go-to
Hi Linda – that’s a great suggestion. I’ve added a link to a printable pdf at the bottom of the post. Thanks!
Hi, I don’t have a Boil setting(Double select Yogurt) in my LUX model. Is there any alternative for this in lUX model?
Here’s a recipe that will work in your LUX http://maomaomom.com/yogurt-diy/ 🙂
My instant pot doesn’t have a poultry button??? It looks like I have a cake button in its place…
Hi Rhonda – I heard they added a cake and an egg button. It’s no problem that you don’t have a poultry button. Times for poultry really vary depending on which cut you’re cooking. Just use the manual button and set the time in the recipe. Have fun!
i am making a (not sure what to call it) red beans ~ already cooked ~ basic seasonings, cranberries (also pre-canned) ~ ~ ~ etc. NO IDEA what button to push!!!!!!! suggestions please
Hi Jay – if you’re just heating something up and not adding liquid to come to pressure, you’ll want to heat it pot in pot. Put 1 cup of water in the pot, put the trivet/rack in the pot. Add the ingredients to an oven safe bowl and place the bowl on the trivet. Then pressure cook for about 3 minutes until the food is warm. I generally use the manual button.
My instant pot doesn’t have a yoghurt button but I would like to make yoghurt can you suggest how?
Hi Lesley – most people are doing it like this https://www.copymethat.com/r/3nkQVaG/yogurt-in-a-lux-instant-pot/
hello Barbara, I would like to bake something in my Instant Pot, but can’t understand which button to use. For example, just plain Apple Pie, what i need to press? And maybe you know for how long? I know other models have “baking” button, but not mine…
Thank you
Hi Elina – I haven’t seen anyone do apple pie. Unless you did a cookie crust, your crust wouldn’t brown in the pressure cooker. Also, you’d have to use a really short cook time for apples because they turn to applesauce very quickly. I’m not aware of any pressure cookers that have a baking button. Now if you want to “bake” a cheesecake, that’s great in the pressure cooker.
Thank you
I have a farberware pressure cooker I do not have a high button I have buttons 1-9 and am wanting to make a cheesecake but not sure which one to use
Hi Kim – you’ll want to use a pressure cooking button with the cook time of the cheesecake. So perhaps the meat button would have a similar time – then you could use the + or – button to adjust to the recipe time. Since it doesn’t have a low pressure button, the assumption is all the pressure cooker buttons cook on high pressure. I couldn’t find the manual for the Farberware online, but if you have it, it should list the psi. Have fun!
Thank you so much for posting this information! It helps me to know what the IP does when I push those buttons!
Great! Have fun 🙂
So excited and usually get bored after a bit, but am committed to pursue, do and get versatile w the ip.
I find that keeping it on the counter helps you remember to use it until you fall in love and wonder how you ever lived without it 🙂 Have fun!
Thank you so much! Total newbie to pressure cooking but have cooked a number of things and never a bad outcome!!! This is getting pinned to my tool bar so I can get to it easily! Thanks again!
I’m cooking rice in the “rice” function. It defaults to “low”. But it does not tell you what release function to use. Quick? Natural? 10- minute natural?
Hi Denise – yes, with the rice button you’ll want to do a 10 minute natural release. That will allow the rice to steam and finish cooking at the end.
I’ve read a ton of recipes that say “press the soup button” and then instruct to use the manual adjustments…. doesn’t that just cancel the soup setting anyways and follow the manual settings instead? So confused!
Hi Alyson – whichever is easier for you. Everyone’s brains work a little bit differently, but the buttons all pretty much all work the same except as noted. So pressing the soup button will start you at high pressure and 30 minutes – if the recipe time is close to 30 minutes, then it might be easier than the manual button for some.
The soup button does nothing you can not do in manual node but if it is set for 5 minute because you made oatmeal that morning it might be quicker since most recipes use manual for 30 minutes anyway. For heating liquids Saute is the fastest mode. I often hit it while adding other ingredients to the broth or water so it will get to pressure quicker once I switch to actually closing it up to make soup.
Thank you for attempting to clarify what the folks at Instant Pot make a so-so attempt of explaining in their manual. 🙂
That said, one key mystery remains: is there _any_ difference at all between Steam and Manual? I know that the manual warns that Steam will warm up at 100%, but at least on my Instant Pot Smart that’s not true, and even while ramping up it switches off periodically. I’m starting to wonder if I should just use Manual for everything pressurized including steaming, and forget about all the other buttons…
Hi Stephanie – if you’re not noticing any difference when using steam, then I would use Manual for everything. That’s what I do.
I hate this pot. It doesn’t work. I put the chicken in and press slow cooker and it’s raw after eight hours. Waste of money. I try pressing all the other buttons and they don’t do a thing. No response.
Hi Karen – sounds like your IP might be defective. Have you contacted Instant Pot customer service? They are very responsive.
Did you plug it in?
I think I fell on my head or something but I cannot seem to understand the time display. Can someone show me what five minutes looks like and what ten minutes looks like, and what one hour looks like in the display? Thanks!!
Hi Olivia – the time function is for delayed cooking. You need to select a cooking function first, make any adjustments, then press the timer button and adjust with the “+” and “-” buttons. So you wouldn’t typically want to delay cooking something for 5 minutes. If the time delay function is on, the light above it is green on the Duo V2.
Wonderful article! I have a question about the MANUAL button. You say, “Use the manual button if a recipe says to pressure cook on high pressure for a specific number of minutes. ” My question is…. can you use MANUAL and LOW pressure ?
Thanks Carol – yes you can. I gave that example because I rarely cook on low pressure since not all pressure cookers have a low pressure setting. Have fun!
Hi Barbara, I’m hoping you can help me out. I just got the Instant Pot. I decided to use the slow cooker to make beef stew. I have long made this in my old slow cooker with good results. I set the Instant Pot on high for 4 hours, as I have always done with my old slow cooker. Well, its been 9 hours and the stew is cooked on the bottom of the pot but not the top. What have done wrong?
Hi Patti – I’m sorry I’m not much help with the slow cooker function. I don’t use it. Perhaps you’ll need to stir it occasionally because of the shape of the IP?
The Instant Pot looks amazing… but since I already have crockpots, a rice cooker/steamer, and a pressure cooker, I feel guilty buying one for myself. I did, however, gift one to my Mom this Christmas and hope she’ll love it! I love your recipes and follow you on Facebook! I’ll coach my Mom through her possible apprehension with this new kitchen gadget, but I’m thinking she will soon grow to love it!
Thanks Michelle – so nice to hear you love my recipes. I’m sure your mom will love her Instant Pot. Sounds like a great gift to me.
Hi Barbara
I ordered the pot without the yogurt button. I really want to make the yogurt and I wonder if a different button on the lux can act like a yogurt heat? Keep warm? Slow cook. Thx
Hi Darlene – here’s a recipe you can make without the yogurt button. I haven’t tried it however. Let me know how it goes. http://www.copymethat.com/r/3nkQVaG/yogurt-in-a-lux-instant-pot/
Got a new IP…but it took me 3 tries (and 1.5 hrs) to get my chicken breasts pressure cooked. Each time it would automatically shut off before it even built up pressure.
I placed the chicken in the pot with 1/2 water, some salsa and seasonings. My gasket seemed fine, the steam valve was closed, the “jiggler” (what I call the steam jiggly thing on my pressure canner) pop up thing wasn’t stuck or anything. I then pressed “chicken” upped the timer to 20 min, and pressed “pressure”. It started…but I had to do this 3 TIMES before it built up enough steam to close the jiggler and begin pressure cooking.
I was so excited finding the great Black Friday deal on an IP and this was my first time using it…it’s probably operator error, yet I can’t figure out what I did wrong. Any suggestions or insight?
meant 1/2 CUP of water
Hi Debbie – sorry you had trouble. Have you tried bringing your Instant Pot to pressure with just 1 cup of water in the pot to see if it’s coming to pressure properly? Do you have the Duo or the LUX?
I have the DUO. No, I didn’t try bringing it to pressure with just water. I’ll try that and let you know how it goes.
On the Duo there’s a little silver float valve next to the jiggly thing that rises and seals the pot when it comes to pressure, not the jiggly thing. There’s a good picture of it in this post https://www.pressurecookingtoday.com/quick-pressure-release-or-natural-pressure-release/
When I use Manuel should the pressure valve pop up? I tried spaghetti for 10 minutes?
Hi Gina – yes, the silver float valve with pop up just like when you use all the other settings. 10 minutes for spaghetti seems too long. Did you have enough water in the pot?
This advise is so helpfull, thank you!
Thanks Bea – have fun with your new Instant Pot!
Thanks for the helpful tips for the new bies..
Thanks for the explanation on the Rice button.
I don’t understand how to use the manual button.
Hi Ann – just press the manual button and use the + or – sign to adjust the cook time to the time you want to use. Wait a few seconds and it will switch to on and when the pressure cooker reaches pressure, it will show the cook time and start counting down.
Hello,
I am used to making chili in a crock pot and leaving it on low for 8 hours or high for 4 hours. Can I achieve this with the instant pot on the slow cooker option? I am not sure how long I should keep the chili on at low medium or high for the instant pot
Hi Teddy – I haven’t used the slow cooker function much. But the advice given on the Instant Pot Facebook group is – Make sure to use the medium or high setting. Low on the IP is like keep warm on a crock pot. Medium on IP is like low and high on IP is like high on a crock pot.
I have the IP duo. The keep warm does not seem to adjust. (I’m seeking a lower temp). Thoughts?
Hi Megan – looks like only the Smart offers the adjustable Keep Warm temperature. You could try using the Yogurt button which cooks at a lower temperature http://instantpot.com/benefits/specifications-and-manuals/instant-pot-ip-duo-series-specifications/
Hi Barbara. Thanks for all the great recipes and info. My husband bought the Duo 6 qt on Amazon Prime day as many people did. We are learning a lot and cooking up a storm. I just have one question that I can’t seem to find the answer to. I saw your post about the different buttons. However, last night I used the steam button for the first time. My question is, what is the difference between the steam and pressure mode? They both have locked on lids, they both have the pressure release valve closed and they both build up pressure/steam inside. So….what’s the difference? Is it where you use steam mode if you are using a steamer basket? Not sure. Thanks in advance 🙂
Hi Brenda – My understanding of the steam button is that it heats up faster, doesn’t cycle on and off before reaching pressure but once it’s at pressure, behaves just the same as the other buttons. Otherwise too much pressure would build up.
Thanks Barbara! Makes sense.
I pushed the slow cooker button. I then pushed the adjust button and the + button and nothing happened.
Did I do it in the erong sequence?
Also how do you turn the cooker “off” ? I have been unpluging when I need to correct a wrong button push?
Thank you,
Gloria Hawkins
Hi Gloria – the adjust button changes it from normal slow cook to more or less (the temperature it will slow cook at). The little bars light up to show you which slow cook setting you’re using. The + and – buttons change the time. You have to make sure you push the buttons adjust and + or – buttons right after pushing the slow cook button or nothing will happen if you wait too long.
Use the Keep Warm / Cancel button to turn the cooker off.
You’ll get it all figured out in no time 🙂
I’m so excited about my new InstaPot. I cleaned it yesterday per instructions and did the “test”. I’m a little concerned, however, because even though I followed the instructions and used the – button to decrease the time to 2 minutes, it didn’t start releasing pressure until almost 8 minutes and then the noise from the pressure releasing lasted 15 minutes before my husband and I couldn’t handle it anymore LOL and I pushed warm/cancel. Even then, it still was releasing pressure so I opened the vent all the way and placed a towel over it to dampen the noise. Is this normal? Help?! 😉 ~Kimmie
Hi Kimmie – sorry the water test didn’t go smoothly for you. First, the water has to come to a boil before the pressure will build up, so 8 minutes for the water to come to pressure isn’t unusually depending on how much water you used. However, the float valve used of closed once pressure was reached and the noise should have stopped. A couple of things that could have gone wrong – the valve wasn’t in the sealing position. If the valve is in the venting position in will continue to release pressure and eventually run out of water. Or, secondly, if you washed the lid and took the silicone gasket out – perhaps your forgot to reinstall it or it wasn’t installed properly. Check those two things and then try again and hopefully this time, it will go smoothly. 🙂
Thanks! I’ll try those tips this evening! ???
I find your site more helpful with instructions and messages than any I’ve come across as a newbie. Thanks for much for your thoughtful instruction.
Thanks CJ! So glad you’re enjoying my site. Have fun with your new pressure cooker.
Thank you for this.
I find the clock confusing…12 mins shows up as ” 1:2″ – It is contrary to a digital clock where you would expect to see for 12 mins “12:00 ” minutes and seconds. It’s weird and gives my brain a workout.
Hi – I think the only time you’ll see the colon in the display is if you’re using the timer button which is just for delayed start. Otherwise it will just show 5 for a 5 minute cook time, etc.
Barbara quick question ? Little worried Barbour the pressure releasing. Is this pretty much automatic on the pot? I bought the Ipro and am waiting for it. Thank you
Hi Pam – a natural release will occur with you having to do anything. Here’s some info https://www.pressurecookingtoday.com/quick-pressure-release-or-natural-pressure-release/
I just ordered mine and your pin will be ever so helpful. Thank you for taking the time to help others.
My wife and I just got our Insta Pot a few days ago. We have made 2 meals that was very direct in the recipes on how and what buttons to use. I’m feeling a little adventurous, I found a recipe for oven baked salsa chicken casserole. It has 1 cup uncooked white rice, 1 cup corn, 1 can of black beans, 16 oz of salsa, 1 cup chicken broth, and some dry seasoning. My question is can I just throw all these ingredients in the pot, hit the manual high pressure or should I cook the rice first the throw it all in? I’m not one for wasting food nor do I want to destroy it!! Just trying to build some kind of open freedom cooking directions using this pot.
Hi Joe – you can throw it all in together if you cut the chicken in to bite size pieces. Assuming it’s white rice, your cook time will be 3 minutes with a 10 minute natural pressure release. Have fun!
Thank you!!
I’m wanting to make creme brûlée..How do you do natural release? I’m so confused!
Hi Malee – I did a whole post about it https://www.pressurecookingtoday.com/quick-pressure-release-or-natural-pressure-release/ Enjoy!
If making chicken, would you get the same result using either the poultry setting for 15 minutes or the manual setting for 15 minutes?
Hi Terry – yes, you’ll get the same result.
Thank you! That’s exactly what I needed to know.
when i push the pressure button, nothing happens… Am i doing something wrong???
Hi Sheila – the pressure button just switches between high and low pressure, so you won’t notice any change. It will just be a little light on the display below high pressure or low pressure. To cook on high pressure you can just pressure the Manual button and change the time to whatever you need because the default is high pressure. You’ll only need to change to low pressure for very few things.
I have a pork roast in, pushed ‘meat’ and ‘pressure’ it just reads ‘on’ now … is that correct? I’ve only used a crock pot. Thank you!
Hi Jamie – the pressure button just switches between low and high pressure. Look at your display and see if the light is lite for high pressure. Most recipes use high pressure. The meat button defaults to 35 minutes. So it will show “on” until it reaches pressure and then start counting down.
I have the IP-DUO and I can’t figure out how to adjust the Keep Warm temperature. Is that functionality specific to the IP-SMART pot? If not, can you explain how it works for the IP-DUO?
I used my IP to saute ground beef for tacos, then added the seasoning & water. After cooking (still in SAUTE mode) for a few minutes, I put my glass lid on the pot and pressed KeepWarm/Cancel – the display said OFF. I pressed KeepWarm/Cancel again to activate the Keep Warm function (I hope), but I don’t see any way to adjust the keep warm temperature. I need to keep the taco meat warm for about 3 hours until we’re all home from a meeting; I had hoped to set it to a lower temp, because I’m worried that it will scorch. Thanks.
Hi Nancy – the Keep Warm button is just on or off, but if you want to adjust it to a lower setting, you have to also use the Adjust button. So when the Keep Warm setting says off, press it once, then immediately press the adjust button twice so it says less.
Hi Barbara,
I used my Instant Pot for the first time today and made some pinto beans. I placed all the ingredients into the pot and covered the beans with chicken stock. I made sure that the stock was at least an inch over the beans. I pressed the chili/bean button, let the pressure naturally release. When I tried the beans, they were a little to firm form my liking. What do you recommend I do in the future?
Mahalo!
Wendy
Hi Wendy – you can always put the lid back on and pressure cook things for more time. Just adjust the time with the + and – buttons. Then with things like beans and large cuts of meat, do a natural pressure release again. You’ll have the hang of it before you know it.
PS – I’m headed to Maui in May. Can’t wait 🙂
Can u do canning in the instant pot
Hi Alma – no you can’t can in the Instant Pot. It’s my understanding that no electric pressure cooker has been approved for canning. http://www.hippressurecooking.com/consumer-alert-no-pressure-canning-in-un-tested-multi-cookers/
NO !! You can not can in anything safely smaller than 12 quarts.
Hi there, I do my porridge on manual for only three minutes. The porridge comes out lovely BUT it always burns on the bottom. I am using x1 cup oats, x1 cup plant milk and x1 cup water. What am I doing wrong? Thanks!
Hi Nicki – sounds like you’re not using enough liquid. I use 2 cups water for 1/2 steel cut oats https://www.pressurecookingtoday.com/steel-cut-oats/ Or, you could try cooking them in a dish on a rack. It will take longer but you won’t have an problems with burning.
Thanks so much for the reply, I will give both a try and hopefully that will sort it!
I believe I read in the Insta Pot directions that you can do water bath canning in the IP, but not pressure canning.
Hi. This post doesn’t explain when to use which button. For example, what is the sufferer between using the poultry button for 15 minutes versus using manuaknfor 15?
There really isn’t any difference between using the poultry button versus using the manual button except the convenience of the pre-set time.
This is my first time using the instant pot. My mom bought for us this week because she thinks it will change our lives. Your website is so very helpful. Thanks so much!!
Thanks Ellyn – I know it changed mine 🙂
I have a Farberware 6 qt electric cooker from Walmart and I was wondering which of my presets were high pressure and which are low. No cookbook or details as to using it. I’ve looked on the Internet for days,but, no luck. Called Farberware and Walmart help and they can’t answer anything. Mostly warranty info. Cooker is nice enough that I want to keep it,but, I hate this guessing game. It has 1slow cook 2soup/stew 3rice/risotto 4fish/steam 5steak/meat 6chicken 7vegetable/steam 8beans/lentins 9brown/sear. There seems to be lots of info and groups for the other brands. Just wondering if someone in this group could help me out. The 4 and 8 Farberware cookers have different buttons so I couldn’t go by their info.
Hi Georgia – I don’t have any experience with the Farberware pressure cookers but did find this recipe book http://www.hippressurecooking.com/faberware-quick-cuisine-pressure-cooker-manual I assume it doesn’t have a low pressure option, which I rarely use in most of my recipes. All the other functions/buttons probably work very similarly to the Instant Pot buttons perhaps with different times. I’m not aware of any groups, but if I come across one, I’ll update my comment.
Hi Georgia, I have the Farberware 6qt Electronic Pressure Cooker from Walmart also. After a lot of research, I have figured that the list above for the IP buttons is similar to the chart on pg 12 of the Farberware operation guide, give or take 5 minutes for a couple of categories. All pressure functions are on high except for rice, which is low. That should make it easier for you to figure out standard Electric Programmable Pressure Cooker recipes. Since the highest psi for the Faberware electronic PC is 10 and for a stovetop PC is 15, you would want to add a few minutes when you use a stovetop PC recipe. I hope this helps give you a starting point for recipe conversions from other Electronic and Stovetop pressure cookers.
Thanks so much for your help Debra!
You’re welcome!
which is the best button to use for cooking steel cut oats? Porridge (which setting?) Multi-grain? Manual ?
thanks
I generally use the manual button for steel cut oats for 10 minutes on manual with a 10 minute natural release.
It would be helpful to know what is the minimum amount of water or liquid one should use when inventing a new recipe with the electric pc.
The minimum amount of liquid required varies according to which pressure cooker you’re using and also what ingredients you’re pressure cooking. Some meats and veggies will release lots of juices or liquid, so you can use less water. Typical though for an electric pressure cooker I use 1 cup of water or broth.
Yes! I took advantage of the Black Friday deal, and I’m so happy to have an Instant Pot. My current PC is showing signs of 15 years of wear and tear, from constant use. Question: Do you think it’s really necessary to buy the glass lid for the slow cooker program? I don’t slow cook much (why would I, when I can pressure cook). Have you used that feature yourself?
This was helpful – but what would also be helpful is what items to use for which button. What is the difference between when to use soup/stew/chili? Does steel cut oats or multi-grain hot cereal go into porridge or multi-grain? White rice/brown rice/wild rice? I know I can experiment and eventually work this all out for myself but if others have done it and can give hints as to when to use which setting for what kinds of ingredients it would save a lot of time and wasted food products,
Hi Jerry – my advice is to just use the manual button and not worry about using the pre-set buttons. Personally I think most of the pre-set buttons just complicate cooking in the Instant Pot. Find a recipe for what you want to cook and use the timing in the recipe and the manual button will give you the same or better results than using the pre-set buttons.
Thanks for posting Barbara ! BTW…..I made your NY cheesecake yesterday and it was wonderful ! Thanks for all of the information you pass along.
What a nice and helpful blog! Thank you for the info!
This is valuable information I couldn’t find in the manual. Thanks so much!
Appreciate all your posts and recipes! Enjoying using my instant pot..as usual I bought two weeks early before Black Friday! Oh well, we have made several of your recipes and haven’t had but one failure! I was excited to see how to do tapioca in the instant pot. I bought large pearl instead of small and I added the milk at the beginning AND I had a scorched burned on mess. But the nice stainless pot was forgiving and looks like new again. Will try again adding the milk later. Again thanks for the education. Hubby and I are 76 and 73 and share the kitchen duties after 53 years of marriage. Fun to learn how to use new kitchen gadgets!