
Water Test: Initial Walk Through with Your Instant Pot / Electric Pressure Cooker
Don’t be intimidated by your pressure cooker! If you’re new to pressure cooking and want to start slow, I recommend doing a Water Test. This is a no-worry way to familiarize yourself with your machine.
A water test is a great way to learn hands-on how your pressure cooker comes to pressure. It will also help you get used to the steps of pressure cooking.
I’ve written out a lot of specific details here—you’ll repeat the steps in this water test every time you cook at pressure. However, most of these details won’t be specifically written out in the recipe. They’re just good habits to get into from the beginning.
Setting Up the Pressure Cooker for the Water Test
Step 1: Choose a place to plug in your electric pressure cooker. You’re looking for a place where the steam will vent away from cabinets and walls.
Some people choose to place it on or right next to their stovetop; however, I don’t recommend this due to the potential to accidentally turn on the stove and melt the pressure cooker. (It really happens!)
Many brands of electric pressure cookers recommend placing your cooker on a heat-resistant counter mat, especially if you plan to use your pressure cooker on a wood table.
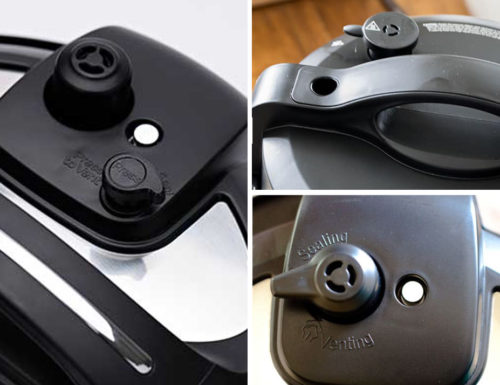
Step 2: Check that the pressure cooker lid is properly assembled. You want to make sure the sealing ring is in position and the float valve in place. Run your finger along the sealing ring to ensure that there are no bulges or gaps.
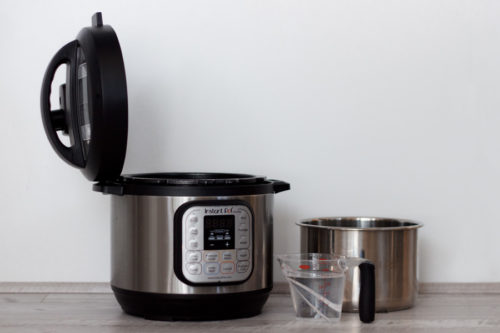
Double check that the inner pressure cooking pot is inside your housing. You can seriously damage your electric pressure cooker if you try to cook without the cooking pot in place inside the housing.
Bringing the Pot to Pressure
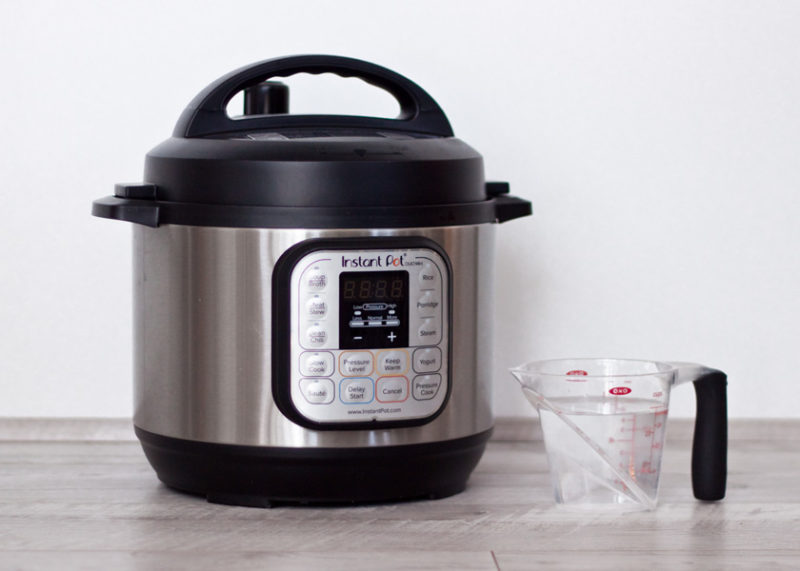
Step 3: Add 1 cup water to the inner pressure cooking pot. (Don’t forget—the pressure cooker doesn’t work without the water!)
Step 4: Close and lock the lid. Make sure the pressure release switch is in the Sealed position. Sealed is the term I use in my recipes; the exact terminology will vary by brand.
- Instant Pot Duo: Turn the pressure release handle from Venting (steam icon) to Sealing (triple-S icon).
- Ninja Foodi: Turn the pressure release valve from Vent to Seal.
- Crockpot Express: Turn the steam release valve from the Open/Release position (steam icon) to the Closed/Seal position (X over the steam icon).
- Power Pressure Cooker XL: Turn the pressure valve from the Open position (steam icon) to the Lock position (bulls-eye icon).
Step 5: Select the Manual/High Pressure setting and set 5 minutes for the cook time. Again, Manual/High Pressure is the term I use in my recipes; the exact terminology will vary by brand.
- Instant Pot Duo: To select High Pressure, use the Pressure Cook button, then use the plus (+) and minus (-) buttons to set the cook time to 5 minutes. (Older models of Instant Pot should use the Manual button in place of the Pressure Cook button.) No need to press start—after a few seconds, a beep will sound and it will start cooking according to your selections.
- Ninja Foodi: To select High Pressure, press the Pressure button, then use the up and down Temp arrows to choose High. Then, use the up and down Time arrows to set the cook time to 5 minutes. Then press the Start/Stop button to begin the cooking process.
- Crockpot Express: This pressure cooker doesn’t allow you to set a Manual cook time; therefore, you’ll need to choose the button with the closest cook time. For this recipe, select the Steam button and use the plus (+) and minus (-) buttons to adjust the cook time to 5 minutes. Press the Start/Stop button to begin the cooking process.
- Power Pressure Cooker XL: Since this pressure cooker doesn’t allow you to set a Manual cook time, you’ll need to choose the button with the closest cook time. For this recipe, select the Rice/Risotto button and, if necessary, use the Time Adjust button to set a 6 minute cook time.

Step 6: Wait for the Pressure Cooker to reach pressure.
Now, sit back and let the pressure cooker do all the work. It takes about 5 minutes for the water to heat up and build pressure.
Different brands of pressure cookers show the pressure building in different ways—some just read on, some have dots or lines that indicate it’s building pressure. During this time, you may see or hear steam coming from the float valve while the pressure is building.
Eventually, the steam will build up enough pressure to push the float valve up, which will seal the lid. The timer will start to count down as soon as the machine reaches full pressure inside the cooking pot.
Releasing the Pressure
Step 7: When the cook time ends, turn off your pressure cooker by selecting the quick pressure release.
Now we’re ready to release the pressure. You can choose to do nothing and let the pressure release on its own. This is called a natural pressure release, and it’s pretty anticlimactic. Just walk away until you hear the float valve drop and you can unlock the lid.
However, I’d recommend trying out the quick pressure release. On this step, it is SO important to keep your arms, hands, and face away from the valve—the steam is very hot and can burn. You can use a wooden spoon to turn the valve if you’re nervous.
(Stay tuned because in the next section, I’ll be teaching you more about the difference between Natural Pressure Release and Quick release).
To do a quick pressure release, carefully turn the pressure release switch to the Venting position so that the steam can escape.
- Instant Pot Duo: Turn the pressure release handle from Sealing (triple-S icon) to Venting (steam icon).
- Ninja Foodi: Turn the pressure release valve from Seal to Vent.
- Crockpot Express: Turn the steam release valve from the Closed/Seal position (X over the steam icon) to the Open/Release position (steam icon).
- Power Pressure Cooker XL: Turn the pressure valve from the Lock position (bulls-eye icon) to the Open position (steam icon).
As soon as you turn the switch, you’ll see and hear a loud jet of steam coming from the pressure release switch.
Step 8: Remove the lid very carefully.
Once the steam is completely dispersed, you should hear the float valve drop. When this happens, the lid unlocks. Carefully remove the lid, tilting it so that the steam vents away from you. The metal parts of the lid will be hot and may have hot droplets of water. Be sure to place the lid somewhere safe.
Use hot pads or silicone mitts to remove the cooking pot to cool.
If something got misplaced during the water test, check out our favorite Instant Pot accessories and parts here.
>>Now that you’ve completed the water test, you’re ready to move on to the next section!
Part 4 in our Getting Started Guide will help you Make Your First Meal in your electric pressure cooker. In under 30 minutes, you’ll have a delicious barbecue chicken cooked up and ready to top sandwiches or salads.
Then, when you’ve got your confidence built up, move on to some easy pressure cooking recipes.
Before you know it, you’ll be making fabulous pressure cooker meals and wondering how you ever cooked without it!
The How To Use an Instant Pot / Pressure Cooker Getting Started Guide Series
- Pressure Cooker Parts Reference Guide
- Water Test Run for the Instant Pot / Electric Pressure Cooker – you’re here!
- Choosing a Pressure Release Method
- Make Your First Meal in Your Pressure Cooker
- Easy Recipes to Make in Your New Instant Pot / Electric Pressure Cooker
Other How To Guides
- How to Get a Pan Out of the Pressure Cooker / Instant Pot
- How to Know Which Instant Pot Button You Should Use?
- How to Use the Pot-in-Pot Method in Your Pressure Cooker / Instant Pot
- How to Convert a Recipe to a Pressure Cooker Recipe
- How to Pressure Cook Frozen Chicken Breasts
- How to Cook Pasta in the Instant Pot / Electric Pressure Cooker
- How to Make Perfect Pressure Cooker Cheesecake
Want to jump to cooking? Here are some easy beginner’s recipes to get you started:
- Easy Recipes for the Pressure Cooker
- How to Pressure Cook Frozen Chicken Breasts
- How to Cook Pasta in the Instant Pot / Electric Pressure Cooker
- How to Make Perfect Pressure Cooker Cheesecake


I have a power cooker. I ordered a new gasket and a stainless steel cooking pot. I replaced the gasket and used the new stainless pot. These new parts look exactly the same as the old. I made my meal and started the cooking process. It built pressure fine and then I heard a “POOF” . The cooker suddenly released pressure. It was steaming around the lid. All the new parts look exactly the same. I then reset the cooker pressure and time and it worked ok. I then added more ingredients and it suddenly released again.
Is it the gasket or the new stainless pot?
Hi Candy – my guess is it’s the stainless pot. Typically the gaskets are pretty interchangeable but I’ve found the pots are not. Sorry – that’s frustrating.
I am also a newbie to pressure cooking, I have the 8 quart Instant Pot Duo, and my question is what is the minimum amount of liquid you have to use in order for the pot to come to pressure? Most recipes are based off a 6 quart and I am always second guessing myself on how much liquid I need to use.
Hi Kelly – officially 2 cups liquid for an 8 Quart cooker. However, if you have ingredients like chicken, pork, and beef that release a lot of liquid as they cook, you can use less. Have fun!
I just got my Instant Pot and was doing a water test, following the instructions that came with the pot. After releasing the steam it was releasing and steaming for what seemed like ten minutes. I was reading the instructions over and over. Finally I Googled and found your post which said to TURN IT OFF before releasing. The Instant Pot instructions didn’t say that! Thanks for your help!!
Hi – Betty, sounds like you’re off to a great start with your Instant Pot by doing the water test. I like to turn off the Instant Pot before releasing the steam so that I don’t forget to do it later and remove the inner pot and forget to turn it off. If you leave the IP on, it will start to count up the time that it has been on the Keep Warm setting, which a lot of people find useful. It’s really just a matter of figuring out what works best for you. The Keep Warm setting doesn’t kick in until all the pressure has been released, so it shouldn’t matter if the IP is on or off when releasing the pressure, the pressure release should take the same amount of time. When you’re waiting for it to release, it can seem like it’s taking a long time, especially the first time. Have fun!
I just noticed this because I’m introducing my daughter to the Instant Pot today.
On my previous stove-top pressure cookers (Kuhn-Rikons), they recommend to measure the amount of water remaining after the quick release to see how much, if any, is lost during the cooking to ensure that the seal is working and that the gasket is not damaged.
I realize that the Instant Pot is totally sealed but wondered about steam being released before the float valve pops up. Has this accidentally been omitted from the Water Test instructions or is it simply never necessary for the electric cookers?
I would like to know more about canning in my pressure cooker.
Hi Dora – unfortunately, unless you have a larger pressure canner, the USDA hasn’t approved any electric pressure for canning. You can, however, do hot water bath canning. https://www.friedalovesbread.com/2017/09/safe-steam-canning-with-your-instant.html
“Close and lock the lid. Make sure the pressure release switch is in the Sealed position. Sealed is the term I use in my recipes; the exact terminology will vary by brand.
•Instant Pot Duo: Turn the pressure release handle from Sealing (triple-S icon) to Venting (steam icon).
•Ninja Foodi: Turn the pressure release valve from Seal to Vent.
•Crockpot Express: Turn the steam release valve from the Closed/Seal position (X over the steam icon) to the Open/Release position (steam icon).
•Power Pressure Cooker XL: Turn the pressure valve from the Lock position (bulls-eye icon) to the Open position (steam icon).
Select the Manual/High Pressure setting and set 5 minutes for the cook time. Again, Manual/High Pressure is the term I use in my recipes; the exact terminology will vary by brand.”
This information is completely contradictory & can’t be correct, can it?
Thanks for catching that, Bonnie—you’re right that I had it backwards in the individual brand sections. I’ve updated the post.