
How to Use the Pot in Pot Method in Your Pressure Cooker (Instant Pot)
Wondering how to use the pot-in-pot method to cook in your pressure cooker? This tutorial will walk you through the whole pot-in-pot process—how to set it up and what equipment you’ll need, as well as tips for adapting recipes to cook pot-in-pot!
Have you tried pot-in-pot cooking yet? The pot-in-pot method (sometimes shortened to “PIP”) of cooking in the electric pressure cooker has several benefits!
- Cooking pot-in-pot lets you make a dish in the pressure cooker without dirtying the inner cooking pot, which is useful if you plan to use the pressure cooker again (for instance, making white rice to serve with your Beef and Broccoli).
- Pot-in-pot also lets you make two separate parts of the meal at the same time in the same pressure cooker (making white rice while the lemon chicken cooks below).
- Pot-in-pot is necessary for “baking” things like cheesecakes in the pressure cooker.
- It’s also automatic portion control—the pot-in-pot method uses cute, smaller-size dishes like cake pans, half-size Bundt pans, mason jars, and ramekins.
- Pressure cooking is a great way to reheat many foods.
I recently had the chance to walk a friend through the pot-in-pot method, and I thought I’d take some photos to share with you!
You’ll find lots of pot-in-pot recipes in my dessert cookbook, Instantly Sweet. (Have you ordered your copy yet?)
How to Cook Using the Pot-in-Pot Method in Your Pressure Cooker/Instant Pot
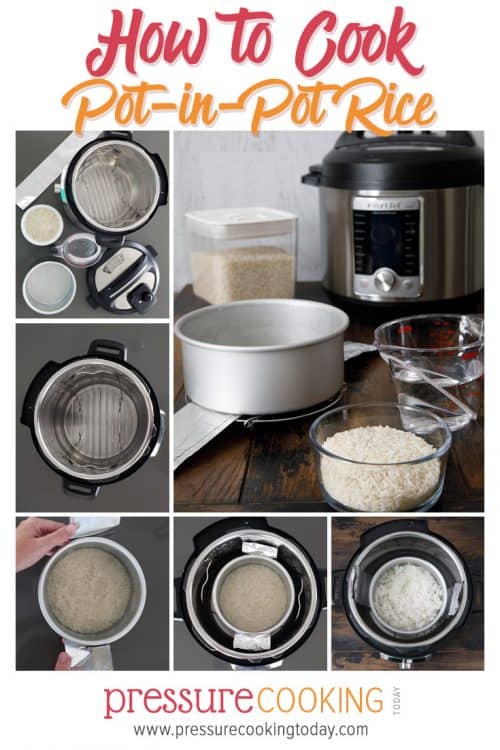
For this tutorial, I’ll be adapting my classic white rice recipe to use the pot-in-pot method.
Equipment
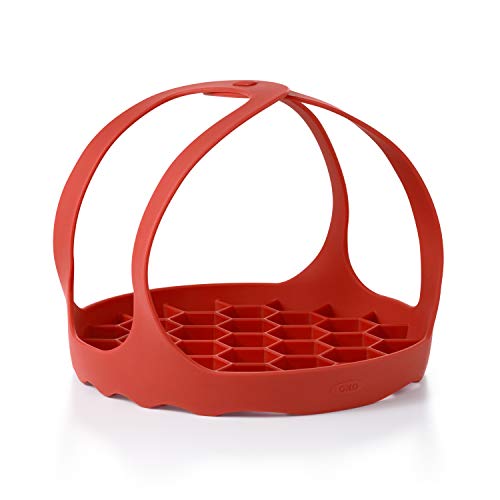
First, you’ll need to assemble your equipment—in addition to your pressure cooker, you’ll need a trivet, an oven-safe pan or glass dish, and a sling or retriever tongs.

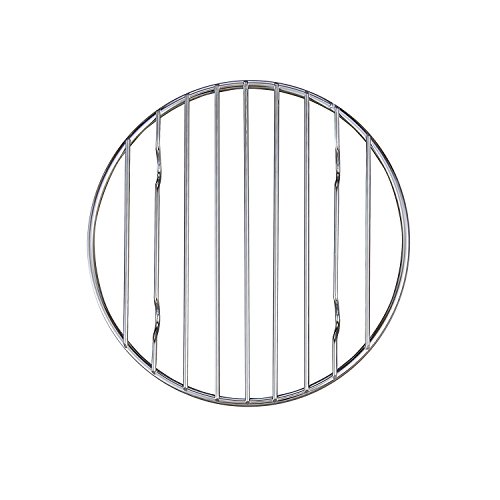
Many pressure cookers come with a trivet (also called a cooking rack with feet)—some are lower than others, and some have handles to make it easier to remove the pot. If your pressure cooker came with a trivet, you’re good to go. If you need to purchase one, I highly recommend having both a low trivet for cooking taller pans and a high trivet for cooking one-pot meals.
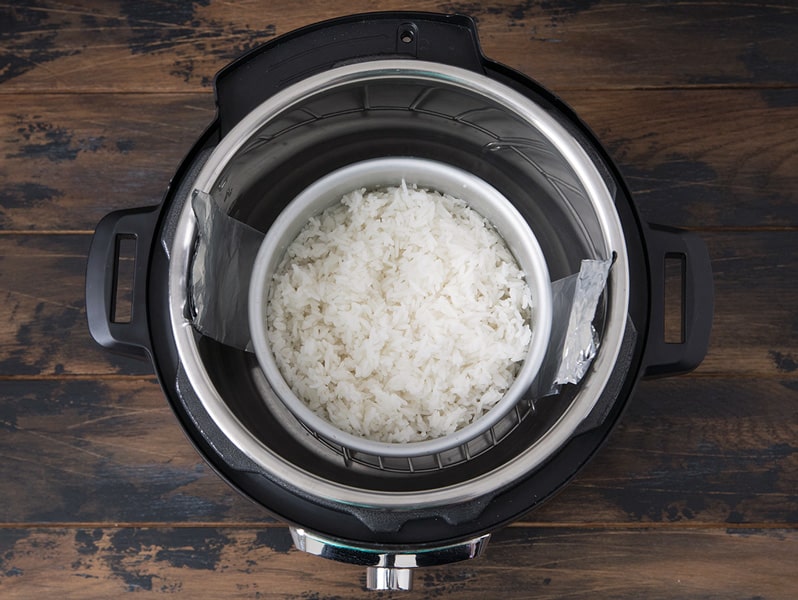
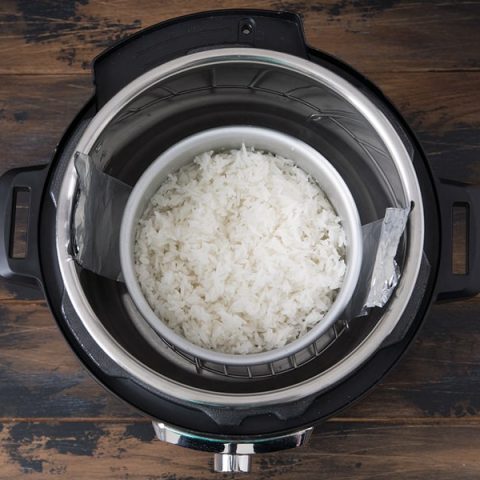
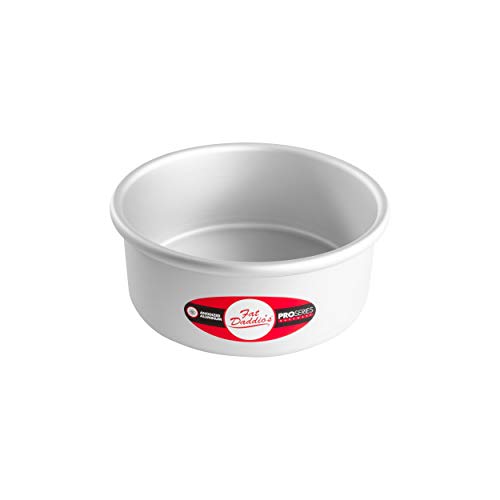
As far as the cooking dish goes, most oven-safe dishes will work as long as it fits in your pressure cooker with enough room for the steam to escape around it. Many people like to cook their rice in a Pyrex or other serving dish; however, some people shy away from glass. Do what you’re comfortable with! I’m partial to using my 7×3-inch round cake pan—it really is my workhorse in the kitchen.
You can make a simple sling by folding a long strip of aluminum foil in thirds lengthwise. Since I cook pot-in-pot so often, I’ve made a reusable sling by cutting a large silicone pastry mat lengthwise into 4-inch strips. I also love to use my retriever tongs to remove the pot-in-pot pan from the hot inner cooking pot. As always—go with what works for you!
Process
The MOST important thing to remember about pot-in-pot cooking is to add water to the cooking pot BEFORE lowering in the pan! Pressure cookers need steam to cook—the water added to the bottom of the pressure cooking pot is the key to creating this steam! I like to add the water to the pressure cooking pot first thing so that I don’t accidentally forget this step once the pot-in-pot is in place.

The amount of water needed will vary depending on the cook time; however, for most things (cheesecake, rice, eggs, veggies), add 1 cup of water to the 6 quart pressure cooking pot, then place the trivet on the bottom.
In your oven-safe dish, add the ingredients and stir. Center the oven-safe dish on the sling, and use the sling to carefully lower the pan onto the trivet. Fold the sling so that it doesn’t interfere with closing the lid.

Lock the lid in place and cook as directed. When the time comes, remove the lid and unfold the sling. Use the sling to remove the oven-safe dish from the pressure cooker. (Be careful, since the cooking process can make the sling hot and slippery.)
I like to use my mini mitts to get a good grip on the sling since they’re all silicone and easy to wash, but any oven mitt will work. Other people prefer to use retriever tongs to grab the sides of the pan and lift it out. Use whatever you have on hand to do what works best for you!

Recipes that Use the Pot-in-Pot Method
If you’re brand new to cooking pot-in-pot, I’d recommend you start with a few recipes that are already written to use the pot-in-pot method.
Red, White, and Blue Cheesecake (or any other cheesecake recipes)
Spinach Artichoke Dip
Barbecue Bacon Meatloaf (OK, technically this one doesn’t use a pot in another pot—the meatloaf itself rests on foil—but the principles are the same)
Lemon Chicken (see it in action in the video and follow the tips listed at the bottom of the recipe)
More Pot-in-Pot recipes from The Electric Pressure Cookbook
Mexican Breakfast Casserole (p. 41)
“Baked” Cheese Ravioli (p. 124)
Penne and Homemade Marinara Sauce (p. 200)
Buttermilk Cornbread (p. 261)
Nearly the entire dessert section (starting p. 277)
Adjusting a Recipe to Use the Pot-in-Pot Method
Once you’ve familiarized yourself with the pot-in-pot method, you can start to get a feel for what kinds of recipes it’ll work with. Here are a few guiding principles I use:
Choose Similar Ingredients to Another Pot-in-Pot Recipe
One of the easiest ways to adjust a pot-in-pot recipe is to choose a recipe that uses similar ingredients and base your cook time off of that. For example, if you want to make a Snickers Cheesecake, I recommend starting with my Peanut Butter Cup Cheesecake recipe and adapting it to your candy of choice. (Candy, chocolate chips, and other mix-ins to the cheesecake batter require a longer cooking time.)

Choose Foods with Similar Cook Times
Choose recipes with similar cook times—for instance chicken breasts diced into large bite-size pieces cook in 3 or 4 minutes with a 10-minute natural pressure release, which is an excellent match for the cook time of white rice! For example, you can make my Indian Butter Chicken and rice at the same time! Simply cut the chicken thighs into large bite-size pieces so they cook more quickly. Then add a trivet and rice as directed in the white rice recipe below and reduce the High Pressure cook time to 4 minutes with a 10-minute natural release.
Chicken is also an excellent match for pastas. To figure out a cook time for pasta, simply take the time listed on the box, divide in half and then subtract a minute. (For example, the time listed on my box of bowtie pasta is 12 minutes, so in the pressure cooker that bowtie pasta should cook in 5 minutes.)
I love to serve my Chicken Lazone over pasta, so when I want to use the pot-in-pot method, I saute the chicken in the cooking pot, then transfer the sauteed chicken to my cake pan. I’ll wipe out the pot, then cook my spaghetti in the bottom of the cooking pot with just enough water to cover the noodles. I’ll rest the cake pan on a tall trivet in the cooker and cook for 3 minutes with a quick pressure release.
Change the Size of the Meat
Large cuts of meat require much longer in the pressure cooker than that same cut of meat diced into bite-size pieces. So if you want to cook a side with a longer cook time, consider changing up the size of the meat. For instance, the thinly sliced beef strips in Beef and Broccoli only take 12 minutes at high pressure, so they’re too long for white rice and too short for brown rice. However, beef cut into 2- or 3-inch cubes would need about 20 minutes at high pressure, making them a good match for brown rice, which has a 22-minute cook time and a 20-minute natural pressure release.
Don’t Be Afraid to Add Time
Since the trivet lifts foods up and away from the heating element on the bottom of the cooking pan, foods occasionally need an additional minute or two at high pressure. When first adjusting a recipe, I recommend starting with the original time listed in the different recipes and testing for doneness. For example, if I use a tall trivet when just cooking rice pot-in-pot, I will use a 4-minute cook time to make sure the rice cooks through.
Reheating Food In The Instant Pot / Pressure Cooker
You’ll use the same pot-in-pot method listed above to reheat food in the Instant Pot / Pressure Cooker.
- insert a trivet
- add water (1 cup for a 6 quart pressure cooker)
- add food you’re reheating into a dish (I usually use a 7×3-inch round cake pan for reheating food)
- use a sling to lower the dish onto the trivet (I generally do not cover the pan when reheating food) If you use this sling, it works as your trivet and your sling.
- use a 5 to 10 minute cook time, depending on what you’re reheating
OK, that’s it! Do you have any questions about cooking pot-in-pot? Leave me your questions in the comments!
Perfect Pot-in-Pot Pressure Cooker White Rice
Ingredients
- 1 cup long-grain white rice, rinsed*
- 1 1/4 cups water
- 1/2 teaspoon salt
Instructions
- Place a trivet in the bottom of the pressure cooking pot and add 1 cup water to the bottom of the cooking pot.
- In a 7×3-inch cake pan or oven-safe dish, add the rinsed rice, 1 1/4 cups water, and salt. Stir and ensure all rice is covered.
- Lock the lid in place. Select High Pressure and 4 minutes cook time.**
- When the cook time ends, turn off the pressure cooker and allow pressure to release naturally for 10 minutes, then finish with a quick pressure release.
- Use the sling to carefully remove the oven-safe dish from the pressure cooker. Fluff rice with a fork or the rice paddle that came with your pressure cooker.
Notes
*This white rice recipe works well with basmati, jasmine, short- and long-grain white rices, with no change to cook time or water content. **When I cook pot-in-pot, I find that the rice needs an additional minute or two from what a traditional, cook-on-the-bottom recipe calls for. A 4-minute cook time is perfect for me at 5,000 feet—start with that and add another minute if necessary.
Recommended Products
As an Amazon Associate and member of other affiliate programs, I earn from qualifying purchases.


Hi! I have an oldie Instant Pot Lux Mini. I want to make some veggie pea soup. I am thinking while writing this – do I ever put the one cup of water over the heating element? I don’t think so lol. So if making soup I don’t have to add water because my soup has lots. But if I were going to make chicken for instance would I add the water in the pot and put the trivet in and top it with the chicken? I haven’t used it in a looong time. Thanks for your help!!
Hi Anita – you always need to use a thin liquid in the pot. If you’re cooking pot in pot, the liquid (water) needs to be under the dish with the liquid in it. Your pressure cooker will not come to pressure with just the liquid in the cooking dish, you need liquid in your inner pot as well. It doesn’t matter whether your cooking soup or chicken in the dish on the trivet, you need waters underneath the dish as well. 🙂
I’ve got a 3 qt IP and want to cook 1/2 cup rice for the 2 of us. What changes do I need to ?
Thank you.
Hi Donna – I haven’t tried just 1/2 cup rice in my 3 quart, but you should be able to half this recipe without any other changes https://www.pressurecookingtoday.com/pressure-cooker-white-rice/
Have tried PiP grits twice now and both times the InstaPot never attained pressure! Manual 7 minutes on High. Ceramic ramekin in a mesh basket. 1 cup water in bottom. Recipe amount of water in PiP. After 1st fiasco I tested just the IP and it came up to pressure as it was supposed to.
Since the PiP never attains pressure it never gets to the Normal release stage.
What on earth am I doing wrong?
Hi Melissa – are you leaving enough space around the sides of the pot for the steam to come up around it?
Hi, do you soak the rice before cooking? For how long? And since you have mentioned that it takes 2 minutes more for a recipe to cook for pot in pot method, does it mean that the rice which took you 4 minutes for pot in pot would take only 2 minutes when cooked straight in the instapot container?
Also, how do you adjust timings if you are cooking 2 dishes using 2 pots & adding water to the base of instapot container? Does the cooking time of the dish in the lower pot & the upper pot both increase by 2 minutes or the lower pot takes the same time of cooking as when cooked in the instapot container while the upper pot item takes 2 minutes extra?
Hi Carol – no, I don’t soak my rice before cooking. I typically cook rice for 3 minutes plus a 10-minute natural pressure release https://www.pressurecookingtoday.com/pressure-cooker-white-rice/
The dish closer to the bottom cooks slightly faster than the dish above it. Although cook time will vary depending on the type of pan you’re using and whether the bottom dish is covered by the top dish or if there is a rack between the pans. A covered dish slows down the cook time.
Yes, you’ll add two minutes to both dishes and you’ll adjust the cook time so top and bottom are about the same. You can do this by cutting your meat into larger or smaller pieces so the cook time is similar.
Why do you need the foil sling if your trivet has handles?
If your trivet has handles and you can safely remove the hot pan without the foil sling, you do not need it. Some sizes of pans work better with the trivet than others.
Can i use the inner pot on the stove for sauting bacon,onions?
Hi Mary – if you have the Duo Evo Plus or the Pro with a flat bottom you can, but if yours has a domed bottom it is not meant to be used on the stove and you should used the Saute function instead.
Our national food needs plenty of finely chopped onions. After cooking chopped onions 12 minutes, Ethiopian spiced paprika, tomatoes sauce, and spices, oil is added. I keep getting burn message even after adding water to it. Am thinking pip might be the solution to solve the burn problem. If I have water in inner pot and continue cooking the onions and spices in pip. What do you think. Right now now I use instant pot to cook only onions. Any suggestion. Thank you
Have enjoyed your knowledge of pip
Hi there! Sometimes with the Instant Pot you have to change the order you add ingredients. My guess is the burn notice is coming from the tomato sauce—it’s one of the most common causes of the burn notice. If I were adapting this, I would probably saute the onions in the bottom of the cooking pot, then transfer them to the pot-in-pot, add 1 cup of water to the cooking pot, and pressure cook with the tomato sauce and spices for the remaining time you need. I hope that helps!
Just bought a pot to use inside my PC. Re rice recipe, 1 cp rice isn’t enough for my family. When I increase it is the ratio always the same; 1 1/2 cps rice to 2 cps water, 3/4 tsp salt? Cooking time the same?
Thanks for all the great tips! – I’m planning to make a CHRISTMAS PUDDING in my 6 quart IP and wasn’t sure if an inner pot with a 7. 5 inch diameter that is almost as high as the inner pot that comes with the cooker when standing on the trivet will still allow the steam to circulate properly. Somebody else had that same question, obviously, and it seems to be o.k.
I’ll try it out tomorrow!
Thanks Gabriele – glad the information was helpful. Good luck with the Christmas Pudding.
I have been trying to make perfect rice in my Instant Pot PIP method ever since my rice cooker broke several months ago. It never turns out right. I have used the 1:1 ratio ans it always turns out hard even after 10 minutes of pressure cooking. I would really like a fail-safe method, but none of the recipes I have tried come out right PIP. Today I used 1.5 cup water to 1 cup rice and after cooking twice for 5 minutes on high pressure it was still hard. The last time I tried 2:1 for 20 minutes and it came out mushy. I am so disappointed as it seems everyone gets it but me. I am a good cook so I a bit flabbergasted as to why it never turns out. I am about to give up and just purchase another rice cooker (what a waste!). Please help!
Hi Michelle – are you allowing the rice to steam at the end of the cook time? Letting it do a 10 minute natural pressure release at the end of the cook time so the rice steams and finishes cooking is essential. Here’s my recipe https://www.pressurecookingtoday.com/pressure-cooker-white-rice/ Although if you cooked your rice twice for 5 minutes and it was still hard, it makes me wonder if your pressure cooker is functioning properly. Are you having trouble cooking other things as well?
Dumplings are great this way! Make your chicken on the bottom as you normally would and fill a small dish with biscuit dough torn into dumplings.
Add a small amount of broth to your dumpling pan and steam as your chicken cooks. Much more fluffy than boiled dumplings. Take chicken and dumplings out to thicken your sauce then add them back in. You will want to cut your dumpling recipe in half for it to fit.
Thanks for sharing Heather! This sounds like something I need to try.
Can I cook kidney beans with the pip method?
Hi John – sure, but your cook time will probably be longer and you won’t able to cook as many beans. Why do you want to cook them pot in pot?
I bought a really tall inner pot. It’s about ¹/2 inch taller than the instant pot but the lid still seals (just) but I won’t be able to use a trivet. Is this okay? I haven’t done pot in pot but I want to. I want to make lasagne that calls for pot in pot.
Hi Serena – you do need to use the trivet under the inner pot and should not exceed the height of the inner pot.
I ordered the 7×3” pan on your link and just realized it’s aluminum which I absolutely never cook with.
Hi Tami – you’ll need to cancel your order through Amazon.
I’m really confused. If I,m cooking a sausage pasta and want to cook PiP vegetables on top in a separate stainless steel bowl. Do I need to add water to that bowl as well? I tried this earlier with just the stock liquid in the pasta dish, the pasta was delicious but vegetables were still raw after 8 mins and had to cook them separately on the stove which was frustrating
Hi Dave – what did you cook the vegetables in, did you cover the dish with foil?
Can you make soup in a pot in pot?
Hi Lyn – sure, just use a pot big enough to hold the soup when it boils (probably only fill it half full with ingredients) and use a trivet and water underneath.
I like the info you have given but it’s so hard to read since on the side of the page, it has the “P”, “F”, “tweet” blocks that cover the first part of each line. I can only read above or below these blocks so can only read a few lines at a time. Is there a way to remove these blocks? Thanks.
Thanks for the feedback. As requested, I have removed the buttons.
have you done Mac and cheese with the pot in pot? see it’s just me and hubby so I don’t need a big pot and can u cook the noodles and cheese in the smaller pot. hubby bought a smaller pot with handle and it’s kinda rubber can that be out in pot as well I am new so the kill things I need help with haha I did make rice a Roni and spaghetti one time so ya I’m gonna use it alot thanks Pam
Hi Pam – I haven’t done mac and cheese pot in pot, but I think it would work. At the end when you’re making the cheese sauce though you may have to dump the cooking water and use the larger pot to finish making the cheese sauce https://www.pressurecookingtoday.com/macaroni-and-cheese-in-the-pressure-cooker-and-a-giveaway/ so I’m not sure there’s much benefit to doing it pot in pot.
can I put a plastic bowl that comes with a steamer in my pressure cooker. and put water in the bottom and follow the recipie for rice or what ever. thanks lida
Hi Lida – if it’s meant for steaming and it’s silicone, you can use it in the pressure cooker. If it’s not silicone, I probably would not use it.
Wondering about a pot in pot stainless container that is about a half inch above the rim of the inner liner. I measured to be sure there is additional space on top and the lis closes easily. Thoughts?
Hi Judy – I have never tried it so I hesitate to recommend it.
When cooking high pressure, and you need further cooking, or go to a different function, pot goes back to heat setting, which takes 13 minutes. During this heating time, food will be cooking, so it’s hard to adjust how much time to add. Any suggestions? Say you make soup and it’s 15 minutes, In reality it’s, 13 mins To heat up the pot,, 10 minutes natural release. So saying you can cook soup in 15 mins is misleading, it takes 38 minutes.
Any. Suggestions or comments appreciated.
Hi Elaine – it’s best to think of it like you would cooking pasta the time on the package doesn’t include the time it takes for the water to boil before you can add the pasta. After a while, you learn to estimate the time it will take for the pressure cooker to come to pressure. A big pot of soup will take much longer to come to pressure than only 1 cup of liquid would. When the pressure cooker and ingredients are hot, the pot will come to pressure much faster. Again the example of a pot of pasta water, if it is still steaming, it will come to a boil much faster.
Great blog for an Instant Pot newbie like me.
I now have an 8 qt Instant Pot. Too big for just me and hubby for a daily meal, but great for Ham, Large Beef Roasts.
Question, if I put the insert for a 6qt inside the 8qt, do I need to add liquid to the 8qt if there is liquid going into the 6qt?
Recipes call for liquid, meats, veggies, etc and all goes into the 6qt insert and you ‘hit start’, but can you place the 6qt insert inside a DRY 8qt insert so that the smaller insert is sitting right on the larger insert?
Thanks for any advice
Thanks Barb – glad you’re enjoying my site. Yes, you would have to use 2 cups of water underneath the 6 quart inner pot – the pressure cooker will not come to pressure without liquid and you’d get the burn notice if the liquid was just in the 6 quart pot. Generally, when you cook pot in pot https://www.pressurecookingtoday.com/how-to-use-the-pot-in-pot-method-in-your-pressure-cooker-instant-pot/ you also use a rack underneath the pot. I’m not sure the 6 quart inner pot would fit in the 8 quart with a rack, but you could give it a try 🙂
Can I cook russet potatoes in the bottom pot of stacked pots and steam sweet potatoes in the upper pot? The cooking times are the same.
Hi Marshall – yes, that should work well.
Just to compare, I cooked 1 cup jasmine rice in a ceramic souffle dish and then did the same in a metal pan. Sure enough, the rice cooked in the ceramic dish was a little on the al dente side when coming out of the IP. It did, however, soften up after standing at room temperature for a while. The rice cooked in the metal pan was perfect right out of the cooker.
Question – When cooking 1 1/2 cups, 2 cups, and more dry white rice, how do you adjust the water ratio? I seem to remember that the water is not increased proportionally.
Can I make a beef roast using pot in pot? I like to use cream soups to cook with my roast and the thick gravy sticks
Hi Jean – yes, you can make roast beef pot in pot as long as you have a large pressure cooker with a large pot that will accommodate the size of the roast.
Is Corning Ware safe to use in the Instant Pot? It says oven safe on the bottom.
Corningware (as well as Pyrex) officially says that their dishes aren’t for use in the Instant Pot because they haven’t been tested for those conditions. (Honestly, I think it’s to cover their butts for liability reasons.) So that’s their strict answer. *However* thousands of people do use Corning Ware in their Instant Pot without a problem. Ultimately, it’s up to you and whatever you feel comfortable with.
(Also, I wonder if this will change soon since it sounds like Instant Pot and Corelle/Corningware/Pyrex are now owned by the same company?)
This sounds like a wonderful idea. I’m still not too confident about cooking in the Instant Pot, and appreciate all this information. Would it be possible to cook pasta with this method?
Thanks
Thanks Sharon – glad it was helpful! You can cook pasta pot in pot – a lot of people cook pot in pot lasagna. Here’s my post on cooking pasta https://www.pressurecookingtoday.com/how-to-cook-pasta-in-the-instant-pot/ Have fun!
Thanks for all the good questions users have asked.
Mine was “ when do you cover the pot in pot”? You stated it’s not necessary for rice and that some things cook too slow covered. Is there a time when you do cover.
Hi Sherry – I rarely cover when cooking pot in pot anymore. I was more cautious at first, but after more experience cooking pot in pot, I find that covering really isn’t necessary. One exception is cakes because I like to use a paper towel to absorb some of the moisture, so I use tin foil to keep the paper towel in place.
If you are cooking 2 things that need liquid added to both (say rice and curry)—- do you need to adjust the amount of liquid for each?
thanks
Hi Peter, if I understand correctly, you’re asking about adjusting the liquid in the cake pan as well as in the cooking pot? If you’re cooking foods just pot-in-pot over water, you just need 1 cup of water in the cooking pot and then whatever amount the recipe calls for in the cake pan suspended on the trivet.
Or, if you’re cooking meat on the bottom of the pan and rice on the top, you’d simply follow the recipes and use the liquid called for in each recipe. You don’t need to add or subtract any additional liquid.
I’d like to cook a lot of fish and wondering if I can use the stackable pans for this and put fish in both the top and bottom pans?
Thanks!
Kristi
Hi Kristi – you can use the stackable pans and put fish in both the top and bottom pans. The bottom pan tends to cook a little faster, so if you have pieces that are a little thicker, put them in the bottom dish.
So way too much water for the rice. Very disappointed.
Hi Christin – the recipes works for most. What type of rice did you use?
I’m new to IP cooking and would like to use a stackable PiP, which I have bought. I’m reading recipes and some say meat in the bottom pan because meat needs more time/heat to cook and other recipes say meat in the top pan, rice/vegetables in the bottom. Even the various stackable PiP manufacturers seem to disagree on which method works better.
Any thoughts?
Laurie
Hi Laurie – my experience has been that the bottom pot cooks faster than the top pot. It’s best if you can cut the meat, vegetables so that they have a more similar cook time.
There was a question about using pot in pot where the dish you are using is fairly snug fitting in the pot. Is that sufficient for the steam required to cook? I have the same question, it leaves max 1/4” on either side. Is that enough space? Also does it matter how high the dish is as long as the lid will fit and lock easily? Thanks
Hi Elaine – yes if you have at least 1/4 inch around the edge of the pan and it doesn’t interferre with the lid locking in place, you should be fine.
I have a 6 quart Lux Instant Pot. I have a Daddio 8 inch metal pot and it will fit in my Instant Pot but snug and comes to top on the inner pot. How much roorm do you need to use PIP cooking?. Will the steam come thru on snug fit?
I just got 6qt Instant DUO. Tried to cook Basumati Rice, moong beans and lentils all separate days in a mixing bowl with round bottom, none of the items cooked in spite of cooking for 3 times the recommended time, I have to finish cooking all the items on the stove top. I followed all the instructions you mentioned. Is it the mixing bowl with round bottom a problem? I was disappointed as I had heard so much about Insant pot
Did you have liquid in underneath the bowl as well as liquid in the bowls? What settings were you using?
I face the same issue as well. While everyone raves about pip cooking, I am unsuccessful at it. I tried altering the cooking time and added more water in the inner pot. The stackable pots were not too hot to touch after 12 minutes of pressure cooking and 10 minutes of NPR.
I would also love some advice regarding reheating frozen foods in my Instant Pot. It always seems to take so much longer than stated in any of the guidelines I could find. For example, I tried to reheat (from frozen) cooked BBQ chicken thighs in an Exovana stainless steel pot, covered. After 15 minutes high pressure + 20 minutes Natural Release, they were a barely warm 85 degrees.
Yesterday, I used the PIP method to reheat a bowl of frozen pasta, and it took 30 minutes high pressure + 20 minutes Natural Release.
I don’t understand why it is taking me so much longer than anyone else. Can you give me any pointers please?
Hi Maureen – Have you tried not covering the pot? Most things do not need to be covered in the pressure cooker and it slows down the cooking. Are you freezing the food flat and individual or in a big frozen clump? Things will cook much quicker if it’s not as thick.
I HAD been covering everything that I reheated because I did not want condensation to drip all over the food. (The 2 chicken thighs were frozen individually and flat.) I’ll try uncovered next time.
Thank you for your reply Barbara!
Hi, I tried the PIP method for rice didn’t get cooked. Tried both in manual mode for 10min and Rice mode but no luck. Any ideas what I could be going wrong? Thanks in advance!!
-K
Hi Kavya – what dish did you use? A metal pan conducts heat better and covering the pan with foil will slow down the cooking process. Rice needs to steam after cooking as well. Did you allow for some natural release time?
I’m brand new.. brand new and terrified. But I’m willing to baby step. I just received an 8qrt duo plus from Williams Sonoma and a 6qrt viva from QVC. I have a mesh basket, a colander, a trivet, a springform pan and an egg plate thing for the 8 art. The 6 art was a surprise to me yesterday! So I’ve no Accessories for it.. yet. I’ve gone to your Amazon link and when I’ve money saved, will buy the extra pot. A set of Stackable pans, a fat daddio pan, a mesh and colander and those pincher things.
..
I looked at 2 of your recommendated cookbooks, the dessert one said not available YET. but they are on my wish list as well.
…
I will be doing fish, beef and soups, yogurts, and desserts in these pots. A minimum of chicken. And rarely will I use pork or root veggies, never using peppers(allergic) so I’m hoping your books will be able to help me in my quite limited repertoire of foods. ?. The happy news for me, no more clear liquid or baby food diets. Since my surgery on my spine.. I’m much better at eating. Now I hope I get much better at cooking it!
…
I just had to share, I’m blessed to find your website. And I do better with VIDEOS as from the head injury, I suffer short term memory loss to a degree. Do you have a link to ALL your VIDEOS? A fellow gardener, Larry Hall, put up a website — just VIDEOS. O my. Helps me ALOT. I hope you might have the same.
Thank you for letting me blather. And you can write me with any special instructions blue angel diver at USA dot com. Thank you, Blue
It sounds like you’re off to a great start! I’d definitely start off with the Electric Pressure Cooker Cookbook first—it has a great getting-started guide. As for videos, Barbara keeps her whole collection on her Facebook page, along with some step-by-step videos where she cooks the recipe with viewers. YOu can find those here: https://www.facebook.com/pg/PressureCookingToday/videos/
When you talk of cooking rice and chicken at the same time, do you put the chicken and its ingredients in the bottom, then put the trivet on that, and the rice in a pan on the trivet? Do you then need a tall trivet?
Since the trivet that came with my IP has handles I’m wondering – is the sling necessary for some reason I’m unaware of? I have made crustless quiche PIP and didn’t use a sling but lifted out with the handles.
Hi Janet – yes, if the handles work well for you, you don’t need a sling. Sometimes the handles seem to short or are too close to the pot for me.
Here is a link to a turkey sling on Amazon
…………….https://www.amazon.com/Bekith-Thanksgiving-Silicone-Lifter-Helps-Grilling/dp/B00N9V3IVK/ref=sr_1_1?ie=UTF8&qid=1534154178&sr=8-1&keywords=turkey+sling
What a FANTASTIC post & so helpful, as always, thanks Barbara! I cook my rice exclusively PIP & love it! I’d like to convert my roux-based recipes to Instant Pot & would like your thoughts on how to do that PIP. My pressure cooked dishes seem ‘watery’ tasting due to the amount of water needed to get to pressure, if that makes any sense, & there is no evaporation. On the stovetop, thickness is achieved by roux + reducing liquid long & slow, which also intensifies flavor. Adding cornstarch after pressure cooking (don’t laugh, I use Wondra instead ?) works to get sauce/gravy thickness, but not the more intense flavor from liquid reduction & I find myself adding cook time in sauté to reduce the liquid. I can make a great roux + seasonings in the pot on sauté, then move to pip bowl, add meat & pressure cook. It’s at this point I need help please. I.E. Does a thicker sauce or gravy affect cook time for meat submerged in it? Using stacking pans, should they be covered or uncovered and/or rotated during cooking since bottom pan cooks faster? thanks in advance!
Your pasta calculations are awesome! And I second Carol, how to reheat food in the pressure cooker would be soooo helpful – hit or miss & still haven’t figured out a halfway consistent formula.
Thank you very much for the helpful, informative post!
Have you ever thought of using a “turkey sling” to lift the PIP out. Would need to be trimmed down to fit but it is only silicone so can be trimmed easily. Seems like it would be so much safer.
Hi Sue – I’m not familiar with a turkey sling.
Wouldn’t it be easier to just get a second cooker? Is this too obvious?
Hi Gene – a second cooker is a great option too. I love having more than one pressure cooker. However, it is nice to only have to wash one pot and one pressure cooker lid. If you have room in the pot and the cook time is the same, why not cook them at the same time. Also, pot in pot cooking is how you cook cheesecake and other desserts 🙂
What a fantastic post-so much valuable information. I do quite a bit of pot-in-pot cooking now that I think about it. Cheesecakes for sure,, puddings, all easy and great end results .One of my favorite pot-in-pot recipes is the Braised Chicken Thighs with Creamy Polenta in your cookbook. We absolutely LOVE it-and it’s so nice having everything cook together.
What I would love to know more about is reheating foods using this method in the pressure cooker. I tried it once but must have messed up somewhere because what I was trying to reheat barely warmed through…maybe not using enough time since the food was straight out of the refrigerator? I would love to be able to use my stacking pans to reheat a couple of things at the same time rather than use the microwave.
Thanks as always Barbara-off to pin so I can pull this post up quickly when I need it. 🙂
Thanks Carol – a post about reheating foods in the pressure cooker is a great idea!