
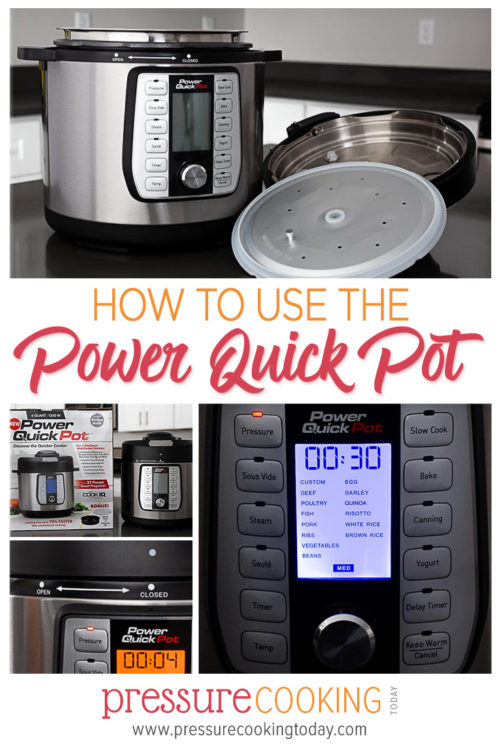
How to Use the Power Quick Pot Pressure Cooker
The Power Quick Pot is one of the newest electric pressure cookers on the market. Here’s everything you need to know about how to use the Power Quick Pot.
Lately Barbara and I have been getting questions about the Power Quick Pot, so we decided to buy a 6-quart to test out. The Power Quick Pot is higher quality pressure cooker by Tristar, an as-seen-on-TV brand that also makes the Power Pressure Cooker XL.
This past weekend we got together for the great unboxing! (Watching Barbara unbox a pressure cooker is a treat—she knows exactly what she’s looking for and gets so excited when she notices things she loves!)
If you’ve recently purchased or received a Power Quick Pot as a gift, here’s what you need to know to get started!

What you’ll love about the Power Quick Pot
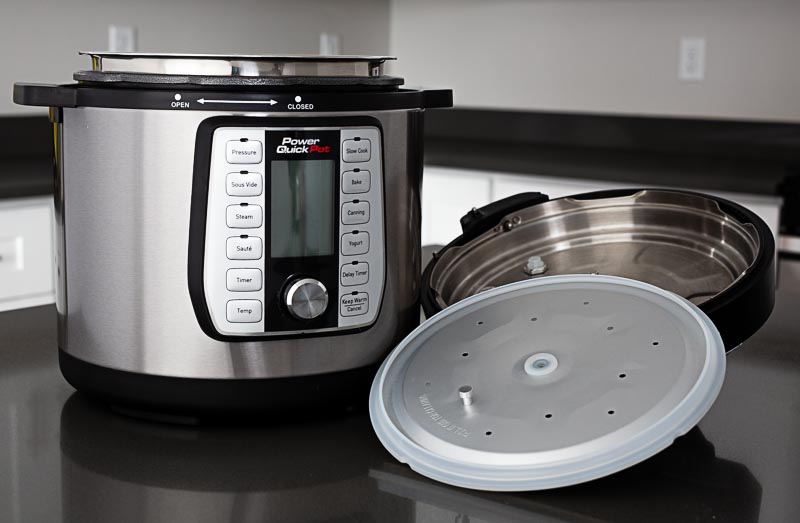
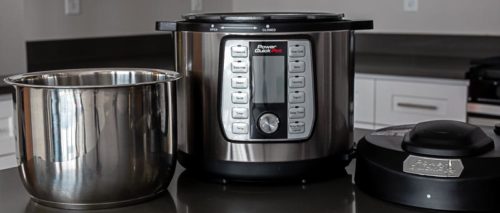
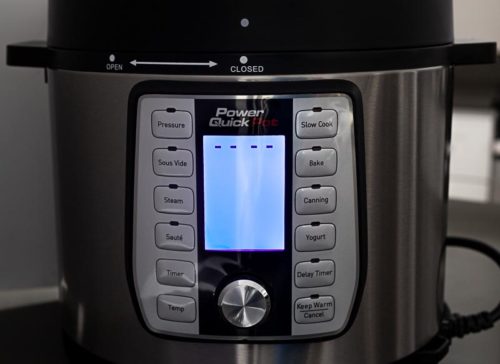
In design, the Power Quick Pot takes cues from the higher-end Instant Pot Ultra, with a spinning dial and multiple preset options. It has a thick, stainless steel pot, which is a big upgrade from the Power Pressure Cooker XL.
Another upgrade from the Power Pressure Cooker XL is the dedicated saute setting and the ability to customize the time and temperature in this setting. You can cook delicate sauces as low as 95°F and you can sear meats as high as 360°F.
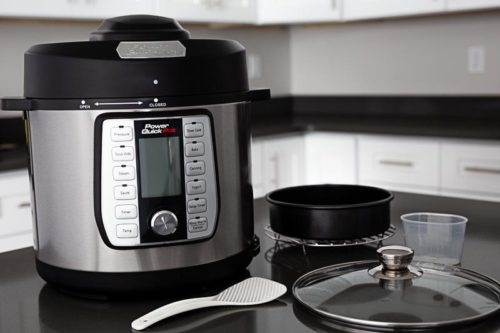
The Power Quick Pot is available in 4-quart, 6-quart, 8-quart, and 10-quart sizes. This is nice if you’re cooking for two or for a crowd; however, keep in mind that most pressure cooker recipes are written for the 6-quart size. If you are using one of the larger sizes, you’ll need to use more liquid in your recipes.
The Power Quick Pot comes with accessories including a casserole pan, a trivet, a ladle, and a glass lid. Instant Pot and other brands offer these items for purchase. (The casserole pan may be a little short for cooking some pot-in-pot meals, but it’s still nice to have included.)
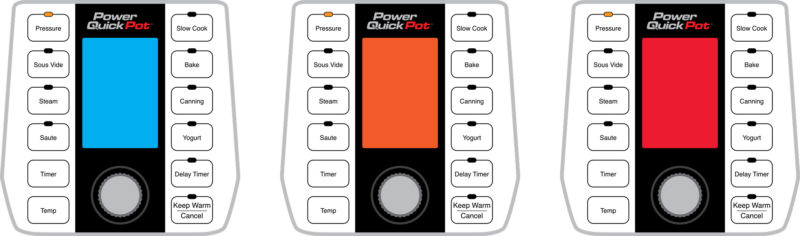
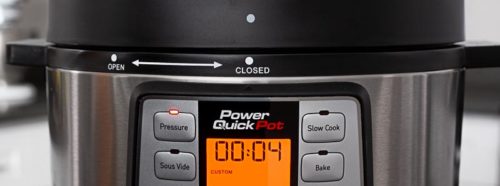
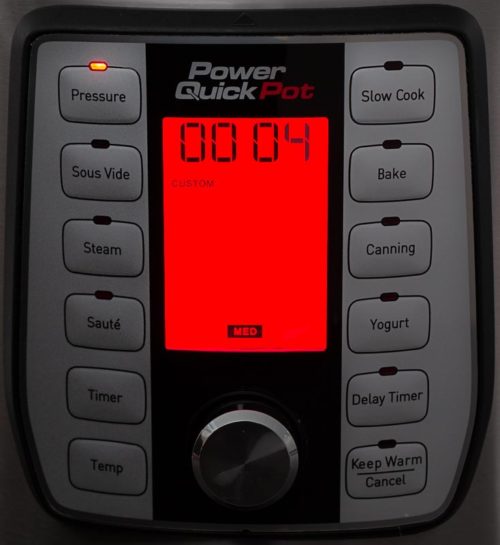
This pressure cooker also uses different color lighting to indicate where it is at in the pressure cooking process; blue indicates standby mode, where you put in your desired settings; orange indicates preheating mode; red indicates fully heated.
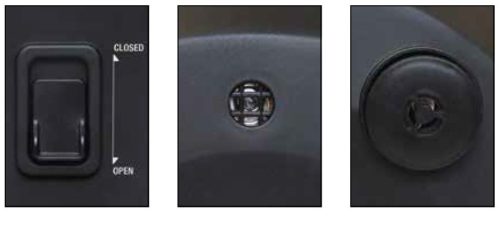
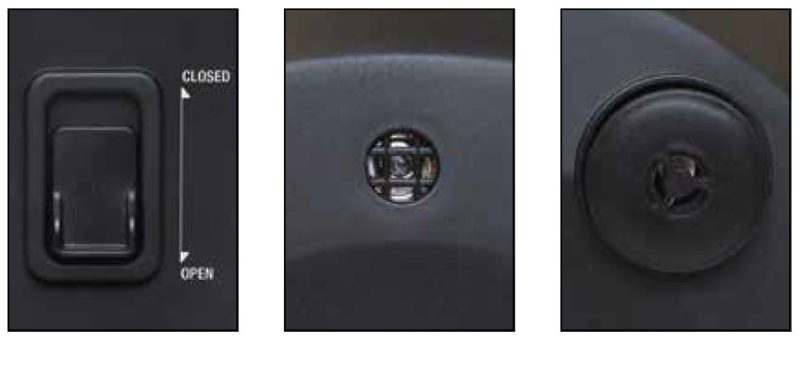 The lid automatically puts the Steam Release Switch in the Closed position when the lid is closed. I love having one less thing to remember! I also loved that the steam release switch was far away from the pressure release vent, so you don’t have to worry about steam burns if you need to use an intermittent pressure release (opening and closing the switch to prevent spraying and spitting out of the pressure release valve.)
We love that the Saute feature displays the temperature on the screen once the pot has reached the desired temperature, so there’s no guessing or listening for beeps to indicate when the pot is hot.
What you should know before buying the Power Quick Pot
The Low, Medium, and High settings are NOT pressure levels. The Power Quick Pot does not actually cook at different pressure levels, like the Instant Pot can. The Power Quick Pot ONLY cooks at high pressure. (If you want to get technical, the Power Quick Pot cooks between 11.6 to 13 psi; the Instant Pot Duo has a slightly lower range, from 10.2 to 11.6 psi.). Instead, the Low, Medium, and High settings are preset time settings.
The manual is confusing and the directions could be better written. This is a concern with all of the Tristar products we have tested so far. (In fact, some people come to Pressure Cooking Today thinking we’re the makers of the Power Pressure Cooker XL. This might have something to do with the fact that it’s difficult to find the user manual for the Power Quick Cooker on their website, so I’ve linked to it here.)
For example, the “Bonus Accessory Set” Guide says to add 12 cups of water with the trivet, which would absolutely cover the food being cooked. I think it’s a typo for 1 to 2 cups of water, which is a reasonable amount for pot-in-pot cooking. Or the Mac & Cheese recipe cooks the pasta at high pressure for 10 minutes, which I think is too long; I use a 3 minute cook time for my Pressure Cooker Mac & Cheese. (The longer cook time may be explained by the fact that the Power Quick Pot recipe instructs you to add the heavy cream and cheddar cheese to the pot before cooking at pressure. However, I’ve found that dairy is more likely to burn on the bottom when added before pressure cooking, so I prefer to add these ingredients after cooking at pressure.)
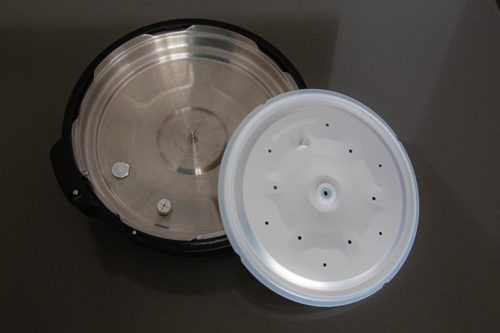
The Inner Lid gaskets have a very different construction than brands like the Instant Pot, and they’re a bit more finicky to put together. Be sure to attach the inner lid to the outer lid with the knob facing out and the writing visible. If the inner lid is installed inside out, it can prevent your pot from coming to pressure. You also have to keep track of the tiny Float Valve Pin so you can place the rubber gaskets on the float valve.
The cord is on the shorter side. It’s only about 36 inches long, so you have to be close to an outlet to use it. (It’s 8 inches shorter than the Instant Pot cord.) As a reminder, you can’t use an extension cord with the Power Quick Pot or any other brand of electric pressure cooker.
The first several times we pressure cooked in the Power Quick Pot, there was a strong plastic smell when releasing the pressure. (We checked for plastic around the housing, stickers, anything that seemed out of place, but we couldn’t find anything.) Luckily, the smell didn’t transfer to our food, but it’s something to be aware of. The smell lessened over time.
If you’re upgrading from another brand of pressure cooker, keep in mind that the lid turns the opposite way from the Instant Pot and many other brands. Just match up the dots on the lid with the dots on the housing.
How to Select a Custom Cook Time in the Power Quick Pot
In my recipes, you’ll see the phrase “Select High Pressure and set a ## minute cook time.” To do this on the Power Quick Pot, it takes three simple steps:
- Press the Pressure button.
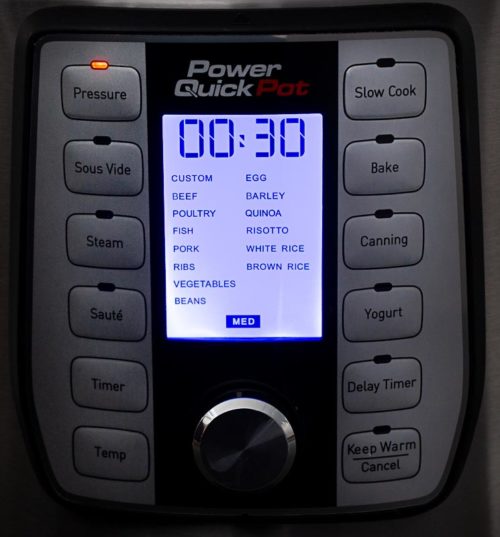
- Press the dial to select the Custom option, then spin the dial to Low (10 minute default), Medium (30 minute default), or High (60 minute default).
- Adjust the cook time by pressing the Timer button and spinning the dial until you reach the desired time, then press the dial to select it.
Your Power Quick Pot display should turn orange to indicate that it’s preheating and building pressure.
Any recipe that cooks at high pressure will work in your Power Quick Pot—regardless of whether the recipe was developed for the Instant Pot, Ninja Foodi, or any other brand of electric pressure cooker.
What do the buttons do on the Power Quick Pot?
Pressure
Press this button to cook your food at High Pressure. While the Power Quick Pot offers 14 different pressure settings that you can select, the ONLY thing you’re selecting is the default cook time. Your pot doesn’t know whether you actually have beef, beans, or barley in your pot. Instead, it just runs a preprogrammed cook time for the item you’ve selected. It also doesn’t know how much of a single ingredient you have in your pot. Regardless of whether you have a single chicken breast or a whole chicken in your pot, it just runs the preprogrammed cook time.
Whenever you’re cooking in your pressure cooker, be sure to use an instant read thermometer to make sure your meat is cooked to a safe internal temperature.
Sous Vide
Sous Vide is a method of cooking food inside a sealed plastic bag in a water bath. This cooking method is discussed on pages 20 and 21 of your manual. You can use the Timer and Temp buttons to set a custom temperature and cooking time for foods you’re cooking. Again, your pot doesn’t actually know what or how many ingredients you have in the pot; it just runs a program to cook for a certain amount of time.
Steam
The Steam button has preset times for fish, eggs, and vegetables. Be aware that the higher steam times on the vegetables setting (15 minutes on low to 35 minutes on high) are better suited to things like butternut squashes than broccoli, carrots, or beans. (If you steam your broccoli for 15 minutes, it’ll be mush.)
Saute
The Saute button allows you to brown meats and simmer sauces. Do not use the pressure cooking lid or the glass lid when using this function. The customization of the Saute setting is one of our favorite features on the Power Quick Pot. The default temperature for all of the Saute settings is 340°F. You can use the Temp button reach up to 360°F or down to 95°F.
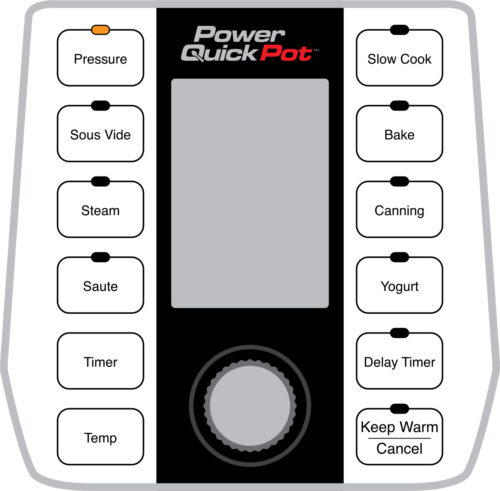
Timer
The Timer button is a little misleadingly named. It is NOT an actual timer function—that’s why it doesn’t have a little indicator light above it. Rather, this button allows you to adjust the timing in all of the other preset buttons. In order to adjust the time, you hit the Timer button, then spin the dial up or down to adjust to your desired time.
Temp
Similarly, the Temperature button does not adjust the pressure cooking temperature. However, you can use it with the Sous Vide, Saute, and Slow cook features. I find it most useful with the Saute feature, where it allows you to adjust the temperature from 95°F to 360°F. You can also use the temperature button to change the temperature in the middle of the cooking program.
Slow Cook
Use the glass lid when using the Slow Cook setting. Generally on a Crock Pot, the low setting takes 7 to 8 hours to reach a simmer point of 209F, while the high setting takes 3 to 4 hours to reach the same temperature. According to the user manual, the slow cook setting can adjust the temperature between 195 and 212F.
When using this setting, remember the Power Quick Pot only has the heating element on the bottom. Some people think it doesn’t slow cook as well as a traditional slow cooker. (This is a common problem for all pressure cookers.)
However, other people get great results using the slow cook setting on their pressure cooker. Find out what works best for your favorite recipes!
Bake
Despite its name, the Bake button doesn’t actually bake like an oven—rather, it cooks the food at high pressure. I like to think of “Bake” as the cheesecake button—the medium preset time is exactly what I use to make my Caramel Pecan Pressure Cooker Cheesecake.
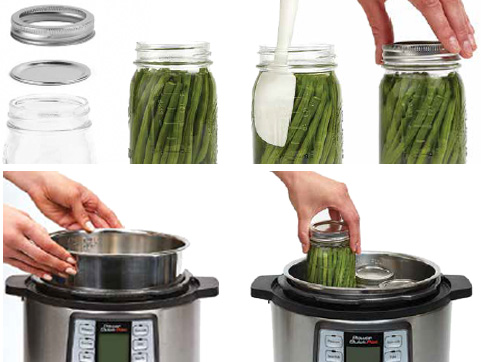
Canning
This button runs the Power Quick Pot’s Canning function, discussed in pages 28 to 32 of the user manual. See the canning discussion below.
Yogurt
Use the glass lid with the Yogurt setting. Page 22 of the Power Quick Pot manual has a very basic yogurt recipe that tells you “once the milk reaches 110°F, the Power Quick Pot will beep.” However, the pot doesn’t have a temperature sensor to tell you the actual temperature of the milk—it’s just programmed to estimate the temperature after a certain time. For best results, you’ll want to check your milk with an instant-read thermometer.
Also, many people are surprised that homemade yogurt requires a small amount of store-bought yogurt or a yogurt starter to get the incubation process started. Learn more in my favorite Instant Pot Yogurt recipe, which works great in the Power Quick Pot.
Delay Timer
The Delay Timer is a common feature on higher-end pressure cookers. It is also not a traditional timer; rather, it will set your pressure cooker to turn on after a specified amount of time. To use it, select the pressure cooking setting and time, then press the Delay Timer button and use the dial to select the time you want your pressure cooker to wait before starting the cooking process.
This is a feature you need to use with caution. For example, rice or oats will absorb water during the delay time, so you may need to add extra water to your recipe. For these items, I like to cook pot-in-pot to guarantee that the pressure cooker will be able to come to pressure.
Also, please note that the user manual recommends to keep your delay time under 2 hours, especially when cooking with meats. I prefer to keep the delay time far under that, since 2 hours is the maximum amount of time the USDA recommends leaving food at room temperature. But it can be useful for dump and go meals while you are working on a few projects around the house.
Keep Warm / Cancel
Once the high pressure cycle is complete, much like other electric pressure cookers, the Quick Pot automatically goes into Keep Warm. The Keep Warm mode will keep food warm for up to 24 hours, though you’ll want to keep in mind that food will continue to cook in the keep warm setting. (This is particularly important for rice, which will dry onto the bottom if left in the Keep Warm setting for too long.) In addition, foods will start to cool, so I wouldn’t recommend using it for long periods of time.
I do like this feature when serving foods to a large crowd. I also like that using the count-up keep warm timer to track how long my food is at a natural pressure release.
Is it safe to can foods in the Power Quick Pot pressure cooker?
The canning button is a hot-button issue in the pressure cooking world. These days, so many pressure cookers offer a canning function built into their pressure cookers; however, all of them have caveats in the user manuals. For example, the Power Quick Pot user manual says
- Do not use the canning button if you’re 2,000 feet above sea level.
- The lower the acid content in the food, the greater potential for contamination.
Ultimately, the user manual says “IMPORTANT: Review USDA guidelines prior to canning.”
Despite the instructions and pretty pictures in the user manual, the USDA still does not recommend pressure canning in the electric pressure cooker.
So what are the USDA’s guidelines for canning with an electric pressure cooker?
The USDA’s National Center for Home Food Preservation specifically discussed canning in an electric pressure cooker in February 2019, saying:
Even if there are instructions for pressure canning in the manufacturer’s directions, we do not support the use of the USDA canning processes in the electric, multi-cooker appliances now containing “canning” or “steam canning” buttons on their front panels.
They list several reasons behind this recommendation:
- “No USDA thermal process work has been done with jars inside an electric pressure cooker, tracking the actual temperatures inside the jars throughout the process.” In other words, NO BRAND of electric pressure cooker, including the Power Quick Pot, has been proven to meet the temperature and pressure levels necessary to ensure the food canned inside is safe.
- USDSA recommendations “were determined for stovetop pressure canners which hold four or more quart-size jars standing upright.” The jars recommended in the Power Quick Pot manual are pint-size jars, which would have different cooking requirements and have not been tested.
- “What matters is temperature, not pressure. … In order to ensure the safety of the final product, the temperature in the canner must stay at minimum throughout the process time.” Since electric pressure cookers work by turning the heating element on and off, the USDA hasn’t yet been able to verify that the foods in the jars stay above the temperature required to kill the botulism bacteria.”
- “Bacteria are not killed in the food only during the process time; the time it takes the canner to come up to pressure, the process time, and the cool-down time all matter. There is no way at this point in time to know exactly the percentage of contribution from cooling for each of the canning recommendations.
At this time, we DO NOT recommend pressure canning in the Power Quick Pot.
However, you can do boiling water canning in your Power Quick Pot (and other brands of electric pressure cooker), as long as your mason jars are short enough to sit on the trivet and still allow an inch or two of boiling water to cover the jars. You can also make awesome freezer jams and compotes that will keep for up to a year in the freezer and 2 to 3 weeks in the refrigerator.
If you’re up for experimenting with steam canning high-acid foods (think fruits, jams, and pickles), my friend Frieda has done some extensive testing with steam canning in the Instant Pot. Her instructions are easily adapted for the Power Quick Pot.
What do the Power Quick Pot error codes mean?
The Troubleshooting section on their user manual is found on page 27. There are five types of error codes you may see on your Power Quick Pot. I’ve never actually known someone to get an E1, E2, or E4 error; however, E3 and Lid errors are common.
Here’s what to do when you see an error code on your Power Quick Pot:
| Error Number | Cause of Error & Solution |
| E1 | Bottom sensor open. Tristar recommends contacting customer service at 1-973-287-5145 |
| E2 | Bottom sensor short circuit. Tristar recommends contacting customer service at 1-973-287-5145 |
| E3 | Unit has overheated. This is the most common error message, similar to Instant Pot’s “Burn Notice.”
It indicates that food may be burned onto the bottom of the cooking pot. When you see this error, use a quick release to release any pressure in the pot. Open the lid and transfer the contents to a separate bowl. Then, check the bottom of your pot for any scorched or stuck food. Wait for your Power Quick Pot to cool down before trying to use again. If food has burnt onto the bottom of your pot, you’ll need to use more water. Also avoid using ingredients containing thickeners, such as jarred tomato sauce. |
| E4 | Pressure switch malfunction. Tristar recommends contacting customer service at 1-973-287-5145 |
| LID | Wrong lid. Either the lid isn’t fully attached or the lid used isn’t the type recommended for the cooking button selected. The Glass Lid is recommended for the Sous Vide, Steam, Slow Cook, and Yogurt settings. The Pressure Cooking Lid is recommended for the Pressure, Bake, and Canning settings. (No lid is required for the Saute setting.) |
Do you have the Power Quick Pot? How do you like it? Let us know in the comments!
Pin It:


I love my power quick pot, I must admit I was intimidated at first, but once I got over the fear it was great. I have recommended it to all of my friends, it’s the best cooking utensil I have ever owned and I cook a lot!
That’s awesome – thanks of sharing Mel!
I love my Quick Pot. I first got the instant Pot on a deal. Then I got a better deal on the PQP. THE PQP is my go-to pressure cooker. There is a bit of a learning curve, though. At first I found my food was coming out very bland. Then I experimented and found that for meats it’s best to season them and let them sit in the fridge overnight. That way the seasonings go into the meat. I make adjustments in the seasonings all the time now. It’s best to try the recipes designed for your pressure cooker first, before attempting to cook some of your tried and true recipes. That way you get a feel for what you like. Today I made a recipe for pot roast. The meat and gravy came out great tasting and very tender. But the veggies were mush. Next time, I will cook just the meat. When it is done, I will take the meat out and cook the carrots, potatoes and small whole onions next. Potatoes and carrots generally take about 4 minutes. Don’t be afraid to experiment and check out the internet for recipes. The PQP is great for making hard boiled eggs, cooked potatoes for mashing or making potato salad. And especially homemade soups and stock.
Thanks for sharing your tips. I agree – I always add the vegetables https://www.pressurecookingtoday.com/pressure-cooker-pot-roast/ Have fun!
Sorry, should have said inner pot be purchased
My quick pot has two hot spots that burn the recipe, No, I did not put cold water in a hot pot, can a new dinner pot be purchased?
There’s one on Amazon that says it’s compatible with an 8 quart, but I haven’t tried it. https://www.amazon.com/Stainless-Compatible-8-Quart-Programmable-Pressure/dp/B07PDZZ798?th=1
Got this off Facebook marketplace today , a 6qt. I like the way it operates ! Not sure why the instruction manual says to use the canning mode for the water test as the pressure cook mode is a bit more effective for me!
Great – have fun!
Got the Shaq Pot 8qt from Shop HQ as well for more size options with the same performance and operation as PQP. Made Bourbon Chicken and Rice.
The Emeril pressure cooker also offers the same performance with the addition of air fry.
Garbage.. don’t bother. Use a toaster over because it actually works.
Hi John – sorry you’re having trouble with the Power Quick Pot. Pressure cooking is a great way to cook. Don’t give up on it.
Is there a steam diverter that will fit the 10 qt Power Pot? It has a short cord and the steam releases straight up at my cabinets.
Hi Gina – companies don’t recommend using steam diverters and I haven’t seen one for the 10 qt. Power Pot. What I do in my RV is unplug it and turn it so the steam is not hitting my cabinets when I release the pressure.
Thank you for this article to make up for the manual which I agree is lacking, although I love my power quick pot!
I have 2 questions….
Can I use my instant pot to proof bread? Many recipes instruct to use the yogurt function but it doesn’t seem to be adjustable. Would the site function work at 95°?
Also… is it possible to do cold start yogurt in this pot?
TIA!
CAROL
I am in need of a lid for my Power Quick Pot. My Lid was totally destroyed and I need One I Love My Pot. Model # Y10D-36 Please help me if you can.
Thanks,
Ivy Hagwood
Hi Ivy – Here’s a link to customer service https://www.tristarcares.com/product/power-quick-pot/ You can call or email them.
I have the 8 Quart Power Quick pot and just love it. My go to recipes are homemade baked beans, chili, spagetti sauce, pot roast, etc. I had a problem tonight making baked beans. I prep my beans by soaking overnight, then using saute to simmer them for 1/2 hour before draining and returning to the pot with my secret ingredients. I then put them on pressure for one hour letting the pressure drop on it’s own. Usually this produces yummy saucy tender beans that are ready to eat, Tonight they were yummy but a little bit hard. I figured maybe another 30 minutes cooking time and they’d be good to go.
Unfortunately I couldn’t get the pot to go back into pressure mode for another 30 min. As soon as I would select pressure mode and set it for 30 minutes, the screen would turn orange and the timer would start counting down, the red cook screen would never happen. After many tries of resetting unplugging, I finally just put the beans in the oven to finish LOL.
the pqp book says not to use oil, but my recipe from an Instant Pot says to add oil to saute. When can you use oil in the PQP?
Hi Julie – perhaps the manual is referring to not pressure frying in oil, which you can’t do in any of the electric pressure cookers. It’s perfectly fine to saute in a few tablespoons of oil in electric pressure cookers. In fact, that’s one of the advantages of using an electric pressure cooker, you can brown and saute before cooking.
Im looking at some electric pressure cookers, here in México this is one of the cheapest i have found, i was interested in it because it can sous vide but i`ve read your article and it says the pot has no temp sensor and calculates the temperature by how long has it been heating the inner pot, if this is true then the sous vide option must be of no use since sous vide cooking requires a controlled temperature over a certain period of time. have you tried the sous vide option??
overall, would you recommend the power quick pot?, im still hesitating about buying it.
Hi Fernando! I haven’t tried sous vide on the Power Quick Pot—I don’t use sous vide very often, and when I do I usually use my Instant Pot Evo for that. I’m sorry I’m not more help there.
In terms of pressure cooking capabilities, for a less-expensive pressure cooker, I do like the Power Quick Pot—I like the steam release switch in the lid, the customization abilities in the Saute features, and I like the thick stainless steel pot. I don’t love how difficult the manual is to read. However, once you get used to how to use your buttons, I don’t think that will matter much. The PQP doesn’t cook at low pressure, if that’s something important to you. (I almost never use that feature, but some people really like it.)
I started having issues with my Power QuickPot after a year and a half and it will show up with “LID”. I am using the pressure cooker lid it came with and I am putting enough liquid in it. I have made a chicken and noodle recipe in it many times, and today I tried putting all of my ingredients in it and it still says “LID”. I have come to realize I believe it’s the float valve, but I cannot even pull out the float valve pin to clean it or anything. I think it may be broke somehow. Other articles I have read said the pin on the back of the lid should pop out whenever the lid has been properly closed. Is this correct? I have checked the gasket on the lid and it’s tight to the metal insert so I know that’s not the issue either… any suggestions before I throw it out and buy an actual Instant Pot?
Regarding the “LID” message, I have received this message several times. I found that the most common reason is some food or crumbs, grit that has accumulated in the top track of the pot and may be hard to see. I take a paper towel, napkin or soft cloth and run it around in the channel, then try the lid again. It has always worked for me. Hope this helps any of you with a problem. Love my pot and use it often.
Thanks for sharing your tips Barb!
The 8 quart version is sold at ShopHQ as the “SHAQ” pressure cooker. Same warranty and all. https://www.shophq.com/Product/shaq-shaq-pot-8-qt-digital-stainless-steel-pressure-cooker/489-289
Sept. 6, 2020 I found replacement parts for the Power Quick Pot here:
https://www.powerxlproducts.com/all-accessories/quick-pot.html
What is the difference between steam and pressure? Also – My first pressure cooker was the quick pot xl and it came with a great user manual. If I would have had the quick pot first, I think I would have been too intimidated to use it like I do now. I do love this pot!
Hi Michelle – a good manual does make a huge difference when you’re just beginning. The steam function is a pressure cooker function as well, it just has presets for fish, eggs, and vegetables.
Thanks I was having trouble finding a cookbook for my quick pot now that I know I can use the same one as instant pot I will be able to make more and different meals thanks again
Great – have fun Sherryl!
Great article . I’m particularly interested in the canning issue. I was hoping to pressure can us in the thing . I’ve made over grown cucumber relish and was hoping to pressure can that but now I don’t think I should after reading what you said.
However could you explain how to use the boiling water canning in the power quick pot?
Hi Norma – Frieda has great info about hot water canning https://www.friedalovesbread.com/2017/09/safe-steam-canning-with-your-instant.html Also, if you’re interested in a larger pressure cooker, Presto has a 12 quart that is now USDA recommended https://www.gopresto.com/product/presto-precise-digital-pressure-canner-02144?
I LIKED THIS PAGE, SITE, BUT I HAVE A BIG PROBLEM. HAVE QUICK ABOUT 6 MONTHS USED ONLY 2 TIMES TROUBLE IS I THINK ONE GRAND KIT, THINKS SHE’S HELPING TOSSED OUT QUICK POT MANUEL. NOW I CAN’T FIND OUT WHERE TO DOWNLOAD A NEW MANUEL… HELP PLEEEZZZ
Hi Robert – you can download the manual at this link http://demo.webandcrafts.com/tristar/wp/wp-content/uploads/2020/03/PQP_4-6-8-10QT_IB_TP_ENG_V6_180720-1.pdf
Hi, your article was great! But I am still not quite understanding how to set a timer? Specifically looking for how to set an odd ball timer, like 6 minutes for example? Thanks!
Hi Jessi, it’s definitely not intuitive! We’ve got a section in the post called “How to Set a Custom Cook Time” that walks you through the steps. Basically, select Pressure > Custom > Timer and then adjust the time as desired, then press the center knob to start cooking! Let us know if you have any other questions!
Just got a quick pot,and it is confusing,I made steel cut oats which came out ok but than tried a hot dish that burned the pot .The directions are confusing,I don’t want to send it back so I’m going to try to figure out the best way to use it. I didn’t realize it was a pressure cooker when I got it. I want to make mostly combination meal.was looking for a instant pot ,couldn’t find one and came across the power quick pot thinking it was the same thing..Also it didn’t come with the float valve, I will call tomorrow and have them send me one. At this moment I am dissatisfied with my purchase,but will try to work out the kinks.
Hi Roberta – it would be very unusual for it not to have a float valve since it is an integral part of the pressure cooker. If you look at the picture of the inside of the lid, the float valve and gasket are on the inside of the lid, next to the silver covering that looks like it has an x on it.
So basically, the low medium high are TIMES not pressure levels, so if I cook something on “high pressure” on the default setting it just means a longer cook time, and low would be the lowest cook time. So technically if I put it on high and changed the timer to 10 minutes, I didn’t adjust the pressure cooker level just the time, same if I pressed low and it says 10 minutes and increased it to 15 it would cook at the same pressure level. I’m glad this was explained, I would’ve liked a better word for it cause high medium low are used in English to describe time.
Also where can you purchase the extra accessories? Thank you for the article it was super helpful.
Hi Mela – glad it was helpful. Amazon is the easiest place to buy accessories. Here’s a link to my Amazon store with some of my favorites. https://www.amazon.com/shop/pressurecookingtoday?listId=3RQJEPRKJIRF9
OK, so I am weird but I had to try this, Hamburgers.
I used 80% 20% (80 20) and not high quality burger. I mushed up a little wortchistershire sauce, not a lot, a tad onion powder, salt, pepper with the burger for about 4 hamburgers 1 inch thick but not very big around, maybe a third of a pound total. I used a rack with a small pan and put the pan on the rack, and put the burgers in the pan sprinkled with very light garlic powder. Then cooked for 30 minutes (using 1 1/4 cup of water on the bottom for the steam not in the upper pan) let stand 15 minutes with the pressure cooker off. They had a texture sort of like meatloaf but was all meat. I browned in a pan afterwards. It was like burger that doesn’t give you a hard time to swallow, not a grizzle texture like a regular fried burger has. I would do it again and mess with BBQ or other things, it came out so edible and made the burger not greasy but not dry. It also looked like they expanded, got thicker. We did not put them on buns just as patties.
Oops, not a 3rd of a pound, it was about 3/4 of a pound to 1 pound for four burgers.
I have had my power quick pot since this past Christmas and love it! The first time i made yogurt it turned out perfect! It registered 7 hrs and then counted 1 hr and then reset itself for 7 more hrs and when it ended i put it in the fridge and all was well. The second, third and fourth times, when I hit the yogurt button, it read heat and then after awhile it read cool for a several hours and beeped and then i had to hit yogurt again and it read 7 hrs and beeped at the end of that but never thickened up at all! I do not umderstand what happened. Do you think my unit malfunctioned?
Hi Sharon – I have never made yogurt in the Quick Pot before. If it didn’t thicken though it makes me wonder if the starter got too hot?
From the user manual:
” The Sous Vide, Steam, Sauté, Slow Cook, and Yogurt presets will not start if the Lid is locked.” So maybe that’s it?
Also, it seems strange to have to hit the Yogurt button again—the user manual it seems fairly automated?
1. Place the Inner Pot in the Base.
2. Pour 2 qts. of whole or 2% milk into the Power Quick Pot’s Inner Pot.
3. Press the Yogurt Button. The LCD Display will show “7:00.” Press the Program Dial to accept the program. Use the dial to choose between the default preset time settings or press the Timer Button to set a custom time. Press the Dial to confirm the time.
4. Once the Unit reaches 180° F, the Unit will maintain the temperature. Then, the Unit will stop heating and the LCD Display will show “COOL.”
5. Once the milk reaches 110° F, the Power Quick Pot will beep and the LCD Display will show “ADD.”Using a ladle or measuring cup, remove 1 cup of milk from the Inner Pot. Mix the 1 cup milk with yogurt or yogurt starter. Then, return the milk mixture into the Inner Pot with the remaining heated milk and stir gently.
6. Press the Yogurt Button. Use the Program Dial and the Timer Button to adjust the time if needed. Press the Program Dial again and the timer will begin counting down. NOTE: If the Yogurt Button is not pressed, the Unit will beep continuously, and the Power Quick Pot will return to standby mode.
7. Place the Glass Lid back on the Power Quick Pot. 8. Lea
I have been using my Quik Pot for over a year, almost daily. All we cooked with growing up were pressure cookers. The other day I was using it and a blue light came on and said lid and it would not work. What could be wrong?
Hi Gay – usually if there’s a problem with the lid it’s because the silicone gasket isn’t seated properly.
Meat, Potatoes, and Gravy,
What you need for all these pressure cookers are a rack and a taller rack (WIRE trivets or a taller egg holder tray), You NEED these for any pressure cooker and you will increase the usefulness 100 times more !!!!. I am not sure this falls under the forum titles of “how to use” but….
It works really good. All you need is cook the vegetables separately, The THICKNESS of the meat should be no more than about 1 1/2 inches, not a big thick roast or chunk. First, all you do is brown the meat pretty good in the bottom, tad bit of oil. Take a beef cube and bay leaf(s) and 1 1/4 cup of water and microwave it so the cube is dissolved and hot. Peel two larger-ish Potatoes and leave them WHOLE !!!. Pour the microwaved mixture in the pot browning in the bottom. Put meat on a short rack, get taller rack and place the whole potatoes on the upper rack.Pressure cook for 40 minutes, let stand power off for 10 minutes. Remove potatoes and meat, have some corn starch with water mix ready to go. Remove the racks, turn on saute to heat the drippings while using the corn starch to make the gravy. DONE, and serve. Using two racks and the top rack doesn’t have to be a perfect level fit. I see a short wire rack for $3.99, and some taller ones at amazon for $8 to $12, I would not use silicone because it soaks up odors. If you get one short and one tall it will let you cook and do certain things much better, even a place to put a bowl inside.
***** JUST REALIZED THIS WAS POSTED ALMOST A YEAR AGO ;( IDK IF YOU WILL SEE THIS COMMENT BECAUSE OF HOW LONG AGO THIS ARTICLE WAS POSTED – Anyway – it’s a lengthy comment with a couple questions – sorry in advance! ***********
THANK YOU SO MUCH FOR THIS IN DEPTH ARTICLE! I have been debating on just getting an instant pot because i am so frustrated and couldn’t quite understand the manual. I can’t really find much on Youtube or google no matter how I worded my search. Then finally I came across your article. The biggest thing for me was the HIGH , MEDIUM , LOW setting that you mentioned. I didn’t understand how HIGH was giving me a longer cook time, I was translating HIGH as in HIGH PRESSURE/TEMP. I was not understanding that the PRESSURE setting was strictly one temperature (high) and that the HIGH, MEDIUM, LOW was just the time , unless you manually entered it for a specific amount. This is giving me a boost of confidence to try other recipes now that I know I won’t do much damage if I follow and INSTANT POT RECIPE for this Power Quick Pot that I have at home.
My main QUESTION is this-
Doe the INSTANT POT cook at different pressures/temperatures? Where you mentioned the POWER QUICK POT , on the PRESSURE SETTING, only cooks on HIGH , then if I were to see a recipe that said to cook on LOW/MEDIUM PRESSURE I would not be able to use the FEATURE on my POWER QUICK POT , therefore wouldn’t be able to follow the recipe given. I hope that makes sense?
Also I have, I believe, one of the Larger Power Quick Pots – you mentioned most recipes call for the 6 qt size of INSTANT POT/POWER QUICK POT. Even if i want to follow the directions for the PRESSURE FEATURE, I might possibly need to add more liquid , even if the recipe doesn’t call for it? – again hope this makes sense :/
I apologize for the lengthy comment. I am truly happy and grateful for your site , and this article in particular. I know I will be a regular back to your site to find recipes and information. You go into great detail and really put it in a way for someone to understand who has never owned this product, or one similar. You have convinced me to give my POWER QUICK POT another chance 🙂 It doesn’t seem as scary or intimidating anymore haha.
THANKS SO MUCH !
– Jasmond
Hi Jasmond – so glad the post was helpful. Very few recipes use low pressure, but if a recipe does use low pressure, you can generally cook it on high pressure and just reduce the cook time slightly. If you have an 8 quart pressure cooker and the recipe already has enough liquid (typically 1 1/2 to 2 cups, then you don’t need to make any changes. If the recipes has less liquid than that, you’ll probably want to double the recipe, or at least the sauce ingredients. Have fun!
I believe the main thing to think about for “pressure cooking” is the thickness of the item you are cooking. A super thick piece of meat will take longer. If you cook noodles or very thin slices of carrots it will cook very fast. So if they say it has a lower pressure, probably means it will give you more time and control over the food item or more time for flavors to saturate.
Hello, This Power Quick Pot 6 quart is an awesome device.
Making split Pea with Ham soup I pressure cook the Ham bone for 40 minutes first. I use a tad more water, like one and a quarter cups. I microwave the water with two Bay Leaves in the water along with a Chicken cube. I take the excess meat off the bone after it’s was cooked. I take out about a half cup of the water drippings I used to cook the bone with then some of the oil and the Bay Leaves then add that to my 5.5 cups of water, 1 cup of Carrots 1 cup of Celery and 1/2 cup of Onion, some Salt, some Pepper, and the meat and the bone and 1 bag of split Peas. Pressure cook that for 30 minutes,, take the bone out, stir, and it is like instantly perfect “Split Pea with Ham soup” ready to eat, perfect texture. I place the contents in the pot then dump the water on top, I don’t mix it up, just cook it and take out the bone and stir it.
I am cooking things that I never cooked but turn out like I am some pro chef in this thing. If you have a honey baked Ham bone, I would add like 2 caps of smoke flavoring.
I forgot to add, it’s best to use a blender to chop up the carrots and celery, the onions just dice them up, not super fine but enough so it keeps the soup without having chunks of vegetables in it.
How long after using the pressure cooker setting can you use the pot again? I think the timer may have been bumped and less time than needed to cook beans resulted. They are about half cooked and nearly an hour later the pot doesn’t allow additional cooking. Can there be no presence of residual heat?
Hi Deb – have you tried unplugging it and restarting it? There should be any time before it will let you start it again.
Check the pressure switch on your lid. It’s got a yellow coloured rubber seal protecting it. Sometimes it sticks and tells your pot it’s still at pressure. Click it a few times and hopefully it will clear the problem
How do I hard boil eggs in my Power Quick Pot? There are many recipes/instructions for Instapot but all require a basket or trivet, neither of which came with my Mosel Y6D-36 6 qiart appliance.
Hi April – all of the Instant Pot recipes will work in your Power Quick Pot. Just use the cook time in the recipe and adjust your Quick Pot to that time. – Press the Pressure button. Press the dial to select the Custom option, then spin the dial to Low (10 minute default), Medium (30 minute default), or High (60 minute default). Adjust the cook time by pressing the Timer button and spinning the dial until you reach the desired time, then press the dial to select it. Here’s my recipe for hard boiled eggs https://www.pressurecookingtoday.com/pressure-cooker-hard-boiled-eggs/
I am so glad you posted this. I have used an Instant pot since they launched. The buttons are almost intuitive. I decided I needed an 8 quart and to be honest ordered the Quick Pot in error thinking I was ordering another Instant pot. The instructions are not particularly useful ( no mention of slow cooking). I was going to send the machine back till I read this article. I have kept it and am using it though I have to be honest I still don’t like it as much as my Instant Pot.
Thanks Lesley – I’m so glad the post was helpful.
Hello:
We purchased a Power Quick Pot a few months ago and liked it so much we sent one to my daughter for Christmas. Every time she uses it, it burns food on the bottom. I noticed during our video chat her little, clear, plastic cup on the side was full of water. I have never had a drop in mine. She is adding a cup of water when she cooks things. Mine has never burned a thing. What can she look for?
Mat, that’s so frustrating! My bet is that your daughter’s machine is faulty. Our Power Quick Pot works more like yours and doesn’t fill up the condensation cup and doesn’t burn.
Power Quick Pot only has a 60 day warranty policy, so I’d encourage you to have your daughter contact them as soon as possible https://www.tristarcares.com/product-power-quick-pot.php
I used my Power Quick Pot fo the first time and selected the pressure cooking setting. The LCD was blue, orange, and then turned red, which I understood that it had reached the pressure level. The problem is that steam continued to come out of the vent, dripped water, and never started counting down the cooking time on the LCD. I tried twice with the same results and ended up turning the pot off. The food cooked a little but not done. I was able to open the lid within two minutes. I don’t know if I am doing something wrong. Please let me know if you have any advice.
Hi Brenda – generally if the pot won’t seal it’s because you haven’t switch the steam release valve to the closed (sealed) position, or the gasket/inner lid isn’t in place correctly – check to make sure it isn’t installed upside down.
I purchased a power quick pot and there wasn’t a manual with it. Would it be possible to have one sent to me.
Hi Karen – here’s a link to download the manual https://www.tristarcares.com/pdf/PQP_4-6-8-10QT_IB_TP_ENG_V6_180720.pdf
https://images.homedepot-static.com/catalog/pdfImages/06/069a9911-366e-4052-98cc-aab10a0cee44.pdf
Official manual and the extra 4 recipe books free download here as of Sept. 6, 2020 : https://www.tristarcares.com/product/power-quick-pot/
Hi Jennie – I made split pea soup in the Quick Pot and used the recipe book that came with the pot. I used the recipe as a guide and it said to pressure cook on the bean setting. That was 20 minutes. I stopped the cooking after 15 minutes as the steam just poured out of the pressure release valve. All the water had evaporated and it was beginning to burn on the bottom of the pot. Do you have a ratio of split peas to water that you can suggest? I have an 8 QT pot and used 9 cups of water and two cups of split peas.
Hi Sheila – did you have the steam release valve closed? Steam should not be coming out of the valve when it’s at pressure cooking. I don’t think the ratio was the problem. I recommend you do a water test https://www.pressurecookingtoday.com/instant-pot-water-test/ and make sure your Quick Pot is functioning properly.
when I tried to use the slow cooking program the time doesn’t change…sits at the time selected.
I follow all the steps but the time didnt change…Please let me know how to use it for slow program cooking.
All the other programs worked fine
Once you have started the slow cooker or whatever function, press “Timer” then use the dial to increase or decrease time. If you are not fast enough with the spinning, it will beep every 15 minute interval you change it to. Then press the dial to confirm. It will go up to 24 hours, even on high. It’s the same process if you want to change the temperature except you press “Temp” instead of “Timer.” Temp goes from 195 to 212. Be prepared for the excessive beeping when it reaches the temperature.
I recently purchased a 6qt hot pot. I would like to use it.However there are no instructions. Where can I uptain a booklet it seems complicated so I have not tried it yet.
Hi Kris – sorry, I couldn’t find any information with just that name. Is there a brand name also?
Where can I buy Pot Sealing Rings for my 6qt Power Quick Pot?
Hi Janet – You can call http://www.powerpressurecooker.com/customer.php and order parts.
Hi- I have a question when using the power quick pot but using an instapot recipe. For instapot recipes say cook on high pressure for 5 minutes and then natural release for 10 minutes. How does this translate to cooking with the power quick pot? Thank you for this article – it was very helpful!
Hi Jenie – I’m glad the post was helpful. You should be able to use the same cook time in the Quick Pot when using an Instant Pot recipe. Have fun!
Use custom, change time to 5 minutes, when complete, click cancel and let the quick pot sit and natural release for 10 minutes, then release pressure and open
We are planning to purchase the 6 qt. PQP very soon . Mt sister swears by her instaPot & says it only takes 18-35 minutes for all of her meat dishes (including pot roast). On the recipies I watched above, most took over an hour to cook. Is this standard w/ this brand? Thanks
Hi Jamie – the timing of meat depends on the thickness of the meat and how tender the meat is to begin with. The only way a pot roast can be done that quickly is if she’s using a tender cut of meat that isn’t too thick. The brands cook very similarly timewise.
I would like to cook smothered pork chops or barbecued chops in my power quick pot but none of the recipes in any of the reference books that came with it gives me a clue. I have used a pressure cooker before and it was really simple and straight forward giving times and settings. With the Power Quick pot I’m sooo confused😫. Do I brown first, what’s the purpose of putting food in a sealed bag. I thought the Power Quick Pot would better. Not what I expected.
Hi Lee – sorry you’re finding it difficult to use your Quick Pot. Until you’re comfortable with how to use it, I recommend following recipes. Here’s one for pork chops you might like https://www.pressurecookingtoday.com/easy-pork-chops-in-mushroom-gravy/
Thank you for this wonderful instruction on the Power Quick pot. I already owned an Instant-pot (6 quart) and loved the ease of use. I bought the quick pot in 8 quart on sale and have been puzzling over the instructions. Very confusing and I was regretting the purchase till I read this article.
So nice to hear it was so helpful. Thanks Lesley. Have fun!
Does anyone know where you can buy additional seals for the 8qt. I have looked everywhere I can think of and cannot find a replacement.
Hi Kayla! I haven’t been able to find the answer to this either, so I decided to call the customer service number on the back of the manual. The person I spoke to said that they don’t sell the individual rubber gasket pieces, that you have to buy a whole lid piece. (!!) For an 8 quart it’s $29.99 plus $14.99 in shipping! I’m really surprised they don’t sell just the rubber piece separate—I even had the customer service agent go check again. When she came back, she offered the lid to me for free if I paid shipping. I told her I wanted to comparison shop, and she said they’re the sole distributor and it wouldn’t be possible to find it somewhere else.
I’m sorry I don’t have better news for you! Hopefully they’d be willing to extend that deal to you to make the costs more comparable to finding another sealing ring for another brand of pressure cooker?
Hi there, I have been looking for a recipe for a Pot Roast for the Power Quick Pot. I’ve looked on youtube, google all over the web and all i can find is instapot..can you help me? Setting and all.
Definitely! Once you get the hang of your Power Quick Pot, you’ll be able to adapt any recipe to your machine. All of the recipes on this site are made to work with any brand of electric pressure cooker, including the Quick Pot. Here’s my recipe: https://www.pressurecookingtoday.com/pressure-cooker-pot-roast/
So for the settings, you’d follow the recipe using the Saute button. To set high pressure, you’d push the Pressure button. Then press the dial to select the Custom option, then spin the dial to High and adjust the cook time by pressing the Timer button and spinning the dial until you reach 50 minutes, then press the dial to select it. After a brief wait, your Power Quick Pot display should turn orange to indicate that it’s preheating and building pressure. Once the cook time ends, wait 10 minutes, then slide the switch on the lid to Open to release any remaining pressure.
I hope this helps!
Thank you for clarifying when to use which lid (pressure lid VS glass lid).
I was trying sous vide and steaming and didn’t understand why the LID error message was
repeatedly happening. I was ready to return my PQP in defeat – thank you this is an important mention!
I HAVE THE 6QT POWER QUICK POT . LOOKS GREAT SETTING ON THE COUNTER.. ONE PROBLEM. WE NEVER GOT ANY INSTRUCTIONS ON HOW TO USE. DON’T KNOW HOW TO DO ANYTHING WITH IT. ANY HELP WOULD BE GREATLY APPRICATED . THANK YOU.
Hi Stan – here’s a link to the manual http://www.tristarcares.com/pdf/PQP_4-6-8-10QT_IB_TP_ENG_V6_180720.pdf Once you’ve read through the manual, then get started with my getting started guide https://www.pressurecookingtoday.com/getting-started-with-your-new-electric-pressure-cooker-or-instant-pot/
I/m attempting yogurt today in my new Pqwer Quick Pot. I’m using an ullta pasturized milk. Can’t figure out how to skip the 180 degree heat time. Any suggestions? Thanks in advance for any suggestions you can offer.
Hi Sandy – here’s a link to a cold start yogurt recipe https://www.friedalovesbread.com/2017/06/easy-cold-start-yogurt-no-boil-method.html that’s popular.
You are my hero! I have been researching information on different brands of “quick” pots for days on end. I was leaning in favor of the Power Quick Pot and believe I am going to purchase it. I do like the idea that the Instant Pot has this large family who share ideas, recipes, information, etc. and no doubt it is a fine appliance but I like that the PQP gives the option to cook by the kind of food your have in the pot. I like this because all food has its own texture and am hoping the PQP is “smart” enough to produce the best tasting, beautiful and, delicious food as is possible. If the PQP functions as I understand it will, I will be very happy.
Your article is a very valuable tool chock full of information of how the PQP and the Instant Pot function.
P.S. I LOVE the steam release valve on the PQP, it is much safer as far as getting no steam burns.
Thank you, thank you, thank you!
Hi Maxine – I’m glad the article was helpful. Just remember the pot isn’t smart enough to know what you’re cooking in the pot, the programmed times are just suggested times for that food. I recommend keeping a notebook and writing down what works for you and what you’d change for next time. Then once you find the perfect time for you, you can replicate it every time.
Hi Barbera, Thank you for this page as it helped better understand this pot. It’s manual is of little help.
When you say the pot isn’t smart anough to know what we’re cooking, and to keep track, is it limited to this brand or is the instant pot the same?
I’ve only had this for a few days and still evaluating which is better. For example:
You mention how the instant pot has variable pressure levels while the power quiick pot only cooks on high pressure. So my question: are there recipe’s that require lower pressure levels? I am trying to imagine this and it seems logical to just cook it in less time on high, than more time on lower pressure… . is it just me?
Another thing, what is the point of having a steam option if it is simply another pressure cooking session?
I am finding the PQP better here that it let’s you steam with a glass lid that has a bit of vapor escape thru the holes, so as not to end up with mush vegetables, and if one prefers, they can just pressure cook them for zero minutes as you suggest.
I would have liked this pot cover to lock onto the main pot and drain water, but its no biggie. Also, it seems like a good idea to have an extra piece in that cover to have less wear and tear on the main cover? does it make sense?
Lastly, given that I comb the internet before buying, and still considering a reutrn if i find out having an IP is better, I noticed IP has so many models, with some not having the same functions as others etc. Also, varying Watts on each.
Why is that? And isn’t it better to have a unit that does it all, and has a high wattage like the PQP @ 1300?
I’m just confused why there seems to be a preference to go with IP overall. It could be the warranty (12 months vs 60 days)… I would love to read your comments and answers, maybe I will get an IP.
Thank you!
The Instant Pot and other pressure cookers are the same way – the machine doesn’t know what’s in the pot. Some people use lower pressure for cooking hard-boiled eggs and quick-cooking vegetables, but the lower pressure is rarely used. I rarely use the steam function either. Do you mean a colander option in the lid?
The Instant Pot is more well known not necessarily better than all other brands. I think Instant Pot does have too many models, but I assume they’re trying to appeal to people at different price levels as well as creating Instant Pots that are exclusive for certain stores – Costco, for example, requires their own model, and I believe QVC does as well. Instant Pot is also constantly improving their models and trying out new features on models. Currently, my favorite Instant Pot is the Duo Evo Plus currently only available at Williams Sonoma. I will review that model on Sunday.
If you’re happy with the Quick Pot, there is no reason to return it and get an Instant Pot. Eventually, you may want to get a second pressure cooker, one to cook the main dish in and one to cook a side dish in for example. You’d be surprised how many people have more than one. Once you change your thinking so that pressure cooking something is your first thought for cooking it, you’ll find yourself wanting two.
Please explain the “pin”. The terrible instruction manual was NO HELP! And my BIG problem is…I lost the pin! Where can I get another one? I looked online, but maybe it’s called something else. Help!
Hi Gayle – the float valve is often referred to as a pin. It is essential to pressure cooking. This tiny pressure cooker part has a miniature silicone gasket attached to it to keep the pressure cooker airtight. As your pressure cooker comes to pressure, the float valve is pushed up until the mini-gasket seals the cooker. When the float valve is up, the lid locks and cannot open. The Tristar customer service number for the Quick Pot is 973-287-5145 http://www.tristarcares.com/contact-us.php you should be able to order another float valve from Tristar.
Hi! I lost the little pin that keeps the valve up for washing the little gasket and putting it back on. Now I use a paperclip (straighten one leg, keep the rest bent so it stays in place) and it works perfect!!
Hi Barbara,
Thank you so much for this information on the Power Quick Pot. I recently purchased one and can see the possibilities, but was really disappointed by the instruction manual and cookbook that came with it. I learned a lot of helpful info just from this post! I’m sure I’ll get more confident with time, but am currently trying to adapt cookbooks written for the Instant Pot to my PQP.
One of my main questions is some guidelines for just using the Steam feature for vegetables. I wanted to steam corn on the cob, but most recipes seemed to use the Pressure feature. It seems like there should be a table for steaming various fresh vegetables so you don’t end up with mush. Thoughts?
I’m going to get a copy of your cookbook as it seems to cover cooking with various brands of multicookers.
Thanks Jeanne – glad it was helpful! The Steam Function is a pressure cooking setting as well. It assumes you’ll want to pressure steam for a very short time, that’s why the pre-set time is one of the shortest times. Vegetables that cook very quickly like broccoli people generally cook for zero minutes. Bring the pressure cooker to pressure and then once the time starts to count down, cancel it. Here’s my corn on the cob recipe https://www.pressurecookingtoday.com/pressure-cooker-corn-on-the-cob/ It’s a great way to cook corn.
I’ll definitely try your corn on the cob recipe! So, for vegetables you wouldn’t uSosually use the Steam option with a steamer basket and the glass lid included with the PQP?
I’m confused by this. When I try to put my pressure lid (as opposed to the glass lid) on my PQP to ‘steam’ the copycat egg bites recipes I’ve found the pot won’t start and gives me a lid error. I think the PQP does not steam at pressure like the other instant pots. I’m struggling to find the right combination of hacks to make these egg bites.
Hi Kim,
You’re right that the steam setting needs a glass lid and will give you an error message if you try to use the pressure cooking lid. I have a recipe for egg bites that works at high pressure—I change up the fillings often and I’ve had great results with. https://www.pressurecookingtoday.com/egg-muffins-in-the-pressure-cooker/
Let me know if you have more questions on the egg bites—I love having them on hand!
Do you know how to turn the sound off? I like the finish beeper, but the constant beeping when changing the time is ridiculous. Thanks!
I keep looking for an answer to this, but I haven’t been able to figure out how to turn the sound off like the Instant Pot does. I’ll keep digging, though!
So I got this Power Quick Pot as a bonus with Emerils Air Fryer. Just paid P&H. Now I am enthralled with the possibilities in this way of cooking. Thanks Barbara for posting your review which explained so much. I will be looking at this until I’ve got the hang of it. I will also be looking at your blog and ordering your cookbook.
Can you tell me about this pin and gasket thing. Is that just for cleaning?
Thanks again for your help!
Carole
Sounds like a great deal. Glad the post was helpful Carole. The first picture shows the inner lid with the pin and the gasket. The pin is for you to grab and pull the inner lid off for washing. Have fun!
WOW, thanks, so much! Just received this yesterday and trying a roast today. I know I will be rereading your recommendations again and again. Looking forward to seeing what recipes you have!
Thanks again!
Fay Esther
Great! Have fun 🙂
I have the 10 quart and I love it! Everything I’ve made has turned out fantastic. I’ve read several things that say you should replace the silicone sealing ring if you don’t want to transfer tastes. For instance, if you’ve cooked salmon and now you want to make a cheesecake. I cannot find anywhere that sells the 10 quart size. I’ll be very disappointed if it wears out or breaks and I can’t use the pot anymore. Please help.
There is an official Power Quick Pot Facebook page. That would be a great place to ask about 10 quart gaskets https://www.facebook.com/powerquickpot/
i received this Pressure Cooker recently & the inner pan is definitely Stainless Steel.
We have the 6 quart pqp and are still in the process of figuring it out.
Love your article on it and will save it to my home page.
Would love to see a greens recipe especially collards, turnps, mustard, kale and dandelion greens.
Thanks again for a great informative article.
Thank Ron – glad it was helpful! I didn’t grow up eating greens, but would be happy to help you convert a recipe for the pressure cooker 🙂
I appreciate your in deprh analysis of the PQ Pot.
Is it a multicooker like the Instant Pot, or is it a pressure cooker?
I’ve used pressure cookers for decades and I thought it was time to consolidate my appliances into one multicooker.
I’ve been trying to decide between the Instant Pot Ultra and the Power Quck Pot. Oh please help me.
Hi Rhonda – yes, it is a multicooker like the Instant Pot. If the price isn’t a major consideration, I would go with the Ultra because the one piece lid is easier to clean than the two piece lid on the Power Quick Pot. Also, Instant Pot’s support has been better than Tristar.
These cookers are sold without the accessories kit by some vendors, like WalMart and the Power Quick Pot web site.
I’ve never found a 4qt being sold by any retailer, just 6, 8, and 10qt. , so the 4qt might be “vaporware.”
PQP Owners on the Facebook group for these say that it takes 40 minutes for the sous vide function to preheat the water, so perhaps one would want to use saute a bit to get the water warmed up first. Thanks for the great article on these pressure cookers, and for confirming my suspicion that there really is only High Pressure. I am willing to trade low pressure for 8qt sous vide, though. 🙂
Wonderful article. It was shared on the 1st Power Quick Pot FB page and greatly appreciated.
I don’t have this new Tristar brand pressure cooker. I did, however, buy the Tristar Power Pressure Cooker XL 2 years ago. It worked fine but the inside of the metal liner was nonstick with a honeycomb bottom. Within 4-5 months, that coating was flaking off into our food. I emailed the company and received a respond that basically said they would not do anything. Lucky, I bought it at Sam’s Club and they took it back. I didn’t notice or may have missed what type of liner this new model has. .
It says it has stainless steel inner pot. I have the one you took back to Sames,I have bought several “extra” inner pots & they all have the same problem. In a way I think they did that on purpose so they could sell more inner pots, but that’s not how they should do business!! #1 The peeling off into our food is a health hazard!#2 It ticks me off, so I dont recommend that brand to anyone looking for a pressure cooker. Hope this helps you!